Developing a WhatsApp Bot in PHP: A Beginner's Guide
WhatsApp is a leading messaging platform, widely used for personal and business communication. Automating interactions through chatbots can enhance customer support, simplify repetitive tasks, and streamline your business processes.
In this guide, we’ll walk you through creating a functional WhatsApp bot using PHP and the Whapi.Cloud API. Why PHP? It’s one of the most popular and beginner-friendly programming languages, especially suitable for web applications and API integrations.
Here’s what we’ll cover step by step:
- Connecting to the WhatsApp API with Whapi.Cloud provider;
- Sending text messages and multimedia content;
- Setting up webhooks to receive and process incoming messages;
- Automating advanced features like managing Groups and message statuses;
No matter your experience level, our comprehensive guide, along with ready-to-use PHP scripts on GitHub and video tutorials on YouTube, will make it easy to start. Whether you're building a simple chatbot or a complex integration, you'll have all the tools and examples you need to succeed.
Let’s get started!
Let’s get started!
Preparing to Develop a WhatsApp Bot in PHP
Before starting to build your WhatsApp bot using PHP and the Whapi.Cloud API, ensure your environment is set up correctly. Here are the key steps:
Install the Required Tools
1. PHP: Ensure PHP is installed on your machine. PHP 7.4 or higher is recommended. Check your version with: php -v
2. Composer: PHP's dependency manager is essential for handling libraries and dependencies. Install it by following the official guide: https://getcomposer.org/download/
3. A Web Server: A web server is essential for running your PHP bot locally or hosting it for testing. If you're working on localhost, tools like XAMPP or MAMP provide a complete package, including Apache, PHP, and MySQL, making setup quick and easy. Simply download and install one of these tools, start the server, and place your project in the htdocs folder (for XAMPP) or a similar directory. Alternatively, PHP's built-in server lets you run projects without additional software-just navigate to your project folder and use the command php -S localhost:8000
Set Up the Development Environment
Create a dedicated folder for your bot project. Inside, initialize a new project with Composer: composer init
This command will guide you through setting up a composer.json file. To save time, you can use the following pre-configured content for your file:
{
    "require": {
        "php": ">=7.4",
        "guzzlehttp/guzzle": "^7.8",
        "slim/slim": "3.*"
    },
    "autoload": {
        "psr-4": {
            "App\\": "src/"
        }
    }
}
Once your composer.json file is ready, install the required dependencies by running: composer install
This will download and configure the libraries needed for your bot, such as Guzzle for API requests and Slim Framework for lightweight routing.
Accessing the WhatsApp API
To interact with WhatsApp through the API, you’ll need an API token from Whapi.Cloud. Register on the platform, and you’ll receive a free channel with limited features, enough to test and set up your bot. Detailed instructions for obtaining the token will be provided in the next chapter.
Some useful links
Whapi.Cloud provides a variety of resources to help you get started quickly with PHP bots:
* Beginner-Friendly Bot: A simple example to help you start sending text and image messages with minimal setup. [This bot repository];
* Advanced Bot: A more comprehensive bot with extended functionality, including file sharing, group management, and multimedia interaction. [This bot repository];
* PHP SDK: A ready-to-use SDK to simplify API integration and streamline development. Perfect for developers looking for a structured approach to building WhatsApp bots. [Check out the PHP SDK here];
If you’re still exploring the differences between WhatsApp Business API and WhatsApp API or need guidance on selecting the right provider, check out our comprehensive guide: How to Choose WhatsApp API: Comparing Solutions and Providers
In the next chapter, we’ll guide you through connecting to the Whapi.Cloud API and obtaining your token to kick-start your bot development. 🚀
Obtaining an API Token and Connecting Your WhatsApp Number
To interact with the Whapi.Cloud API, you’ll need to connect your WhatsApp number and acquire an API token. This token acts as your key for automating messenger functionality, enabling your bot to send and receive messages. Here’s how to get started:
1. Register on Whapi.Cloud
If you haven’t already, create a free account on Whapi.Cloud. Registration is simple and doesn’t require credit card information. Once registered, you’ll have access to a test channel with small limits for 5 days. This is perfect for testing the API and starting your bot development. After 5 days, you can use the Sandbox to continue developing and testing your integration. It's really convenient.
2. Connect Your WhatsApp Number
Connecting your number is straightforward and requires no moderation or migration steps. Follow these steps:
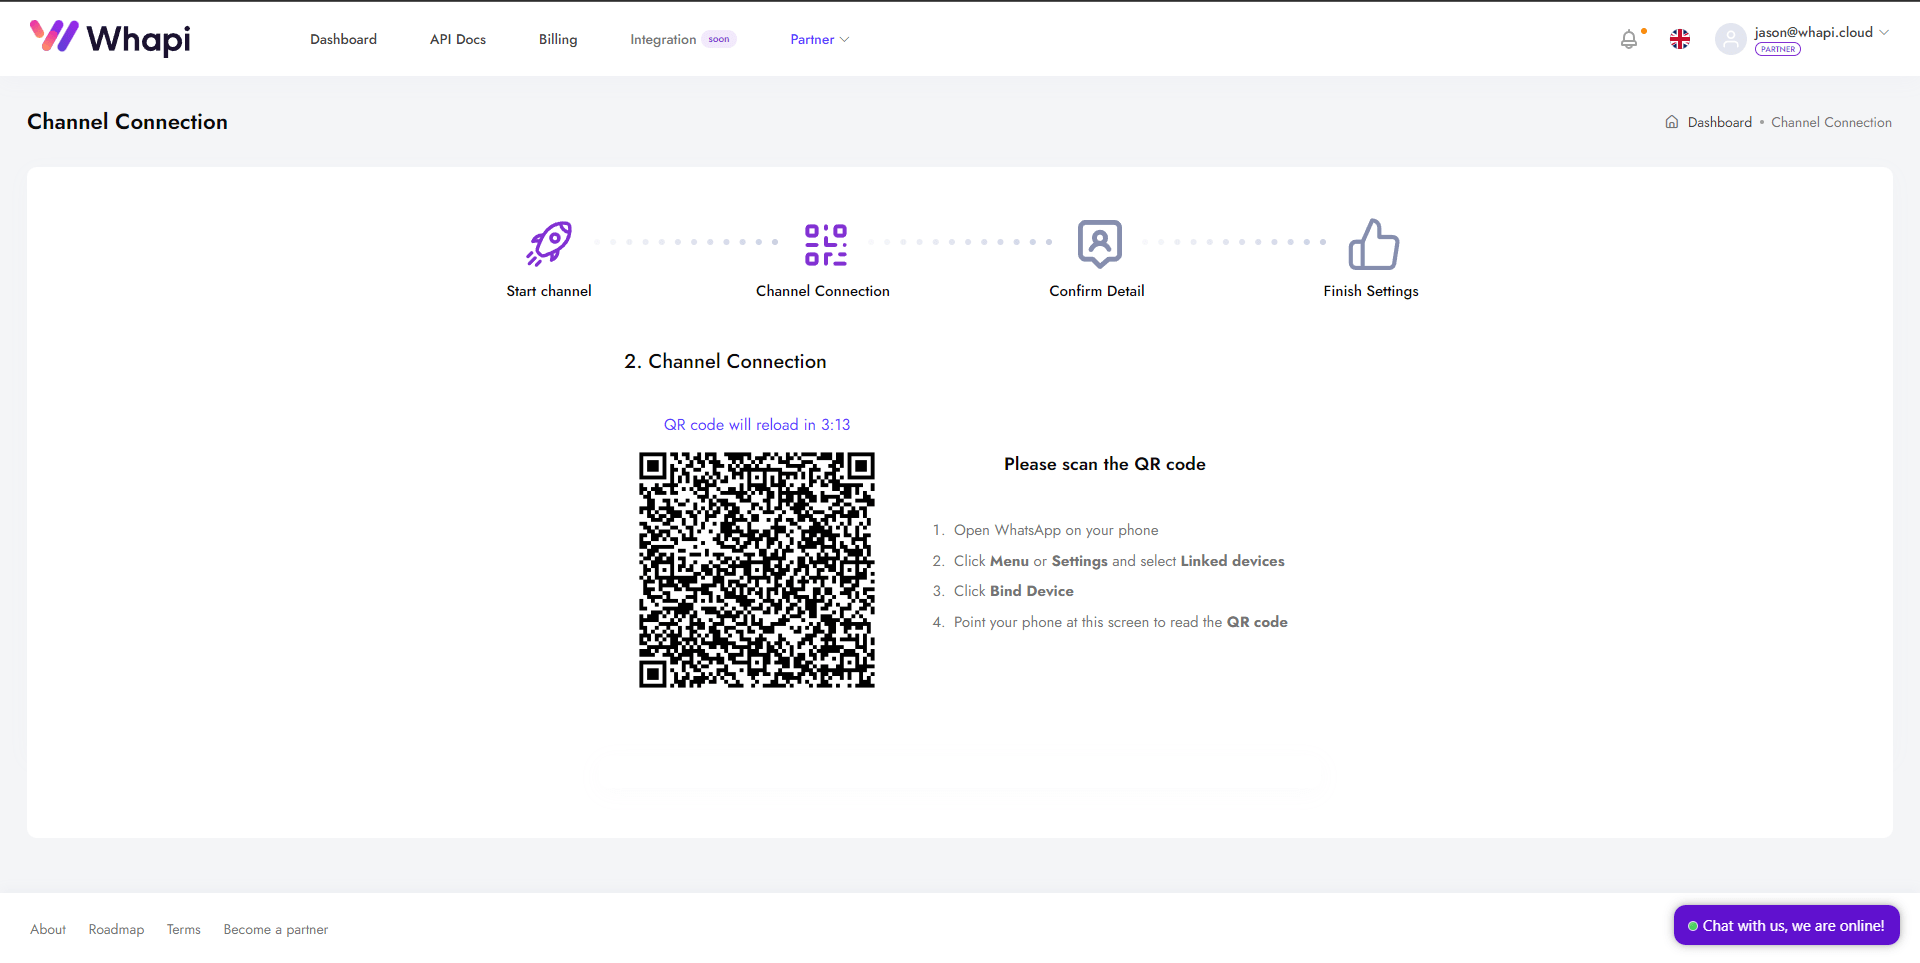
Go to the Dashboard: Open the Default Channel already created for you. As the first step, you will see a QR code and a brief instruction. Open WhatsApp on your mobile device, go to Settings -> Linked Devices -> Connect Device -> Scan QR Code.
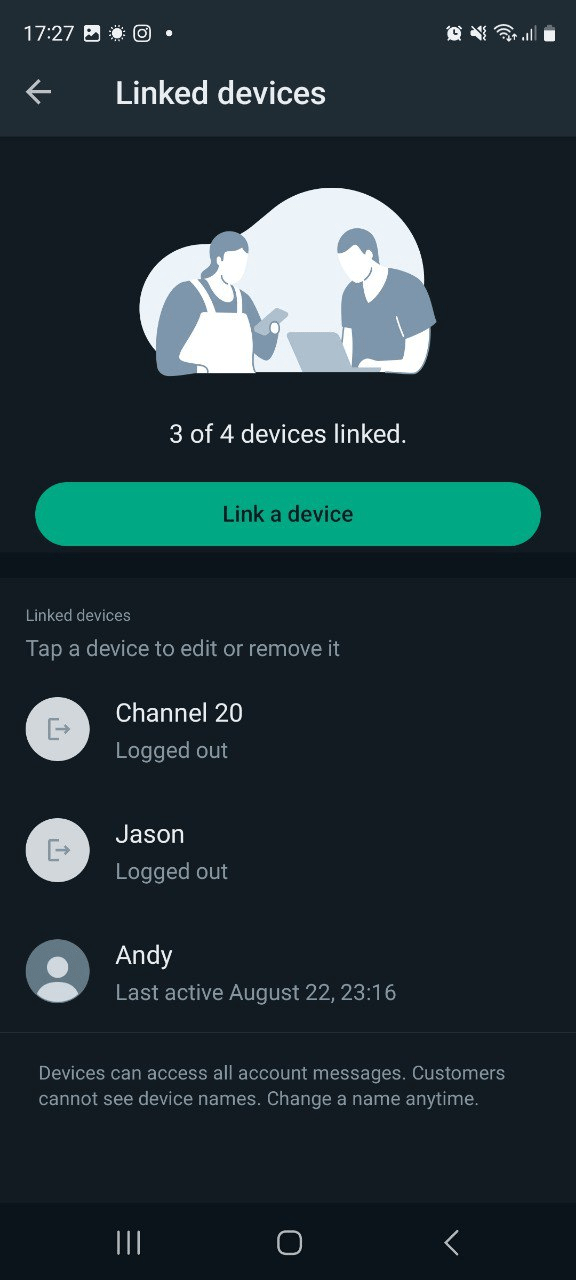
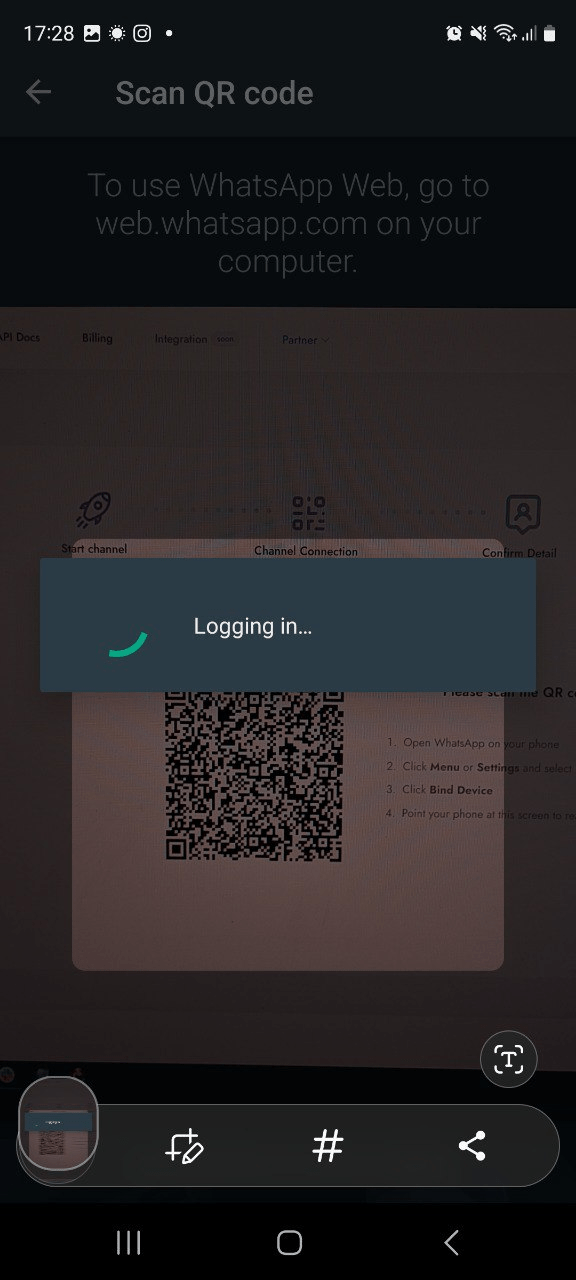
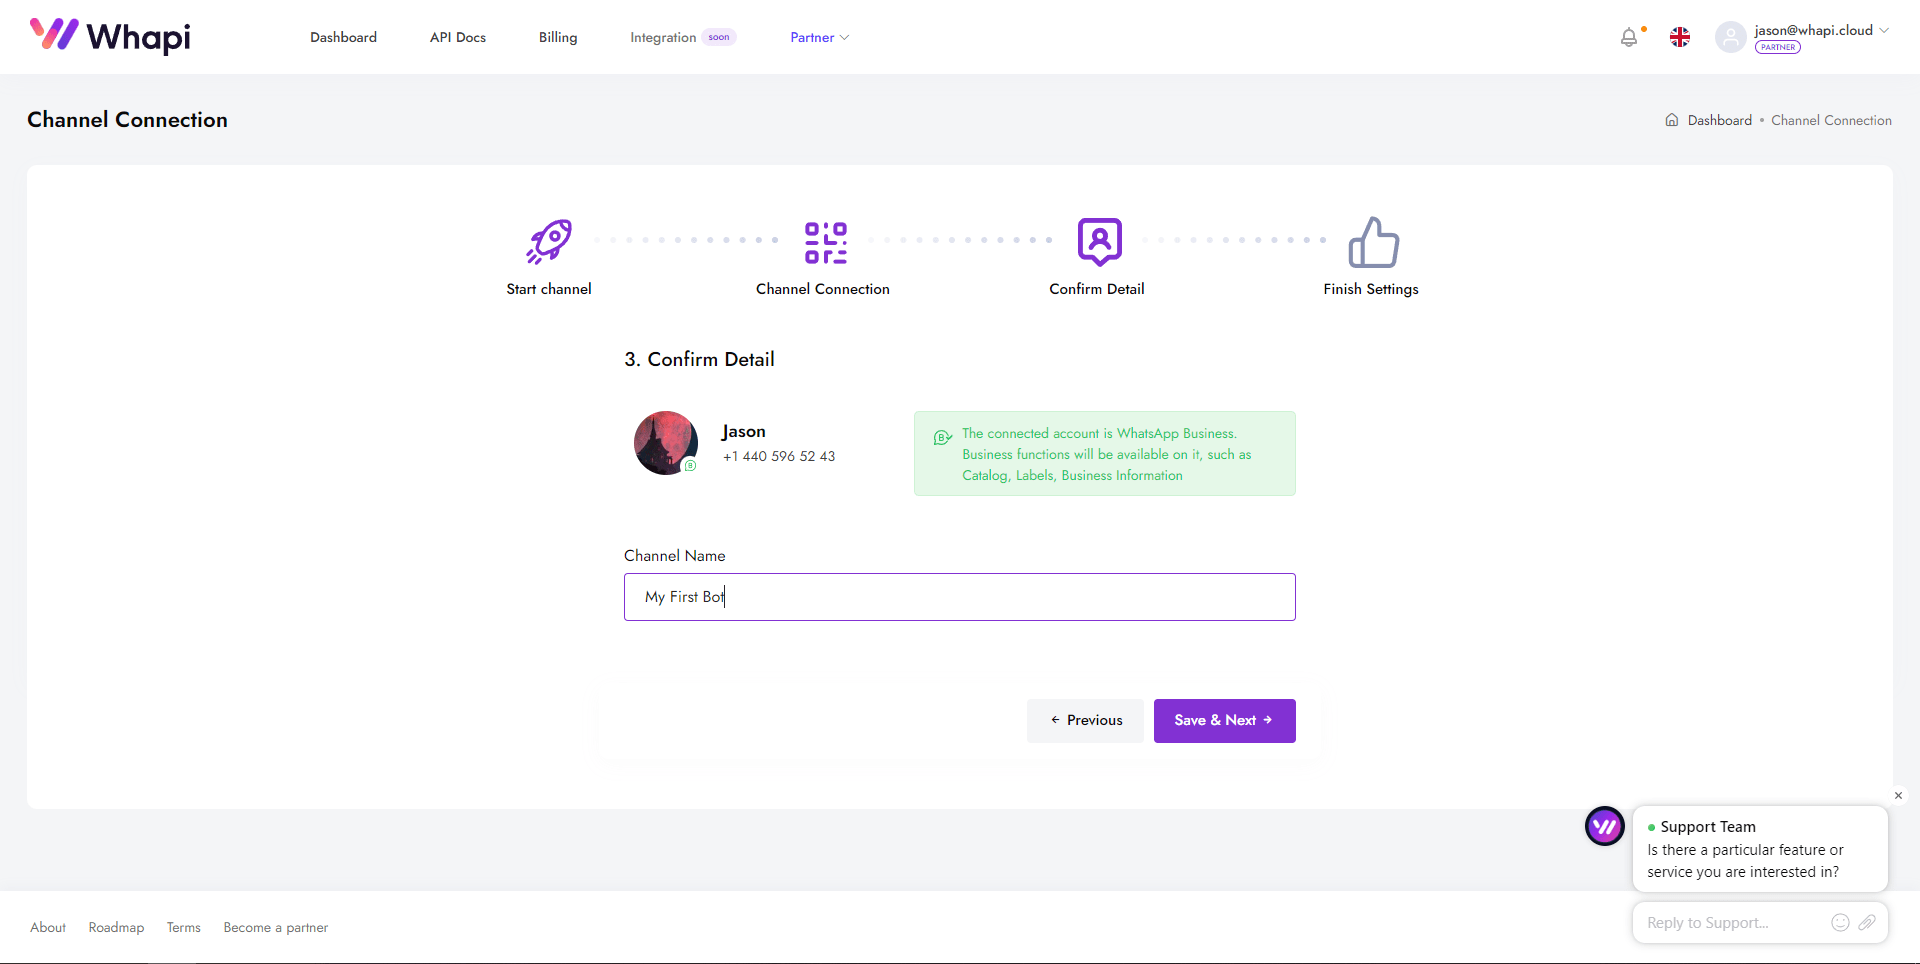
Once connected, assign a name to the channel for easy identification (e.g., "My WhatsApp Bot"). You can skip additional settings like webhooks for now, as we’ll revisit them in a later chapter.
3. Retrieve Your API Token
After connecting your number, find your API token in the channel info section. This token is critical for authenticating API requests and should be kept secure.
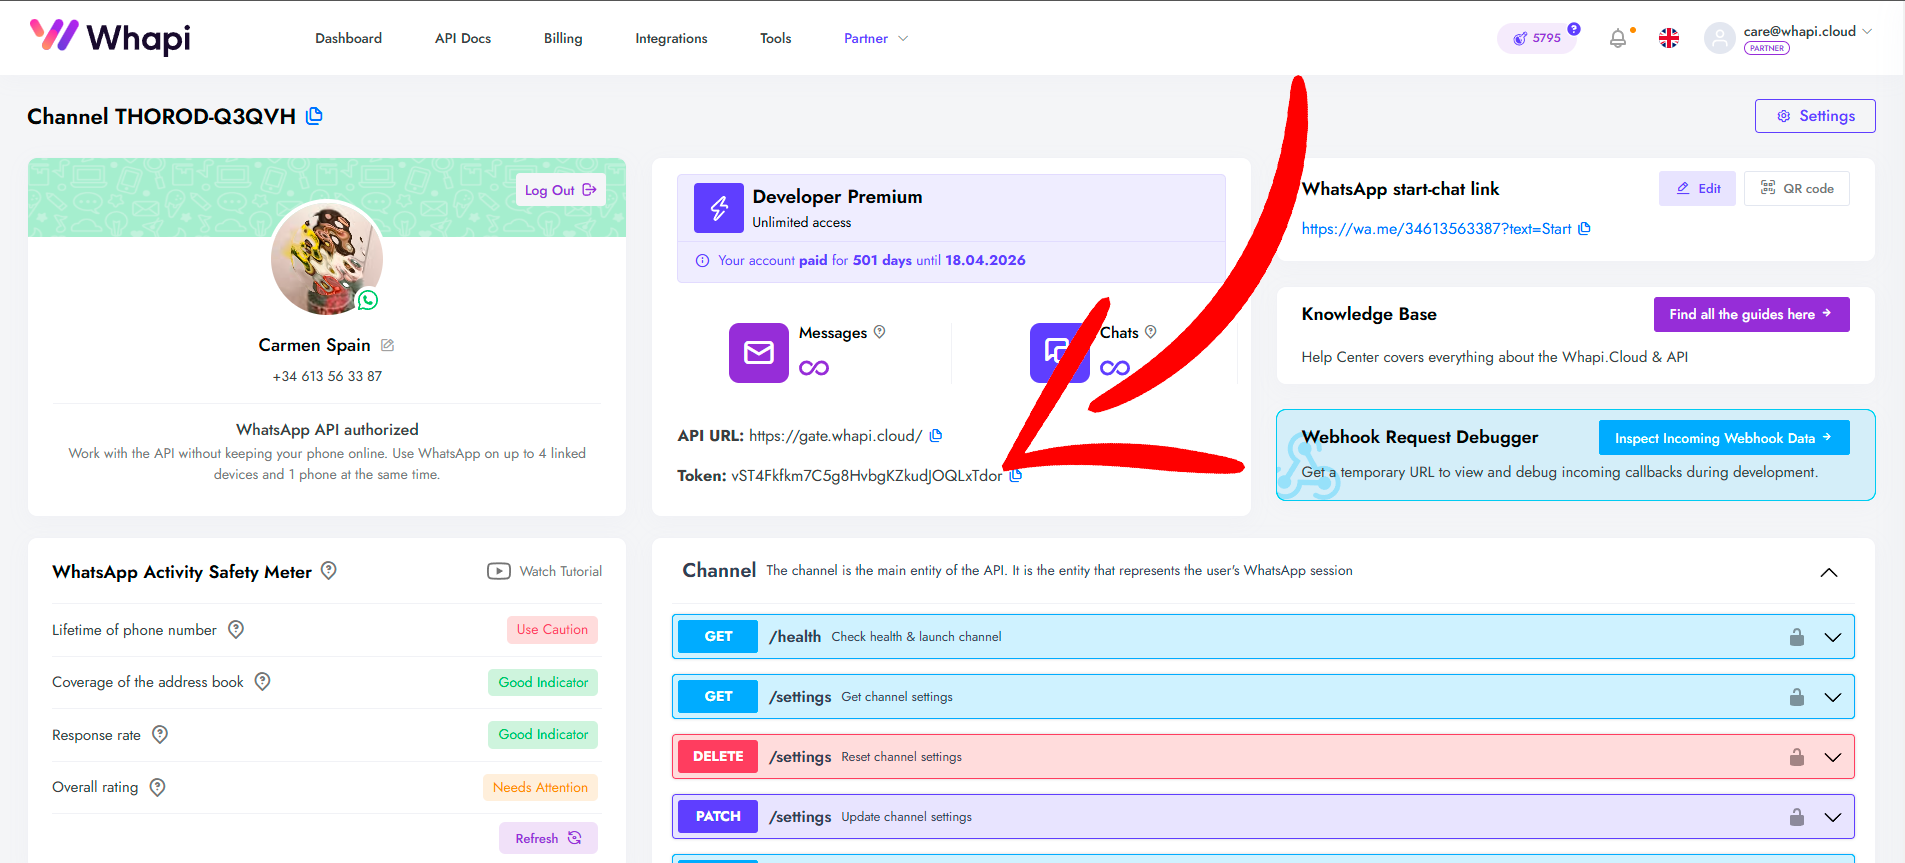 Your API Key
How to Use the Token: Include the token in the Authorization Header as a Bearer Token for API requests.
Now your number is connected, and you’re ready to start building your bot with Whapi.Cloud. In the following chapters, we'll look at getting a webhook link to handle incoming messages and sending messages using the API. 🚀
Tools for Working with the API
Whapi.Cloud offers several ways to access API documentation:
- User-Friendly Developer Hub: A specialized platform with documentation and examples provides code snippets for all endpoints in various programming languages.
- Postman Collection: Ready-made requests for testing the API through Postman.
- Swagger File: A detailed description of all API methods, with testing capabilities directly from the channel page.
These tools help developers of any level quickly understand the Toolkit features and start integration. One of Whapi.Cloud’s key advantages is the ease of setup: you can start working with the API in just a few minutes.
What is a Webhook and How to Set It Up?
Webhooks are the backbone of real-time communication between your WhatsApp bot and Whapi.Cloud’s API. By setting up a webhook, your bot can instantly receive updates like incoming messages, message status changes (e.g., "sent," "delivered," "read"), and other important events. This ensures seamless data exchange and allows your bot to respond dynamically to user interactions.
What is a Webhook?
A webhook is an HTTP callback-a POST request sent from our server to yours when specific events occur on WhatsApp. For instance, when a message is received on your WhatsApp number, the webhook sends data about that message (e.g., text content, sender, timestamp) to your bot’s endpoint, enabling real-time processing.
Benefits of Webhooks:
- Instant Updates: Receive notifications in near real-time as events occur;
- High Throughput: Limited only by the processing speed of your server;
- Customizable: Tailor the webhook to receive only the events you need, such as incoming messages, group updates, and participant changes;
With Whapi.Cloud, you can manage and configure webhooks flexibly to suit your unique requirements.
How and Where to Get a Webhook URL
In order for your integration or bot to receive and process information from the messenger in real time, you need the URL of the server where the bot script will be hosted to receive data.
If you don't know where to get such an address, we have prepared a detailed guide: “Where to find the Webhook URL?”. The article details how to set up a local server or choose external hosting.
Below, we will cover a quick and easy local way to get such a link using Ngrok.
However, for production, we recommend deploying your bot on a reliable hosting platform such as AWS, Firebase, or Heroku. These platforms provide static URLs, making them ideal for deploying webhooks.
Technically, when a message arrives on your WhatsApp, our server sends a POST request with a JSON body to your script URL. The JSON body will contain all the information about the incoming message such as text, sender number, time sent, etc., allowing you to process this information in real time.
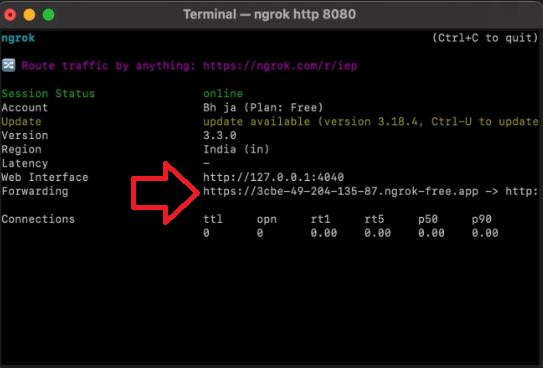
If you’re working on a local server, tools like Ngrok allow you to expose your local environment to the internet, creating a secure and accessible webhook URL.
1) Download Ngrok from the official website and extract it.
2) Open a terminal, navigate to the Ngrok folder, and run: ./ngrok http PORT_NUMBER. Replace PORT_NUMBER with the port your local PHP server is using (default is 8000).
3) Ngrok will generate a public URL. Copy this URL and use it as your webhook URL.
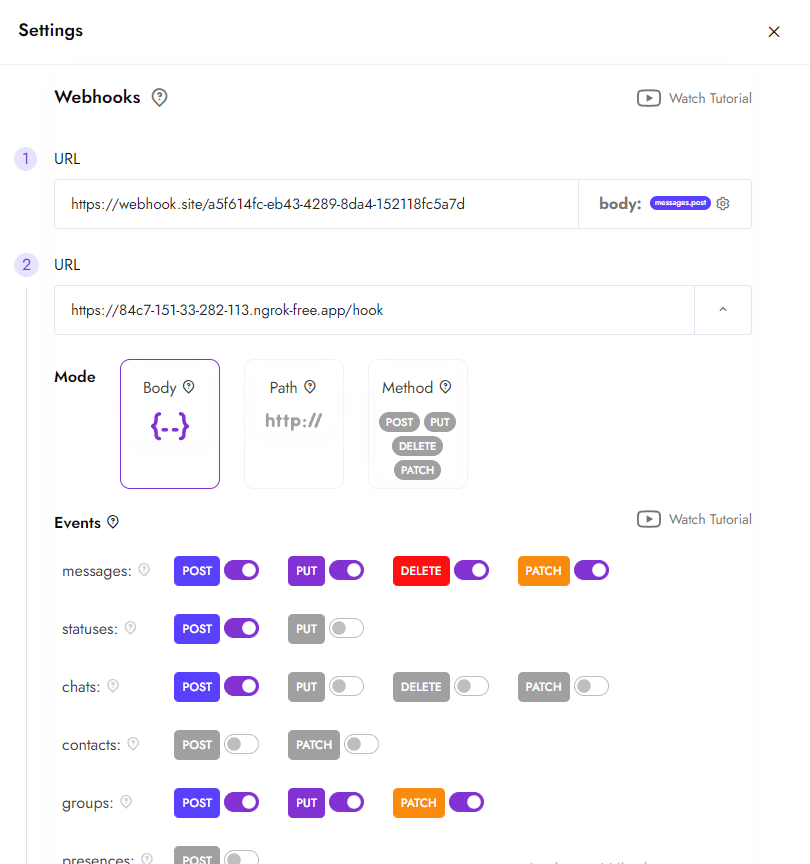
Configuring the Webhook in Whapi.Cloud
Once you have your webhook URL:
- 1) Go to the Channel Settings: Open the channel settings in the Whapi.Cloud Dashboard;
- 2) Set the Webhook: Enter your webhook URL in the designated field. You can configure multiple webhooks for different events if necessary;
- 3) Save and Test: Save the changes and test the webhook to ensure it’s receiving events correctly.
From now on, all relevant events will trigger a POST request to your specified URL, allowing your bot to process them dynamically. In the next chapter, we’ll explore how to handle these incoming events and program responses for your bot. 🚀
Creating the Basics of a WhatsApp Bot in PHP
Building a WhatsApp bot in PHP is straightforward and beginner-friendly. In this chapter, we’ll guide you through setting up the foundation of your bot by creating configuration files, adding core logic, and running your project. If you haven’t yet installed dependencies with Composer or started a PHP server, refer back to the "Preparing to Develop a WhatsApp Bot in PHP" section for detailed instructions.
1. Set Up Configuration Management
Instead of hardcoding sensitive data like your API token, it’s better to use a centralized configuration file. Create a config.php file in your project directory and include your settings:
return [
    'api_token' => 'YOUR_API_TOKEN',
    'webhook_url' => 'https://your-domain.com/webhook'
];
Later, you can access these settings in your code:
$config = include('config.php');
$apiToken = $config['api_token'];
2. Create the Bot Logic in index.php
Next, create an index.php file in your project’s root or public directory. This file will contain the core logic for your bot. For now, let’s include a basic structure for handling requests:
$config = include('config.php');

// Example: Respond to a basic GET request
if ($_SERVER['REQUEST_METHOD'] === 'GET') {
    echo json_encode(['status' => 'Bot is running']);
}

// Example: Handle a POST request from the webhook
if ($_SERVER['REQUEST_METHOD'] === 'POST') {
    $input = json_decode(file_get_contents('php://input'), true);
    // Process incoming messages here
    file_put_contents('log.txt', print_r($input, true), FILE_APPEND);
}
This structure provides a starting point for adding message handling and logic.
3. Start the PHP Server and Test the Setup
To test your bot locally, ensure your development server is running. If you haven’t started it yet, run: php -S localhost:8000
Visit http://localhost:8000 in your browser. You should see a response like:
{
    "status": "Bot is running"
}
If your webhook is set up correctly, you can also simulate a POST request to test incoming message handling.
After successfully launching the bot foundation, you are ready to move to the next stage - sending messages and handling incoming requests. In the next part, we will cover basic API functions and show how to send messages using your bot. 🚀
Sending a Text Message
Let’s start with a simple example: sending a text message. The token must be passed in the authorization header (Bearer), and the request body should contain the message parameters. Below is the PHP code for sending a text message. Each part is explained with inline comments to ensure clarity:
// Include the Guzzle library from Composer dependencies
require_once('vendor/autoload.php');

// Initialize the Guzzle HTTP client
$client = new \GuzzleHttp\Client();

try {
    // Make a POST request to the Whapi.Cloud API to send a text message
    $response = $client->request('POST', 'https://gate.whapi.cloud/messages/text', [
        'body' => json_encode([
            'to' => '919984351847', // The recipient's WhatsApp number in international format
            'body' => 'Hello world!' // The text message to send
        ]),
        'headers' => [
            'accept' => 'application/json', // Specify that we expect a JSON response
            'authorization' => 'Bearer YOUR_TOKEN_HERE', // Replace YOUR_TOKEN_HERE with your API token
            'content-type' => 'application/json', // Send data in JSON format
        ],
    ]);

    // Display the API response
    echo "Message sent successfully: " . $response->getBody();
} catch (\GuzzleHttp\Exception\RequestException $e) {
    // Handle any errors during the request
    echo 'Error: ' . $e->getMessage();
}
Ensure the recipient's number is in international format without spaces or special characters.
After successfully sending the message, you can try more complex scenarios, such as delivering images, files, or interacting with groups. Simply follow the examples of requests in our API documentation. We’ll discuss this in the next chapters. For now, ensure your message is sent correctly and the server returns a 200 OK status.
Handling Incoming WhatsApp Messages with PHP
Earlier, we covered how to set up and configure a webhook URL in the channel settings. If you haven’t done so yet, refer to the previous chapter for detailed instructions on obtaining and configuring your webhook URL. For this chapter, we’ll assume the webhook is active and ready to handle requests.
When an incoming message arrives, Whapi.Cloud sends a POST request with detailed information about the message, including the sender, type of content, and timestamp. Your bot can parse this data and respond accordingly. For example:
- If the message contains the text "help," the bot can reply with predefined instructions;
- If the message requests a media file, the bot can send an appropriate response, such as an image or document;
- The bot can also handle other actions, like adding reactions or forwarding messages;
Here’s how to integrate incoming message processing into your bot logic. The code below assumes you’ve already set up your config.php file with the webhook URL and token.
require_once 'vendor/autoload.php'; // Include Composer autoloader

$config = require 'config.php'; // Load configuration file

$app = new \Slim\App(); // Initialize Slim application

// Route to check if the bot is running
$app->get('/', function ($request, $response) {
    return $response->write('Bot is running'); // Simple health check endpoint
});

// Retrieve the webhook URL from the config file
$webhookUrl = $config['webhook_url'] ?? '/webhook'; // Default to '/webhook' if not set

// Route to handle incoming webhook requests
$app->post($webhookUrl, function ($request, $response) use ($config) {
    // Parse incoming request body as JSON
    $data = json_decode($request->getBody(), true);
    $messages = $data['messages'] ?? []; // Retrieve incoming messages array

    foreach ($messages as $message) {
        // Skip messages sent by the bot itself to prevent infinite loops
        if ($message['from_me']) {
            continue;
        }

        // Extract sender's phone number and message text
        $senderPhone = str_replace('@s.whatsapp.net', '', $message['chat_id']); // Sender's phone number
        $text = strtolower(trim($message['text']['body'] ?? '')); // Message text in lowercase

        // Initialize Guzzle HTTP client
        $client = new \GuzzleHttp\Client();
        $endpoint = 'https://gate.whapi.cloud/messages/text'; // API endpoint for sending messages

        // Define responses for specific commands
        $responses = [
            'help' => 'Here is how I can assist you!',
            'command' => 'Executing your command!',
            'default' => 'Sorry, I didn’t understand that.',
        ];

        // Determine the response based on the received text
        $responseText = $responses[$text] ?? $responses['default'];

        try {
            // Send a response message via the Whapi.Cloud API
            $client->post($endpoint, [
                'headers' => [
                    'accept' => 'application/json', // Expect JSON response
                    'authorization' => 'Bearer ' . $config['api_token'], // Add API token from config
                    'content-type' => 'application/json', // Send data in JSON format
                ],
                'json' => [
                    'to' => $senderPhone, // Recipient's phone number
                    'body' => $responseText, // Response message text
                ],
            ]);
        } catch (\Exception $e) {
            // Log any errors during the message sending process
            error_log('Failed to send message: ' . $e->getMessage());
        }
    }

    // Return a success response to the webhook
    return $response->withJson(['status' => 'success'], 200);
});

// Run the Slim application
$app->run();
Note that the script listens for incoming HTTP POST requests at the configured webhook URL. The bot makes sure that the incoming data contains the correct message payload before proceeding, and also filters outgoing messages to prevent the bot from reacting to its own messages, thus avoiding endless loops.
Now your bot can automatically respond to incoming notifications and perform actions depending on their content. To simplify the process of writing a bot from scratch, you can use our ready-made PHP bot scripts, published on GitHub. These projects include detailed setup and testing instructions, as well as helpful comments in the code. It’s an excellent start for beginner developers.
In the next chapter, we’ll look at advanced features, such as sharing multimedia and interacting with groups.
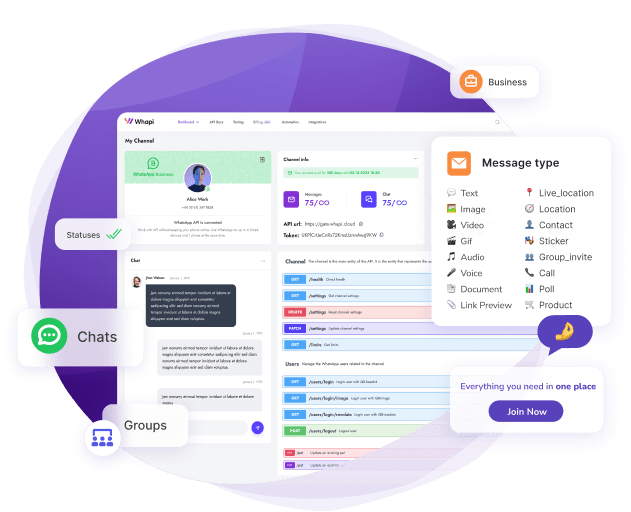
Unlock Advanced Features with Whapi.Cloud
With Whapi.Cloud, you unlock a powerful set of tools to develop feature-rich WhatsApp bots and integrations of any complexity. Whether you're automating routine tasks or building a fully interactive customer experience, our API provides everything you need to streamline your workflow and boost engagement. You can even connect your own number from the app, and best of all, there are no charges for messages or conversations.
Messaging and Media
Easily send text messages, images, videos, documents, geolocations, contacts, stickers, and polls. Create dynamic interactions by adding reactions, quoting messages, marking them as read, or displaying the "typing..." status.
Group and Channel Management
Automate group creation and deletion, add or remove members, assign administrators, and modify group settings. Post announcements to channels, receive replies, and manage participants effortlessly.
Communities and Statuses
Organize and manage WhatsApp Communities for structured communication. Send statuses (stories) to all or specific contacts, enhancing reach and visibility.
Additional Functionalities
Pin chats, block users, retrieve detailed group and participant data, or manage product catalogs and polls. Whapi.Cloud equips you with tools to automate and optimize communication.
All methods are thoroughly documented with examples, SDKs, and step-by-step instructions to accelerate your development process. Start exploring these advanced features today and elevate your WhatsApp automation game! 🚀
Creating a WhatsApp Group in PHP
With Whapi.Cloud, you can not only create groups but also manage them dynamically. For example, add participants, change the group name, assign administrators, and delete groups that are no longer needed. Let’s go through how to create a group using the WhatsApp API with PHP. You can send messages both to new groups created through the API and to old groups where your number is already in. This is no different from sending a message by private message, except that instead of the recipient's phone number, you will need to specify the group ID.
require_once('vendor/autoload.php');

$client = new \GuzzleHttp\Client();

$response = $client->request('POST', 'https://gate.whapi.cloud/groups', [
  'body' => '{"participants":["919984351847","919984351848","919984351849"],"subject":"Group Subject 86"}',
  'headers' => [
    'accept' => 'application/json',
    'authorization' => 'Bearer YOUR_TOKEN_HERE',
    'content-type' => 'application/json',
  ],
]);

echo $response->getBody();
Sending a File
Expanding the functionality of your bot to include file sharing makes it an essential tool for exchanging important information. This can be useful for posting invoices, contracts, price lists, and other documents. Let’s explore how to implement file sending via the WhatsApp API using PHP:
require_once('vendor/autoload.php');

$client = new \GuzzleHttp\Client();

$response = $client->request('POST', 'https://gate.whapi.cloud/messages/document', [
  'body' => '{"to":"919984351847","media":"data:application/pdf;base64,JVBERi0xLjQKJdPr6ejM2IFwoS0h...........","caption":"Terms of Service Whapi.Cloud.pdf","filename":"Hello, I am attaching an important file to my message"}',
  'headers' => [
    'accept' => 'application/json',
    'authorization' => 'Bearer YOUR_TOKEN_HERE',
    'content-type' => 'application/json',
  ],
]);

echo $response->getBody();
Troubleshooting
Various issues can arise during the testing and operation of the WhatsApp chatbot. Here are a few typical situations and recommendations for their resolution:
The Bot Does Not Respond to Incoming Messages
- Ensure you are sending messages to the number on which the bot is running from a different phone. The bot will not be able to respond to messages sent from the same number.
- If the bot does not respond to messages from other numbers, check the operation of webhooks. Use services to simulate webhooks, for example, Webhook.site, to ensure which path the callback requests are coming through. Afterwards, check if the path matches the one you have configured. Also, ensure your server responds with 200Ok.
If you encounter difficulties, do not hesitate to contact our technical support for help. You can write in the web chat widget on our site or email [email protected]. We will assist you and figure out exactly what's wrong with the webhook.
The Bot Sends Messages Non-Stop
Return to the original version of the code. Our script includes a check to determine whether a message is incoming or outgoing, to prevent getting into an infinite loop of sending messages. Infinite sending may occur if there is no check for outgoing messages in the code, causing the bot to call itself, or if there is a cyclic sending of messages in the code.
The Bot Works in Some Chats, But Not in Others
Check your tariff plan on Whapi.Cloud. If you are using the trial mode or the "Sandbox" tariff, interaction is limited to a certain number of chats per month (currently up to 5 chats). In such a case, the bot will not be able to process messages in the sixth chat and subsequent ones.
It's important to remember that many issues can be prevented by carefully checking your chatbot's configuration and logic before launching. Regularly updating your code and paying attention to the details of settings can help avoid most typical errors. And our support team is always in touch and ready to assist you!
Deployment and Using Servers
To ensure your WhatsApp chatbot is available 24/7, it needs to be hosted on a reliable hosting platform. You can use your server, but in this chapter, we will consider the three most popular platforms - Firebase, AWS, and Heroku - and go through the basic steps of deploying your bot on each of them.
The choice of platform depends on your preferences, budget, and project requirements. Each of the considered platforms offers its unique features and advantages. Firebase and AWS Lambda provide powerful backend functionality without the need to manage a server, while Heroku offers simplicity in deploying applications based on Git.
Firebase
Firebase offers Cloud Functions functionality, allowing you to run your bot without worrying about server infrastructure. In our opinion, this is the most optimal option.
- Create a project in Firebase Console;
- Install Firebase CLI, following the instructions;
- Initialize Firebase in your project directory with the command firebase init;
- Deploy your bot using the command firebase deploy --only functions.
AWS (Amazon Web Services)
AWS Lambda offers the ability to run code in response to triggers from other AWS services, making it a good choice for a bot.
- Register or log in to AWS Management Console;
- Create a new Lambda function through the AWS console, selecting API Gateway as the trigger;
- Upload your bot's code into the Lambda function;
- Configure the API Gateway to interact with your bot and the outside world.
Heroku
Heroku offers an easy-to-use platform for hosting applications, which can automatically deploy code from your Git repository.
- Create an account on Heroku;
- Install Heroku CLI and log in;
- Create a new Heroku app through the console or using the command heroku create;
- Link your Git repository to Heroku and perform deployment with the commands git push heroku master;
- Set the webhook URL provided by Heroku.
Conclusion and recommendations
Building a WhatsApp bot with PHP using the Whapi.Cloud API makes automating messaging easier than ever. As this guide demonstrates, the process is broken down into straightforward steps, enabling even beginners to implement a functional and efficient bot.
On GitHub, you will find several repositories with different bots. One of them is considered ideal for beginner programmers as it has very simple but understandable functionality-sending text messages and images in response to commands. Another bot version is suitable for more advanced users, as it includes more features: Sending plain messages, images, files, videos, contacts (vCard), products, creating new WhatsApp groups, sending invitations, and sending messages to groups.
If you encounter any challenges, our dedicated support team is always ready to assist. We’re here to help ensure your experience with Whapi.Cloud is smooth, efficient, and tailored to your needs. Unlock the potential of WhatsApp automation today and elevate your business communication!
Thank you for choosing Whapi.Cloud, and we hope your bot becomes an integral part of your business! We’ll always be here to help you 🚀