
Part 1: If you don't have time to read
This example of the bot implementation touches in detail on the most frequently used functionality. This will allow you to adapt the source code to your tasks and needs, or take it as a basis for creating any other integration. We have left comments near each function to make it easier for you to understand the code. In the source code of the bot you will find the following functionality:
- Respond to an unfamiliar command, this could be an instruction or your welcome message;
- Send regular message;
- Send image;
- Send file;
- Send video
- Send contact (vCard);
- Send product;
- Create new group, send an invitation and send message to the group;
- Receive and reading incoming messages;
Part 2: Introduction
Welcome to this comprehensive guide on creating your own WhatsApp bot using Node.js! This article aims to equip you with the knowledge and practical skills to build a functional WhatsApp bot from scratch. Whether you're a complete beginner in the world of programming or have some experience but are new to Node.js, this guide is for you.
What is a WhatsApp Bot and Why Do You Need One?
A WhatsApp bot is an automated software program designed to interact with users through the WhatsApp platform. It can provide instant customer support, deliver notifications, and even handle transactions. In an age where customer engagement is crucial, a WhatsApp bot can significantly elevate the user experience, streamline business operations, and even increase sales.
Why Node.js?
Node.js is an open-source, cross-platform JavaScript runtime environment that allows developers to build scalable network applications. Here's why it's an excellent choice for building a WhatsApp bot:
- Asynchronous Programming. Node.js is non-blocking, meaning it can handle many connections simultaneously, perfect for a chatbot that needs to manage multiple interactions at once.
- Strong Community Support. With a vibrant ecosystem and a vast number of freely available modules in the npm registry, you're never really alone when coding in Node.js.
- Ease of Learning. If you are already familiar with JavaScript, picking up Node.js would be a cinch. Even if you're not, JavaScript is one of the easiest programming languages to learn.
- Our support. We are happy to help developers in this programming language. If you send us a fragment of your code where something doesn't work, it will be easier for us to help you, give you a hint or improve your work.
By the end of this guide, you'll have a working WhatsApp bot capable of receiving and sending messages, media files, and even interacting in group chats. Ready to start your journey? Let's dive in!
Setting Up the Development Environment
Before you dive into coding, there are a few things you'll need to prepare:
- Node.js and npm. If you don't have Node.js and npm (Node Package Manager) installed on your computer, you'll need to install them. You can download the latest version from the official Node.js website.
- Text Editor. Any text editor will do, but IDEs like Visual Studio Code or WebStorm offer additional features like debugging and auto-completion that can make your life easier.
- Terminal or Command Prompt. This is where you'll run all your Node.js scripts.
Installation Steps
- Step 1: Install Node.js and npm. Visit the official Node.js website and download the installer for your operating system. Run the installer and follow the on-screen instructions. This will install both Node.js and npm.
- Step 2: Set Up Your Project Folder. Create a new folder where you'll store all the files related to your WhatsApp bot. Navigate to the folder using the terminal. Initialize a new Node.js project. This will create a package.json file that will hold all the metadata and dependencies for your project.
- Step 3: Install Required Packages. Since we'll be working with the WhatsApp API, we'll need to install some packages to help us with the task.
At this point, you have a working development environment, a new Node.js project, and all the required packages. You're now ready to start coding your WhatsApp bot!
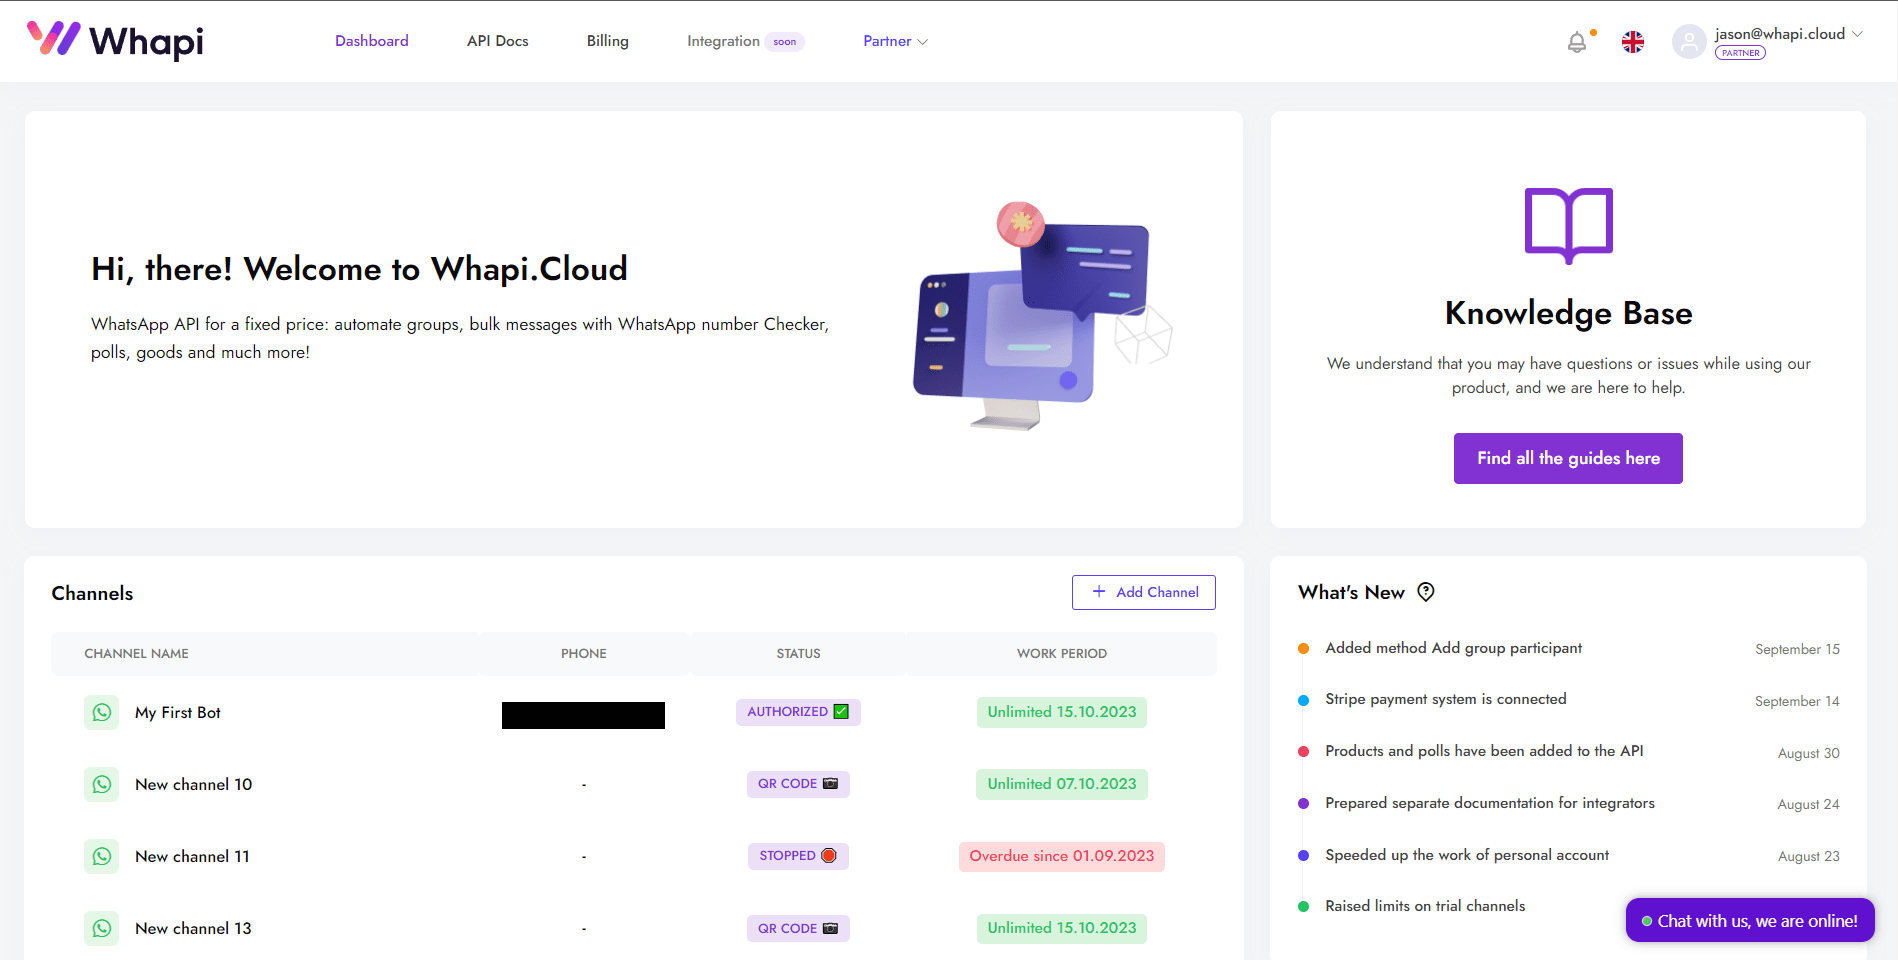
Connecting WhatsApp API provider
Whapi.Cloud is an API gateway that facilitates integration with WhatsApp. This makes it possible, with the Cloud API's tight restrictions and expensive messages, to fully automate any messenger functionality. In this article, we will look at just a few methods for sending, receiving and processing messages in WhatsApp, but the possibilities of this tool are much more.
How to Connect to Whapi.Cloud
Registration. The first step is to register on the Whapi.Cloud website and create an account. It's free and doesn't require you to enter a credit card.
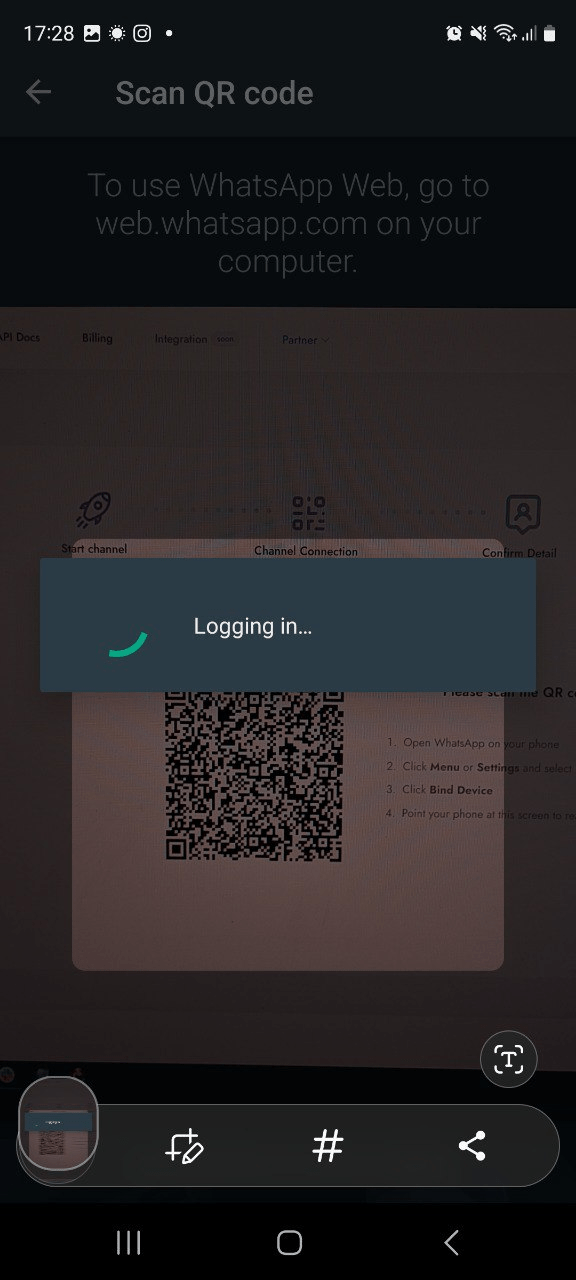
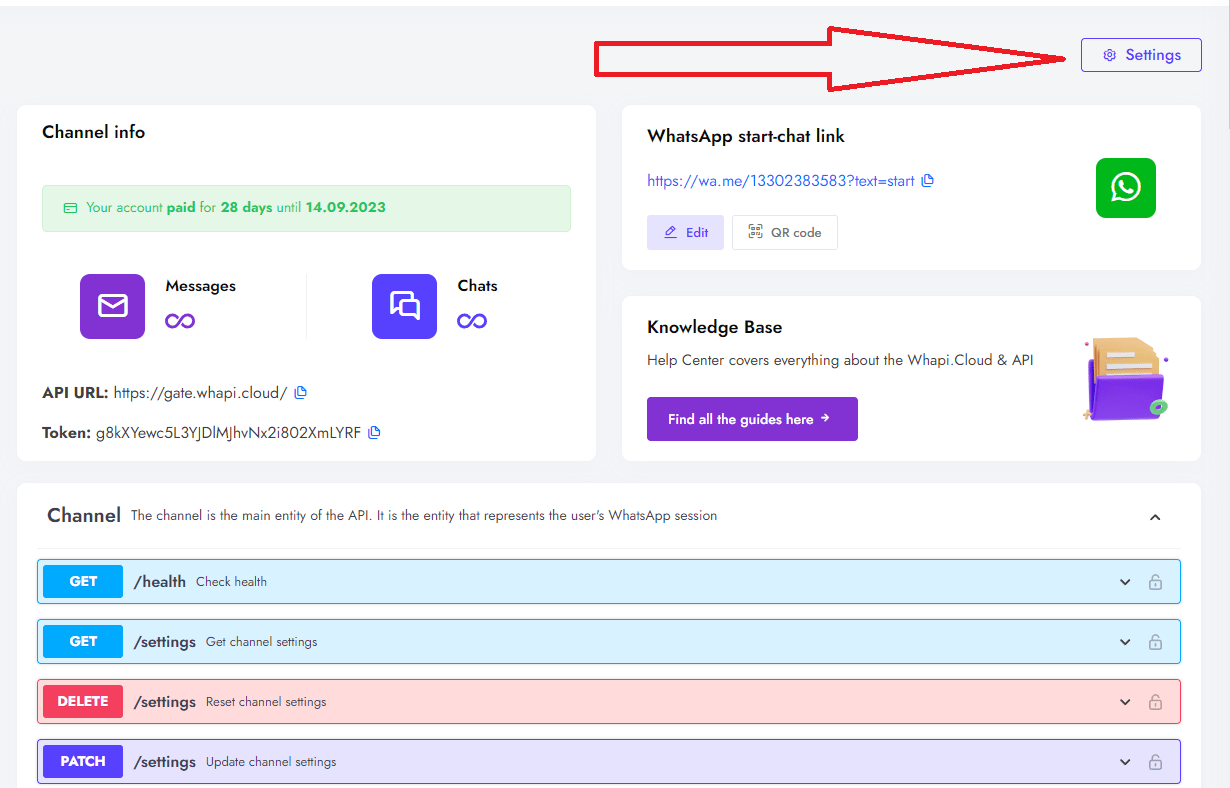
After registration you will immediately have access to a test channel with a small limitation. Wait for it to start (it usually takes about a minute). You will need to connect your phone for Whatsapp automation. It is from the connected phone that messages will be sent. The big advantage of the service is that it takes only a couple of minutes to launch and start working.
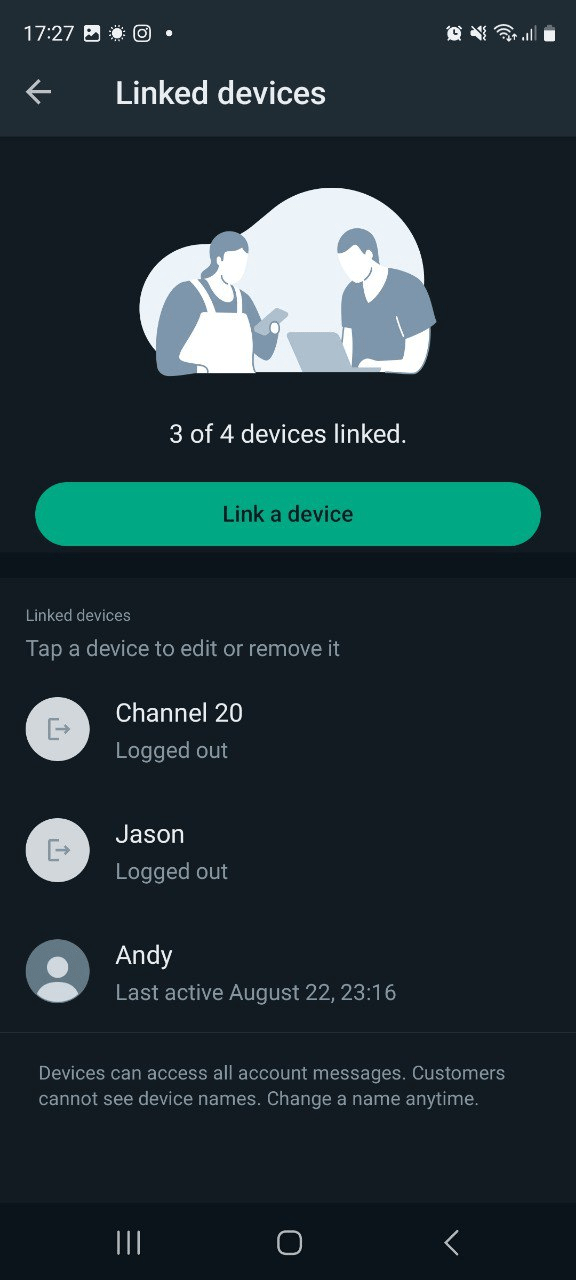
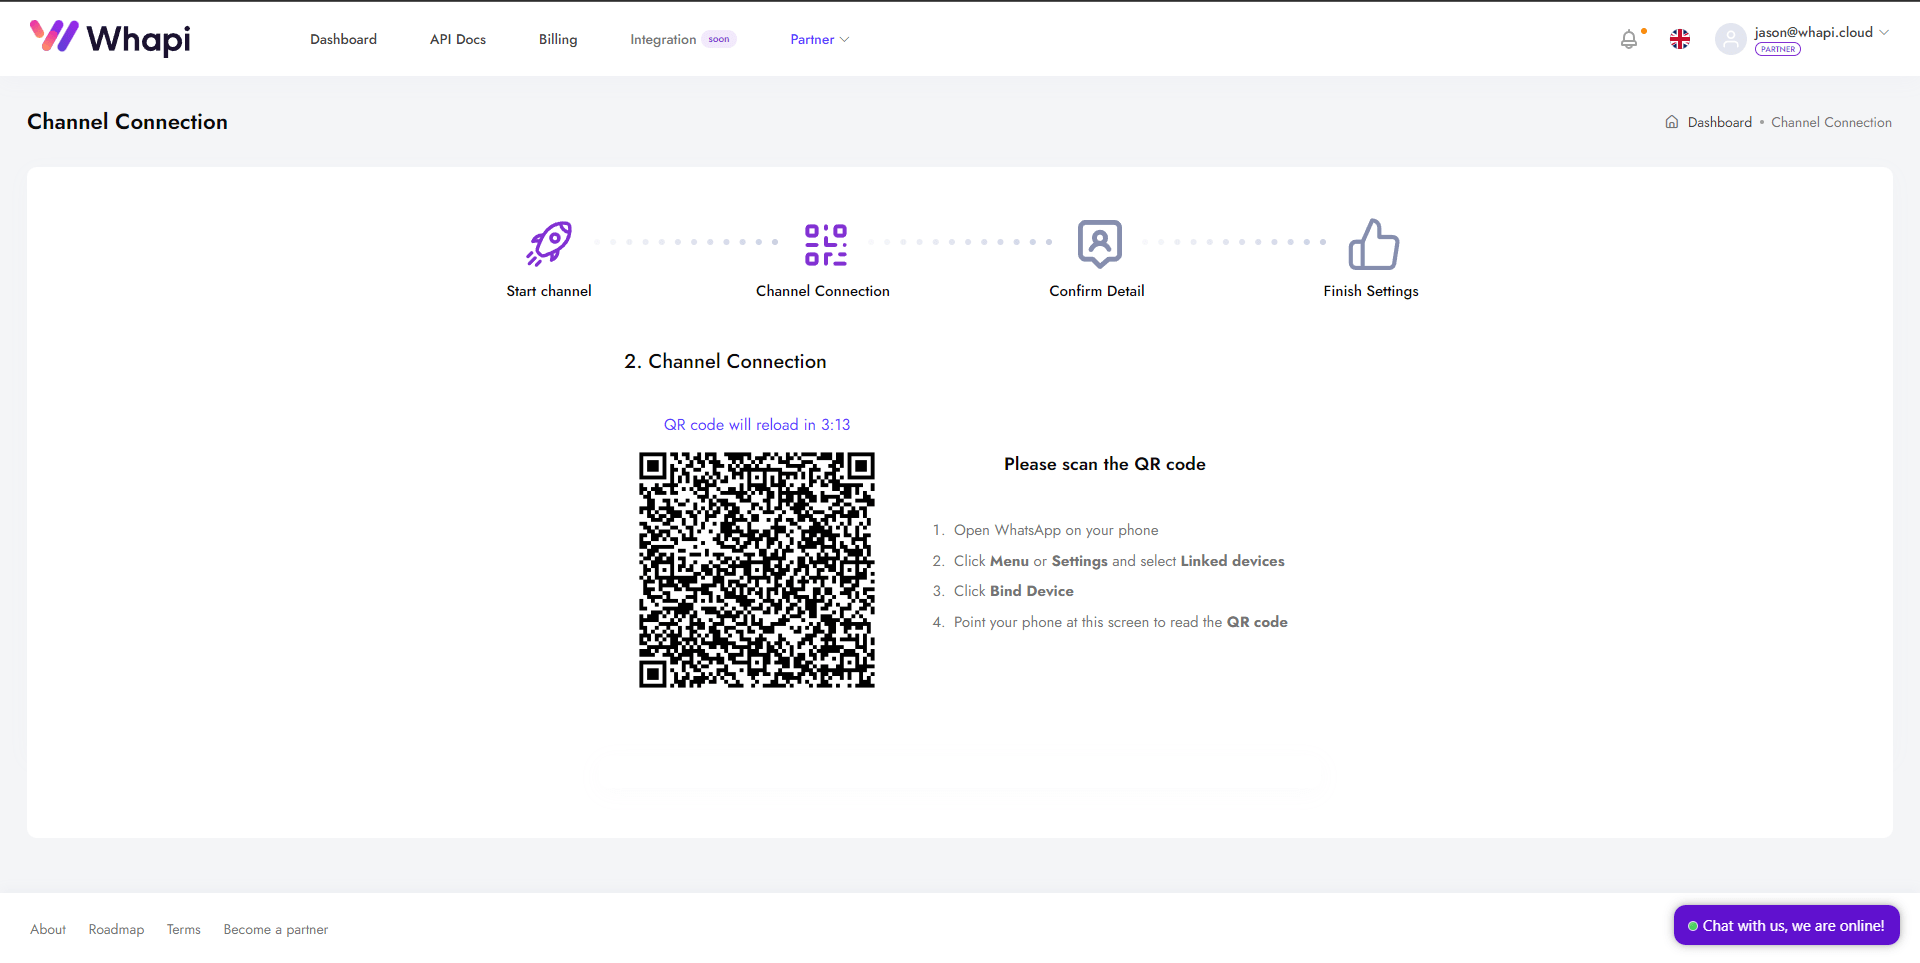
To connect your phone, use the QR code available when you click on your trial channel in your personal account. Then open WhatsApp on your mobile device, go to Settings -> Connected devices -> Connect device -> Scan QR code.
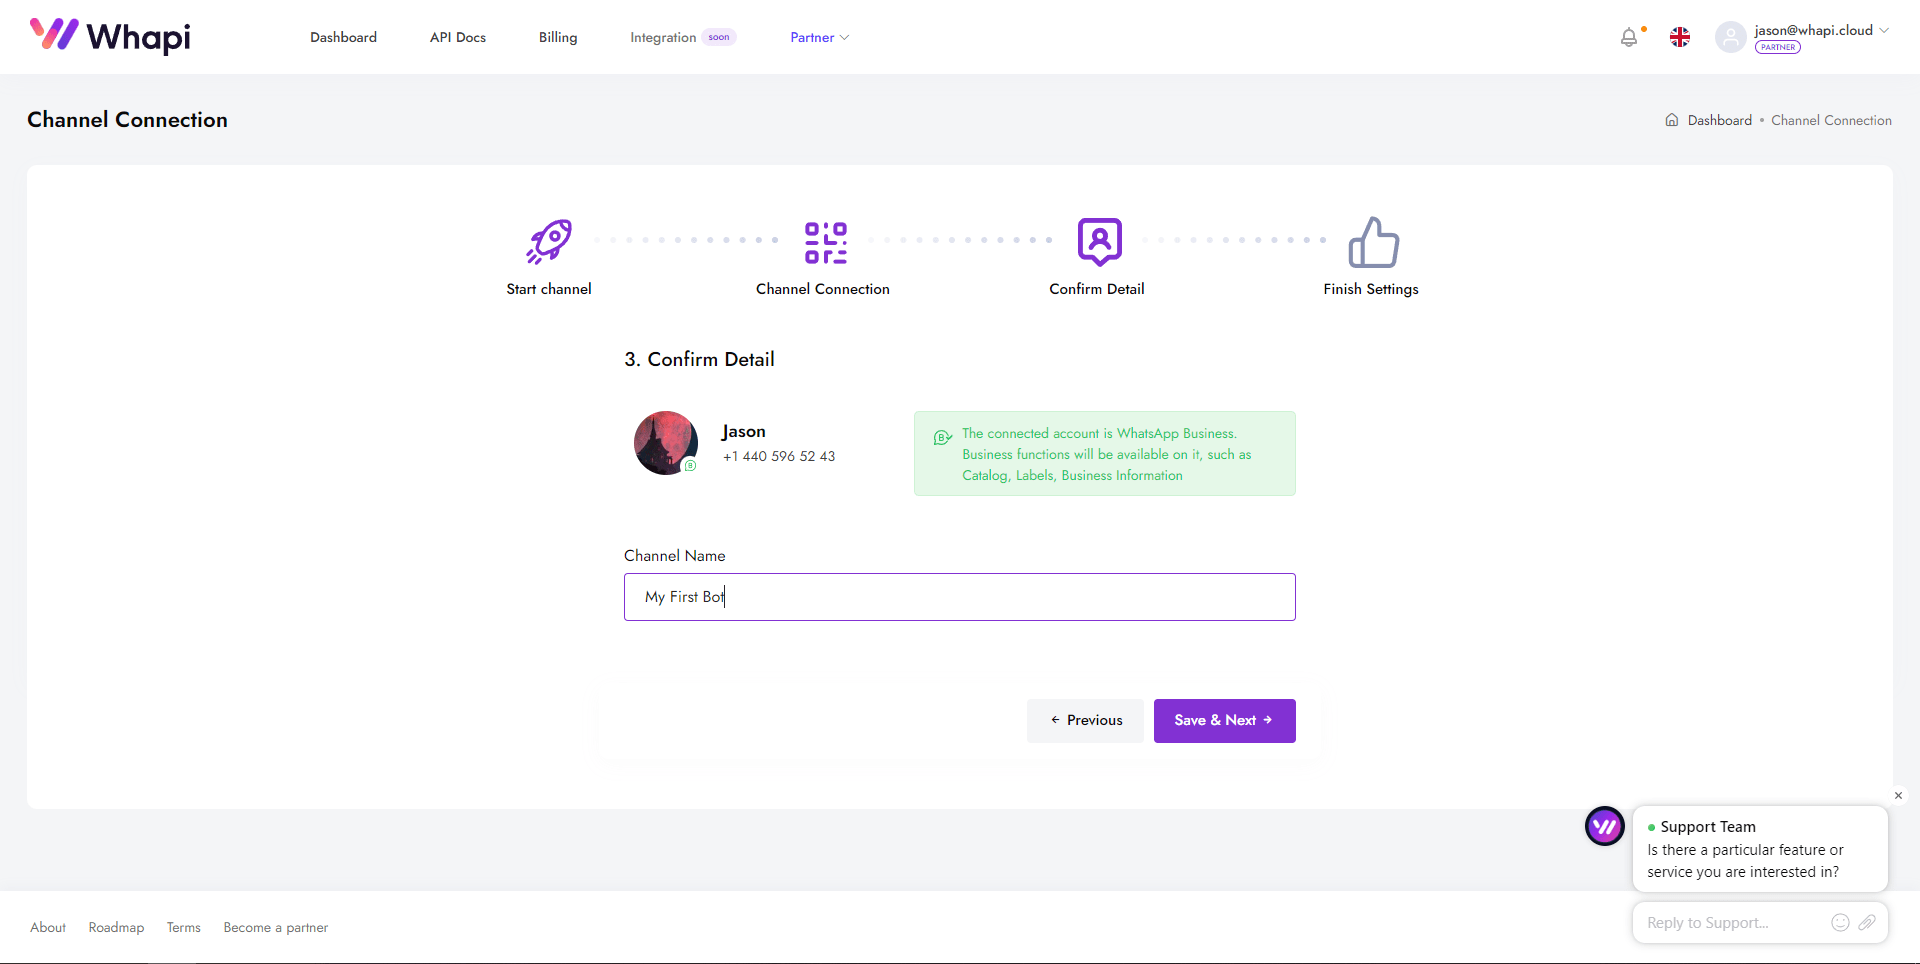
In the second and third steps, the service will ask you to customize the channel: write its name for your convenience, set webhooks, change settings. All these steps can be skipped, and we will come back to webhooks a little later. After launching, you will find in the center block under the information about limits, your API KEY, that is Token. This token will be used to authenticate your API requests. Generally, it's added to the request headers as a Bearer Token or simply as a request parameter, depending on the API method you're using.
Laying the WhatsApp Bot's Foundation
Initializing the Server with Express
Express is a minimal and flexible Node.js web application framework that provides a robust set of features for web and mobile applications. We'll use it to initialize our server.
Installation: If you haven't installed Express yet, you can do so with the following npm command.
npm install express --save
Initialize Your Server: Create a new file called index.js and initialize the Express server.
const express = require('express');
const app = express();
const port = 3000;

app.listen(port, () => {
  console.log(`Server running on http://localhost:${port}/`);
});
Basics of Asynchronous Programming in Node.js
Node.js is built on top of the V8 JavaScript engine, which is asynchronous and event-driven. Understanding the basics of asynchronous programming, such as callbacks, promises, and async/await, is essential for developing your bot.
async function fetchData() {
  const data = await getData();
  console.log(data);
}
With these foundations laid, we'll move on to the specifics of message handling in the next chapter.
Handling Incoming Messages
In this chapter, we will delve into the core part of any messaging bot - processing incoming messages. We'll cover how to set up a webhook, the basics of routing, and finally, the implementation of some elementary logic to respond to text messages.
Your WhatsApp bot and API gateway need to communicate so that when something changes in one system, the other system knows about it. For example, tracking changes in the status of messages such as "sent", "delivered" and "read".
This is where a webhook comes to the rescue! A specially configured webhook allows your server to be instantly aware of certain events. Depending on your settings, you can receive notifications about messages, their status, channel status and even missed calls.
ARTICLEBOTPHP.CONTENT.TEXT.9--1
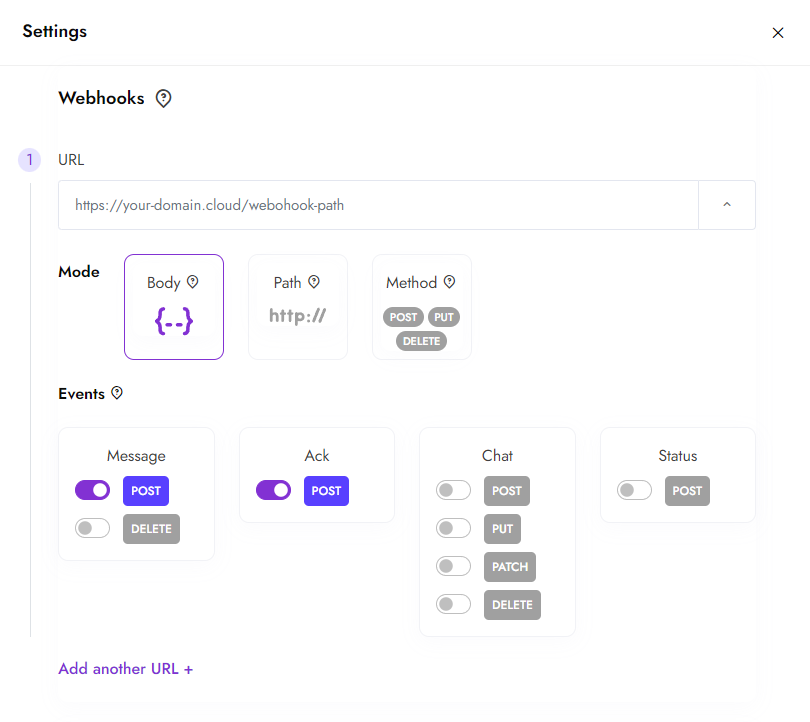
Whapi.Cloud provides the ability to set up a webhook for your bot. And it is possible to set up several Webhooks at once, for different events and with different conditions. This makes the work of programmers very easy.
Technically, upon receiving a message, the system will perform a POST request with a JSON body to the configured URL of your script. The JSON body will include all the information about the incoming message, such as text, sender's number, sending time, etc., allowing you to read this information on the fly.
Let's move on to setting up this URL!
Let's move on to setting up this URL!
Locally or on a Server
When developing a WhatsApp bot, you might want to test it locally before deploying it to a server. The simplest way to do this is to use tools like Ngrok, which creates a secure tunnel to your localhost, allowing you to provide access to your local server from the internet.
Let's take a test chatbot link from Ngrok right now. Download Ngrok from the official website and extract it. Open the terminal and navigate to the folder where Ngrok is stored.
Run ./ngrok http PORT_NUMBER, replacing PORT_NUMBER with the port your Express server is running on locally.
Now you should have a public URL that you can use as a URL for your webhook.
Copy this link into the config.js file:
botUrl: "https://84c7-151-33-282-113.ngrok-free.app/hook"
Run ./ngrok http PORT_NUMBER, replacing PORT_NUMBER with the port your Express server is running on locally.
Now you should have a public URL that you can use as a URL for your webhook.
Copy this link into the config.js file:
botUrl: "https://84c7-151-33-282-113.ngrok-free.app/hook"
Routing and Request Handling
For routing and request handling, we'll continue to use Express. The webhook URL that we provided in Whapi.Cloud will point to a specific route in our application.
const express = require('express');
const app = express();

app.use(express.json());

app.post('/webhook', (req, res) => {
  // Handle incoming messages
});

app.listen(3000, () => {
  console.log('Server started');
});
Finally, let's add some basic logic to reply based on incoming text messages. For the sake of simplicity, we'll use a basic if-else structure, although you can later extend this to something more sophisticated.
app.post('/webhook', async (req, res) => {
  const message = req.body.message.text;

  if (message === 'hello') {
    await sendMessage('Hi there!');
  } else if (message === 'help') {
    await sendMessage('How can I assist you today?');
  }

  res.sendStatus(200);
});
The sendMessage function will be a placeholder for now, which we'll replace in Chapter 6 with actual code to send messages.
Send WhatsApp message using Node JS
In this chapter, we will go through the nitty-gritty of sending text and media messages. Sending the right type of content at the right time can make your bot much more engaging. We will look at code snippets that will allow your bot to send text messages, media files, and even documents.
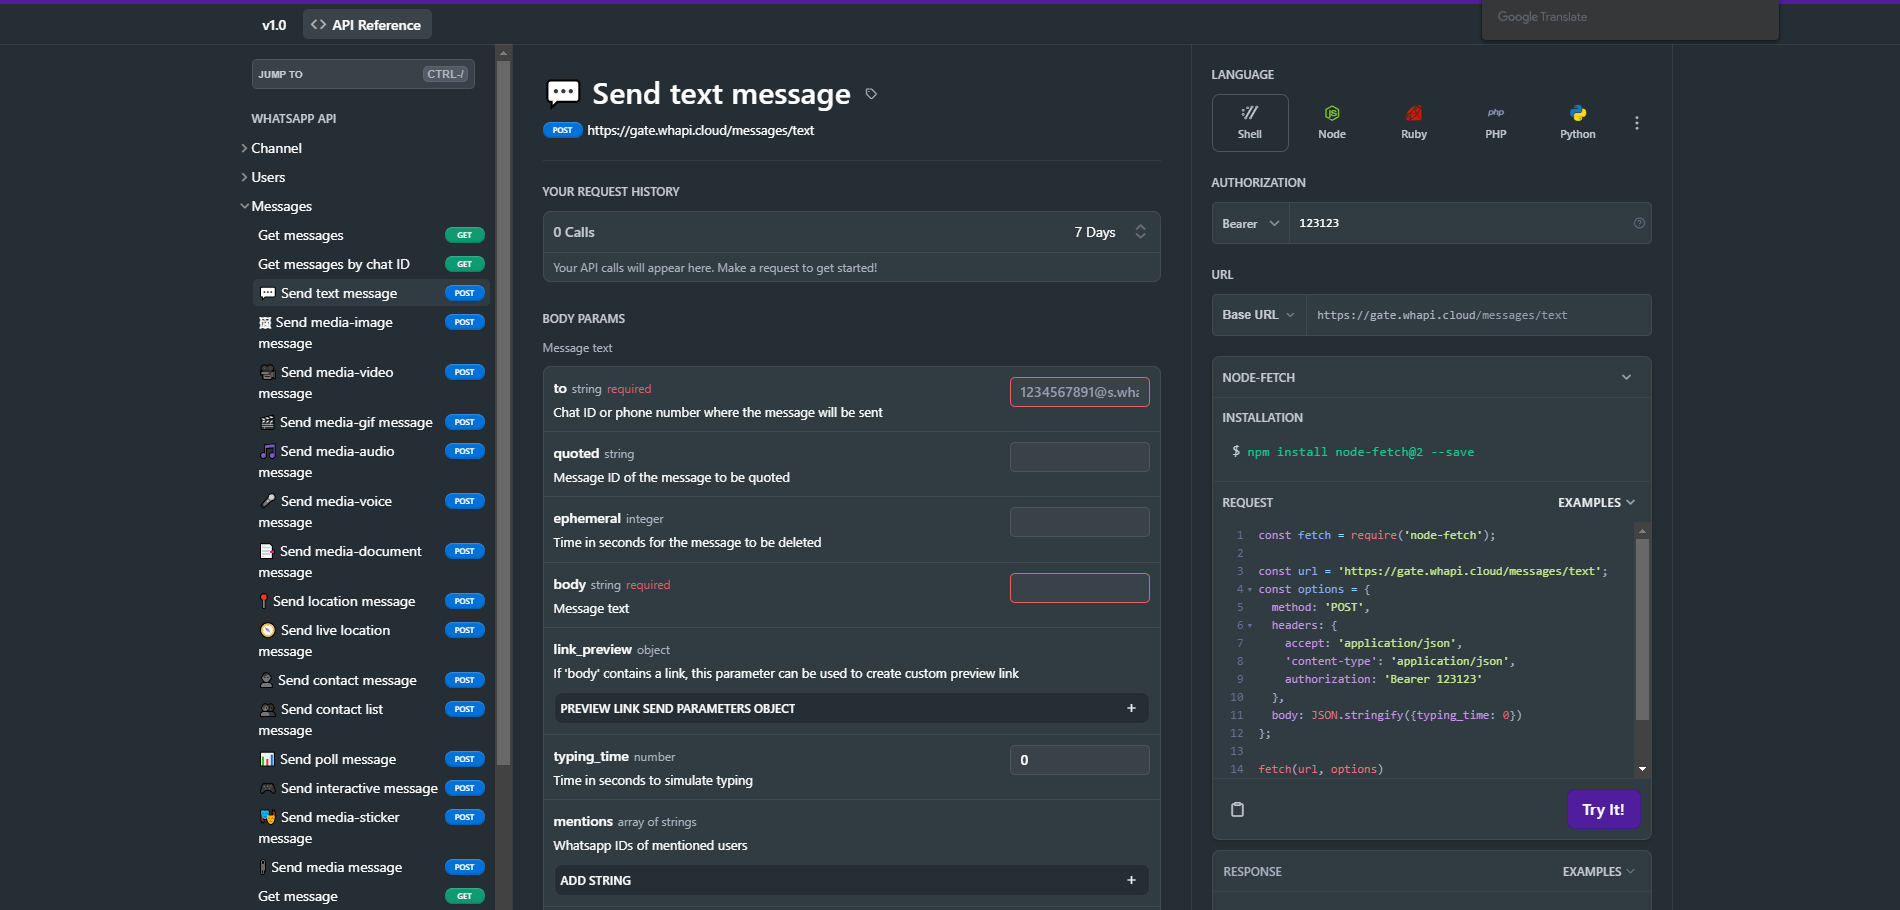
Sending Text Messages
Sending text messages is the most basic but essential feature. Below is a code snippet demonstrating how to send a text message using the Whapi.Cloud API.
const request = require('request');

const options = {
  method: 'POST',
  url: 'https://gate.whapi.cloud/messages/text?token=YOUR_API_TOKEN',
  headers: {accept: 'application/json', 'content-type': 'application/json'},
  body: {typing_time: 10, to: '[email protected]', body: 'Hello, world!'},
  json: true
};

request(options, function (error, response, body) {
  if (error) throw new Error(error);

  console.log(body);
});
Sending Multimedia, Documents
WhatsApp allows the sending of various types of media - images, audio, videos. You can submit a file by URL, or by uploading it to our storage. You can also send document files, such as PDFs or text files. Below is an example using a base64 encoded file.
const request = require('request');

const options = {
  method: 'POST',
  url: 'https://gate.whapi.cloud/messages/document?token=YOUR_API_TOKEN',
  headers: {accept: 'application/json', 'content-type': 'application/json'},
  body: {
    to: '[email protected]',
    media: 'data:application/octet-stream;name=site.webmanifest;base64,ewogICAgIm5hbWUiOiAiIiwKICAgICJzaG9ydF9uYW1lIjogIiIsCiAgICAiaWNvbnMiOiBbCiAgICAgICAgewogICAgICAgICAgICAic3JjIjogIi9hbmRyb2lkLWNocm9tZS0xOTJ4MTkyLnBuZyIsCiAgICAgICAgICAgICJzaXplcyI6ICIxOTJ4MTkyIiwKICAgICAgICAgICAgInR5cGUiOiAiaW1hZ2UvcG5nIgogICAgICAgIH0KICAgIF0sCiAgICAidGhlbWVfY29sb3IiOiAiI2ZmZmZmZiIsCiAgICAiYmFja2dyb3VuZF9jb2xvciI6ICIjZmZmZmZmIiwKICAgICJkaXNwbGF5IjogInN0YW5kYWxvbmUiCn0K'
  },
  json: true
};

request(options, function (error, response, body) {
  if (error) throw new Error(error);

  console.log(body);
});
Below, at the end of the article, we will publish the source code of the bot, which you can copy for your own work.
Working with WhatsApp Groups using Node.JS
In this chapter, we will explore how to interact with WhatsApp groups using the Whapi.Cloud API. Specifically, we will look at how to get the list of all groups, count the number of participants in each group, and handle messages coming from groups.
Getting the List of Groups
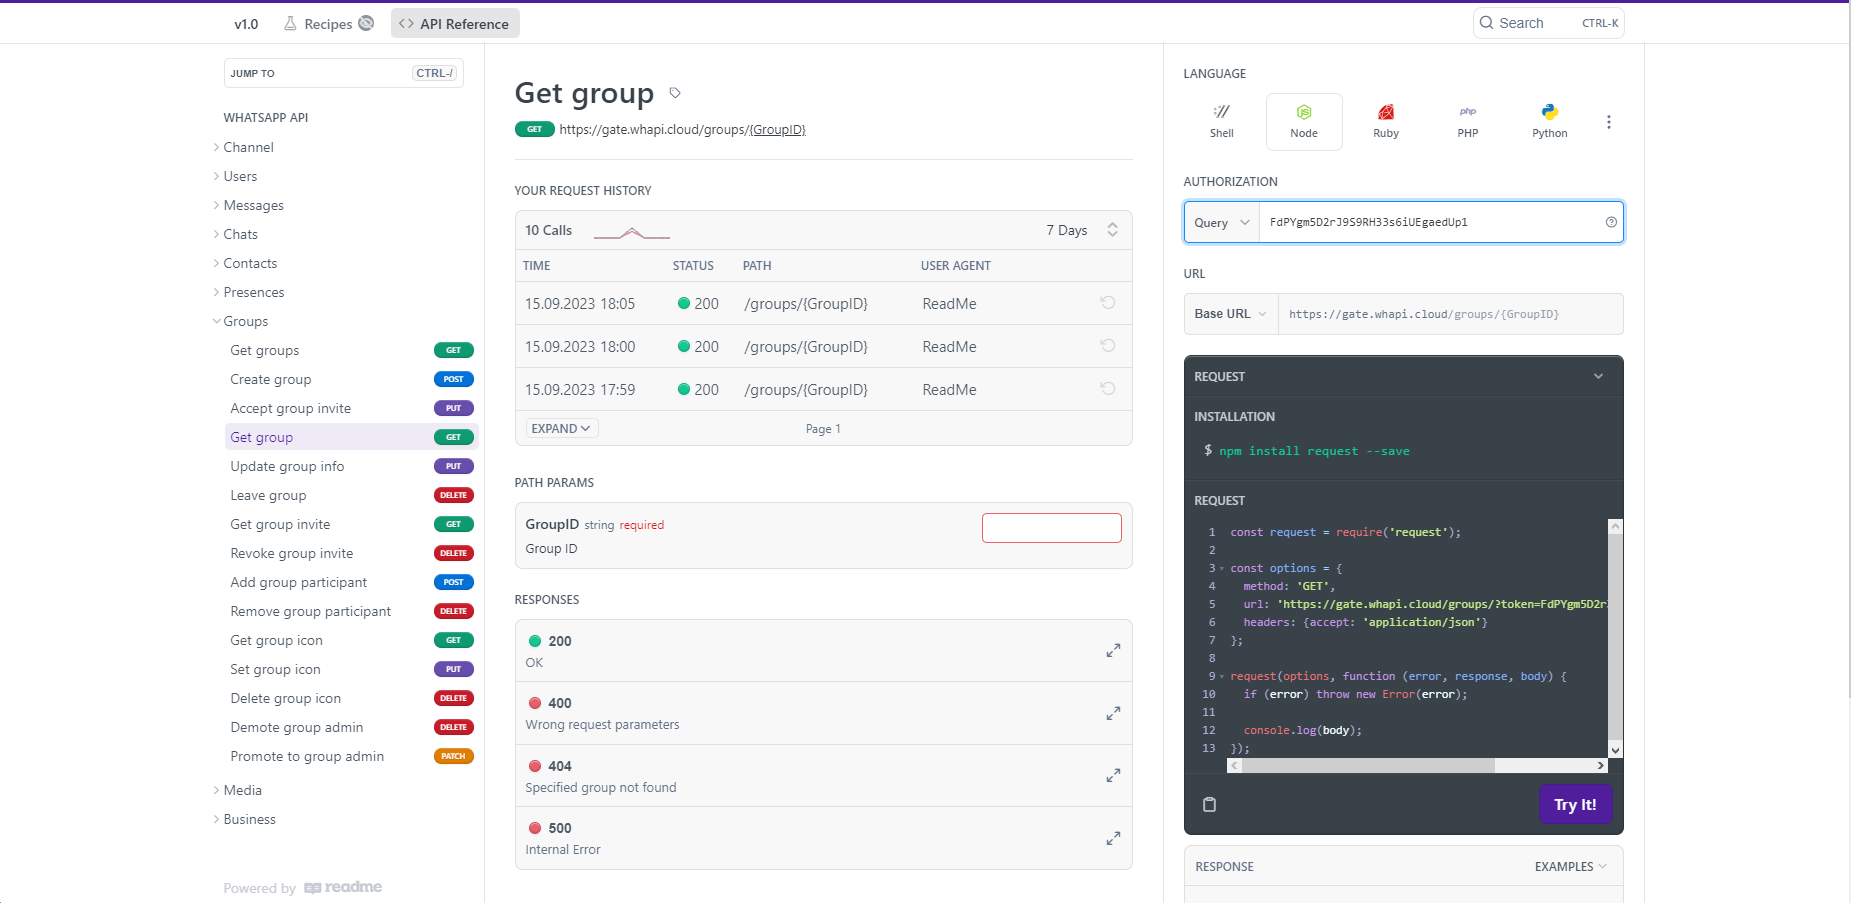
Firstly, to get the list of all the groups you are a part of, you can use the following code snippet:
const request = require('request');

const options = {
  method: 'GET',
  url: 'https://gate.whapi.cloud/groups?token=YOUR_API_TOKEN',
  headers: {accept: 'application/json'}
};

request(options, function (error, response, body) {
  if (error) throw new Error(error);

  console.log(body);
});
The response will include an array of group details such as name, chat picture, last message, name of the owner, description, participants, and more.
Counting the Number of Participants in WhatsApp Group
Now that we have group details, we can go ahead and count the number of participants in each group. The following code snippet demonstrates this. In this code snippet, we loop through each group and log the group name and the number of participants it contains. The participants field is an array of objects, and we can get its length to count the number of participants.
request(options, function (error, response, body) {
  if (error) throw new Error(error);

  const groups = JSON.parse(body);
  groups.forEach(group => {
    console.log(`Group Name: ${group.name}`);
    console.log(`Number of Participants: ${group.participants.length}`);
  });
});
Handling Group Messages
To handle messages coming from groups, you can modify your webhook handler like so:
app.post('/webhook', (req, res) => {
  const message = req.body;

  if (message.from.endsWith('@g.us')) {
    // This is a group message
    handleGroupMessage(message);
  } else if (message.type === 'text') {
    // Handle Text Messages
    sendTextMessage(message.from, 'You said: ' + message.body);
  }

  res.status(200).end();
});

function handleGroupMessage(message) {
  console.log(`Received a group message from ${message.from}: ${message.body}`);
  // Further logic for group messages can be implemented here.
}
In the updated webhook, we check whether the message.from field ends with @g.us, which is a typical identifier for group messages in WhatsApp. If it does, we call the handleGroupMessage function to handle the message.
And there you have it! You now have a basic understanding of how to work with groups in WhatsApp using Whapi.Cloud. From here, you can extend the functionality as per your needs.
Troubleshooting
Various issues can arise during the testing and operation of the WhatsApp chatbot. Here are a few typical situations and recommendations for their resolution:
The Bot Does Not Respond to Incoming Messages
- Ensure you are sending messages to the number on which the bot is running from a different phone. The bot will not be able to respond to messages sent from the same number.
- If the bot does not respond to messages from other numbers, check the operation of webhooks. Use services to simulate webhooks, for example, Webhook.site, to ensure which path the callback requests are coming through. Afterwards, check if the path matches the one you have configured. Also, ensure your server responds with 200Ok.
If you encounter difficulties, do not hesitate to contact our technical support for help. You can write in the web chat widget on our site or email [email protected]. We will assist you and figure out exactly what's wrong with the webhook.
The Bot Sends Messages Non-Stop
Return to the original version of the code. Our script includes a check to determine whether a message is incoming or outgoing, to prevent getting into an infinite loop of sending messages. Infinite sending may occur if there is no check for outgoing messages in the code, causing the bot to call itself, or if there is a cyclic sending of messages in the code.
The Bot Works in Some Chats, But Not in Others
Check your tariff plan on Whapi.Cloud. If you are using the trial mode or the "Sandbox" tariff, interaction is limited to a certain number of chats per month (currently up to 5 chats). In such a case, the bot will not be able to process messages in the sixth chat and subsequent ones.
It's important to remember that many issues can be prevented by carefully checking your chatbot's configuration and logic before launching. Regularly updating your code and paying attention to the details of settings can help avoid most typical errors. And our support team is always in touch and ready to assist you!
Deployment and Using Servers
To ensure your WhatsApp chatbot is available 24/7, it needs to be hosted on a reliable hosting platform. You can use your server, but in this chapter, we will consider the three most popular platforms - Firebase, AWS, and Heroku - and go through the basic steps of deploying your bot on each of them.
The choice of platform depends on your preferences, budget, and project requirements. Each of the considered platforms offers its unique features and advantages. Firebase and AWS Lambda provide powerful backend functionality without the need to manage a server, while Heroku offers simplicity in deploying applications based on Git.
Firebase
Firebase offers Cloud Functions functionality, allowing you to run your bot without worrying about server infrastructure. In our opinion, this is the most optimal option.
- Create a project in Firebase Console;
- Install Firebase CLI, following the instructions;
- Initialize Firebase in your project directory with the command firebase init;
- Deploy your bot using the command firebase deploy --only functions.
AWS (Amazon Web Services)
AWS Lambda offers the ability to run code in response to triggers from other AWS services, making it a good choice for a bot.
- Register or log in to AWS Management Console;
- Create a new Lambda function through the AWS console, selecting API Gateway as the trigger;
- Upload your bot's code into the Lambda function;
- Configure the API Gateway to interact with your bot and the outside world.
Heroku
Heroku offers an easy-to-use platform for hosting applications, which can automatically deploy code from your Git repository.
- Create an account on Heroku;
- Install Heroku CLI and log in;
- Create a new Heroku app through the console or using the command heroku create;
- Link your Git repository to Heroku and perform deployment with the commands git push heroku master;
- Set the webhook URL provided by Heroku.
Source code of ready-made simple WhatsApp bot Node.JS
Here is an example of a complete code to create a simple WhatsApp bot using Node.js and Express. This code includes server initialization, handling incoming messages via webhook and sending text and media messages. First, let's create config.js to store the configuration settings.
module.exports = {
    // API endpoint URL
    apiUrl: "https://gate.whapi.cloud",
    // API token from your channel
    token: "YOUR CHANNEL TOKEN",
// The ID of the group to which we will send the message. Use to find out the ID: https://whapi.readme.io/reference/getgroups
    group: '[email protected]',
// The ID of the product we will send for the example. Create a product in your WhatsApp and find out the product ID: https://whapi.readme.io/reference/getproducts
    product: '6559353560856703',
    // Bot`s URL (for static file). Webhook Link to your server. At ( {server link}/hook ), when POST is requested, processing occurs
    botUrl: "https://yoursite.com/hook",
    // Bot's Port (for hook handler). Don't use 443 port.
    port: "80"
}
Let me remind you that the entire source code of this project can be downloaded from GitHub: https://github.com/Whapi-Cloud/nodejs-whatsapp-chatbot
const express = require('express');
const bodyParser = require('body-parser');
const fs = require('fs');
const fetch = require('node-fetch');
const FormData = require('form-data');
const config = require('./config.js');

process.on('unhandledRejection', err => {
    console.log(err)
});

const COMMANDS = {  // bot commands
    TEXT: 'Simple text message',
    IMAGE: 'Send image',
    DOCUMENT: 'Send document',
    VIDEO: 'Send video',
    CONTACT: 'Send contact',
    PRODUCT: 'Send product',
    GROUP_CREATE: 'Create group',
    GROUP_TEXT: 'Simple text message for the group',
    GROUPS_IDS: 'Get the id\'s of your three groups'
}

const FILES = { // file path
    IMAGE: './files/file_example_JPG_100kB.jpg',
    DOCUMENT: './files/file-example_PDF_500_kB.pdf',
    VIDEO: './files/file_example_MP4_480_1_5MG.mp4',
    VCARD: './files/sample-vcard.txt'
}

async function sendWhapiRequest(endpoint, params= {}, method = 'POST') { // send request to endpoint with params, with POST by default
    let options = {
        method: method,
        headers: {
            Authorization: `Bearer ${config.token}`
        },
    };
    if (!params.media) options.headers['Content-Type'] = 'application/json'; // if in params media is null - set json in headers
    let url = `${config.apiUrl}/${endpoint}`;
    if(params && Object.keys(params).length > 0) {
        if(method === 'GET')
            url += '?' + new URLSearchParams(params); // if GET method set in params, then params move to query
        else
            options.body = params?.media ? toFormData(params) : JSON.stringify(params); // if in params media - transform to formData, else - json
    }
    const response = await fetch(url, options); // send request
    let json = await response.json();
    console.log('Whapi response:', JSON.stringify(json, null, 2));
    return json;
}

/**
 * Convert object to FormData
 * @param obj
 * @returns {FormData}
 */
function toFormData(obj) {
    const form = new FormData();
    for (let key in obj) {
        form.append(key, obj[key]);
    }
    return form;
}

async function setHook() {  // request for set hook and recieve messages
    if (config.botUrl) {
        /** type {import('./whapi').Settings} */
        const settings = {
            webhooks: [
                {
                    url: config.botUrl,
                    events: [
                        // default event for getting messages
                        {type: "messages", method: "post"}
                    ],
                    mode: "method"
                }
            ]
        }
        await sendWhapiRequest('settings', settings, 'PATCH');
    }
}

async function handleNewMessages(req, res){ // handle messages
    try {
        /** type {import('./whapi').Message[]} */
        const messages = req?.body?.messages;
        for (let message of messages) {
            if (message.from_me) continue;
            /** type {import('./whapi').Sender} */
            const sender = {
                to: message.chat_id
            }
            let endpoint = 'messages/text';
            const command = Object.keys(COMMANDS)[+message.text?.body?.trim() - 1];

            switch (command) { // depending on the command, perform an action
                case 'TEXT': {
                    sender.body = 'Simple text message';
                    break;
                }
                case 'IMAGE': {
                    sender.caption = 'Text under the photo.';
                    sender.media = fs.createReadStream(FILES.IMAGE); // read file
                    endpoint = 'messages/image';
                    break;
                }
                case 'DOCUMENT': {
                    sender.caption = 'Text under the document.';
                    sender.media = fs.createReadStream(FILES.DOCUMENT);
                    endpoint = 'messages/document';
                    break;
                }
                case 'VIDEO': {
                    sender.caption = 'Text under the video.';
                    sender.media = fs.createReadStream(FILES.VIDEO);
                    endpoint = 'messages/video';
                    break;
                }
                case 'CONTACT': {
                    sender.name = 'Whapi Test';
                    sender.vcard = fs.readFileSync(FILES.VCARD).toString();
                    endpoint = 'messages/contact';
                    break;
                }
                case 'PRODUCT': {
                    /* you can get real product id using endpoint  https://whapi.readme.io/reference/getproducts */
                    endpoint = `business/products/${config.product}`;
                    break;
                }
                case 'GROUP_CREATE': {
                    /* Warning : you can create group only with contacts from phone contact list */
                    const res = await sendWhapiRequest(`groups`, {subject: 'Whapi.Cloud Test', participants: [message.chat_id.split('@')[0]]});
                    sender.body = res.group_id ? `Group created. Group id: ${res.group_id}` : 'Error';
                    break;
                }
                case 'GROUP_TEXT': {
                    /*To get group id, use /groups endpoint */
                    sender.to = config.group;
                    sender.body = 'Simple text message for the group';
                    break;
                }
                case 'GROUPS_IDS': { // get groups
                    const {groups} = await sendWhapiRequest('groups', {count: 3}, 'GET');
                    sender.body = groups && groups.reduce((prevVal, currVal, i) => {
                        return i === 0 ? `${currVal.id} - ${currVal.name}` : prevVal + ',\n ' + `${currVal.id} - ${currVal.name}`;
                    }, '') || 'No groups';
                    break;
                }
                default: {  // if command not found - set text message with commands
                    sender.body = 'Hi. Send me a number from the list. Don\'t forget to change the actual data in the code!  \n\n' +
                        Object.values(COMMANDS).map((text, i) => `${i + 1}. ${text}`).join('\n');
                }
            }
            await sendWhapiRequest(endpoint, sender); // send request
        }
        res.send('Ok');
    } catch (e) {
        res.send(e.message);
    }
}

// Create a new instance of express
const app = express();
app.use(bodyParser.json());

app.get('/', function (req, res) {
    res.send('Bot is running');
});

app.post('/hook/messages', handleNewMessages); // route for get messages

setHook().then(() => {
    const port = config.port || (config.botUrl.indexOf('https:') === 0 ? 443 : 80) // if port not set - set port 443 (if https) or 80 (if http)
    app.listen(port, function () {
        console.log(`Listening on port ${port}...`);
    });
});
In this code sample:
- We initialize the server with Express and install a webhook to handle incoming messages.
- When a text message is received, the bot responds by repeating the received text.
- To send messages, we use the sendTextMessage and sendImageMessage functions.
Please replace YOUR_API_TOKEN with your real API token from Whapi.Cloud. This code is a basic example and can be augmented with other functions and handlers to create more complex and interactive bots.
Expanding Functionality
After successfully launching and testing your WhatsApp chatbot, there are numerous ways to further expand its functionality to make the bot even more useful and interactive for users. Here are some common use cases:
- Sending files via link. Sending a media file via a link is very simple. The main condition is that the file itself must be directly accessible via the link (which is why Cloud services like Google Drive or Dropbox do not work as they do not provide direct file access). Use the media parameter in any of the methods that allow sending media files. Read more in our article: Endpoint for sending a media file.
- Distributing leads among groups. You will need the group creation function, as well as adding a participant to the group. Adding a participant to a group is straightforward, but there are some nuances. We described in detail in the article: "Adding a new member to a group"
- CRM Integration.
Technically, CRM integration is not much different from a chatbot, except that it adds an additional resource with its own API that needs to be utilized. Add functions that allow users to book services, order products, or receive up-to-date information from external sources in real time.
- Surveys as an alternative to buttons.
Interactive buttons in WhatsApp are a very convenient tool for customer engagement. However, this feature is not available to most WhatsApp users. We advocate for making communication with users easier, so we offer you a convenient alternative - using surveys as buttons. Detailed article with NodeJS source code and how to use it.
- Increasing customer engagement.
Use stories, change your number statuses, put likes and other emojis on your customers' messages, send voice messages - increase engagement in customer service.
- Checking for WhatsApp availability on a number.
Check whether a given phone number exists on WhatsApp or not. Determine which phone numbers are active and which cannot receive WhatsApp messages. Integrate into your application before making a broadcast! Source code on GitHub and instructions here.
We provide comprehensive support to our clients! If you have any questions about bot operation, platform setup, or encounter technical difficulties, you can always count on our help.
We hope this guide will help you successfully launch your WhatsApp chatbot. Good luck in your endeavors!