WhatsApp Automation with Python
WhatsApp has long ceased to be just a messenger - it has become a vital tool for business. Automating client communication via chatbots and integrating messenger into CRMs unlocks new opportunities for efficiency and better service. Python is an excellent choice for this task due to its flexibility and accessibility, while Whapi.Cloud provides easy access to the API with excellent support, always ready to assist.
In this guide, we will cover:
- How to work with WhatsApp API using Python;
- Integration with Whapi.Cloud for automating various tasks;
- Using webhooks to handle and auto-respond to messages;
- Connecting your WhatsApp bot to ChatGPT for AI-powered conversations;
The purpose of this article is to demonstrate step-by-step how to create a simple yet useful WhatsApp chatbot in Python. If you have any questions or difficulties, feel free to contact us through our chat widget on the website - we’ll respond promptly! For more advanced topics, explore additional resources on our “How to Create a WhatsApp Bot” page.
To make your work easier, you can use our ready-made Python bot scripts published on GitHub. These projects provide detailed setup and testing instructions, and the code contains useful comments. It’s an excellent starting point for beginner developers.
To make your work easier, you can use our ready-made Python bot scripts published on GitHub. These projects provide detailed setup and testing instructions, and the code contains useful comments. It’s an excellent starting point for beginner developers.
Getting Ready to Develop a Bot
Before getting started, make sure you have everything you need:
- Python. Install Python if you haven’t already. Download the latest version (3.6 or above recommended) from the official site and follow the installation instructions.
- Flask. Flask is a lightweight Python web framework that we’ll use to set up a server and handle webhooks. Install Flask using the command: pip install Flask.
- API Token. Register on Whapi.Cloud to get an API token. This token allows your bot to interact with messenger through the API. After registration, you’ll receive a free channel with limited features, sufficient for testing your development. Whapi.Cloud stands out for its stability, low cost, and wide range of features. We’ll provide instructions on obtaining the token below.
- Configured Webhook. To enable your bot to process incoming updates and events from WhatsApp, you’ll need a server URL (local or external) to handle notifications from messenger. This article will explain in detail how to set it up and where to get such a link.
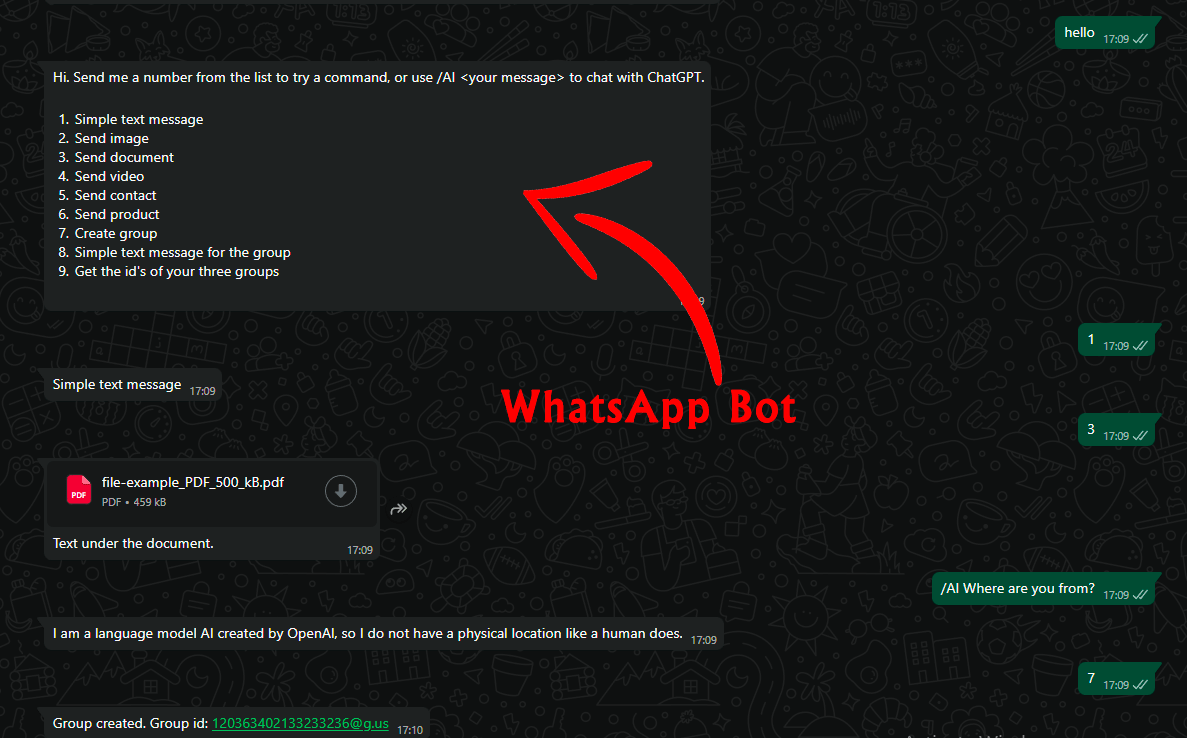
On GitHub, you will find several repositories with different bots. One of them is considered ideal for beginner programmers as it has very simple but understandable functionality-sending text messages and images in response to commands. Another bot version is suitable for more advanced users, as it includes more features: Sending plain messages, images, files, videos, contacts (vCard), products, creating new WhatsApp groups, sending invitations, and sending messages to groups.
If you want to learn more about the differences between WhatsApp Business API and WhatsApp API or are unsure about which provider to choose, we recommend reading our article "How to Choose WhatsApp API: Comparing Solutions and Providers". It will help you make an informed choice and avoid future issues or unnecessary expenses.
Obtaining an API Token
Registration and Connecting a Number
If you haven’t registered on the Whapi.Cloud platform yet, do so right now. Registration is simple, doesn’t require credit card information, and grants you 5 days of full API access with minor limitations. This is more than enough to test all methods and functions and set up your bot or integration.
The next step is to connect a number. There’s no need to go through moderation or number migration steps. Connect any number you already use in your WhatsApp application. Your chatbot will continue working even if the phone is offline, so there’s no need to keep the device active constantly.
To connect a number:
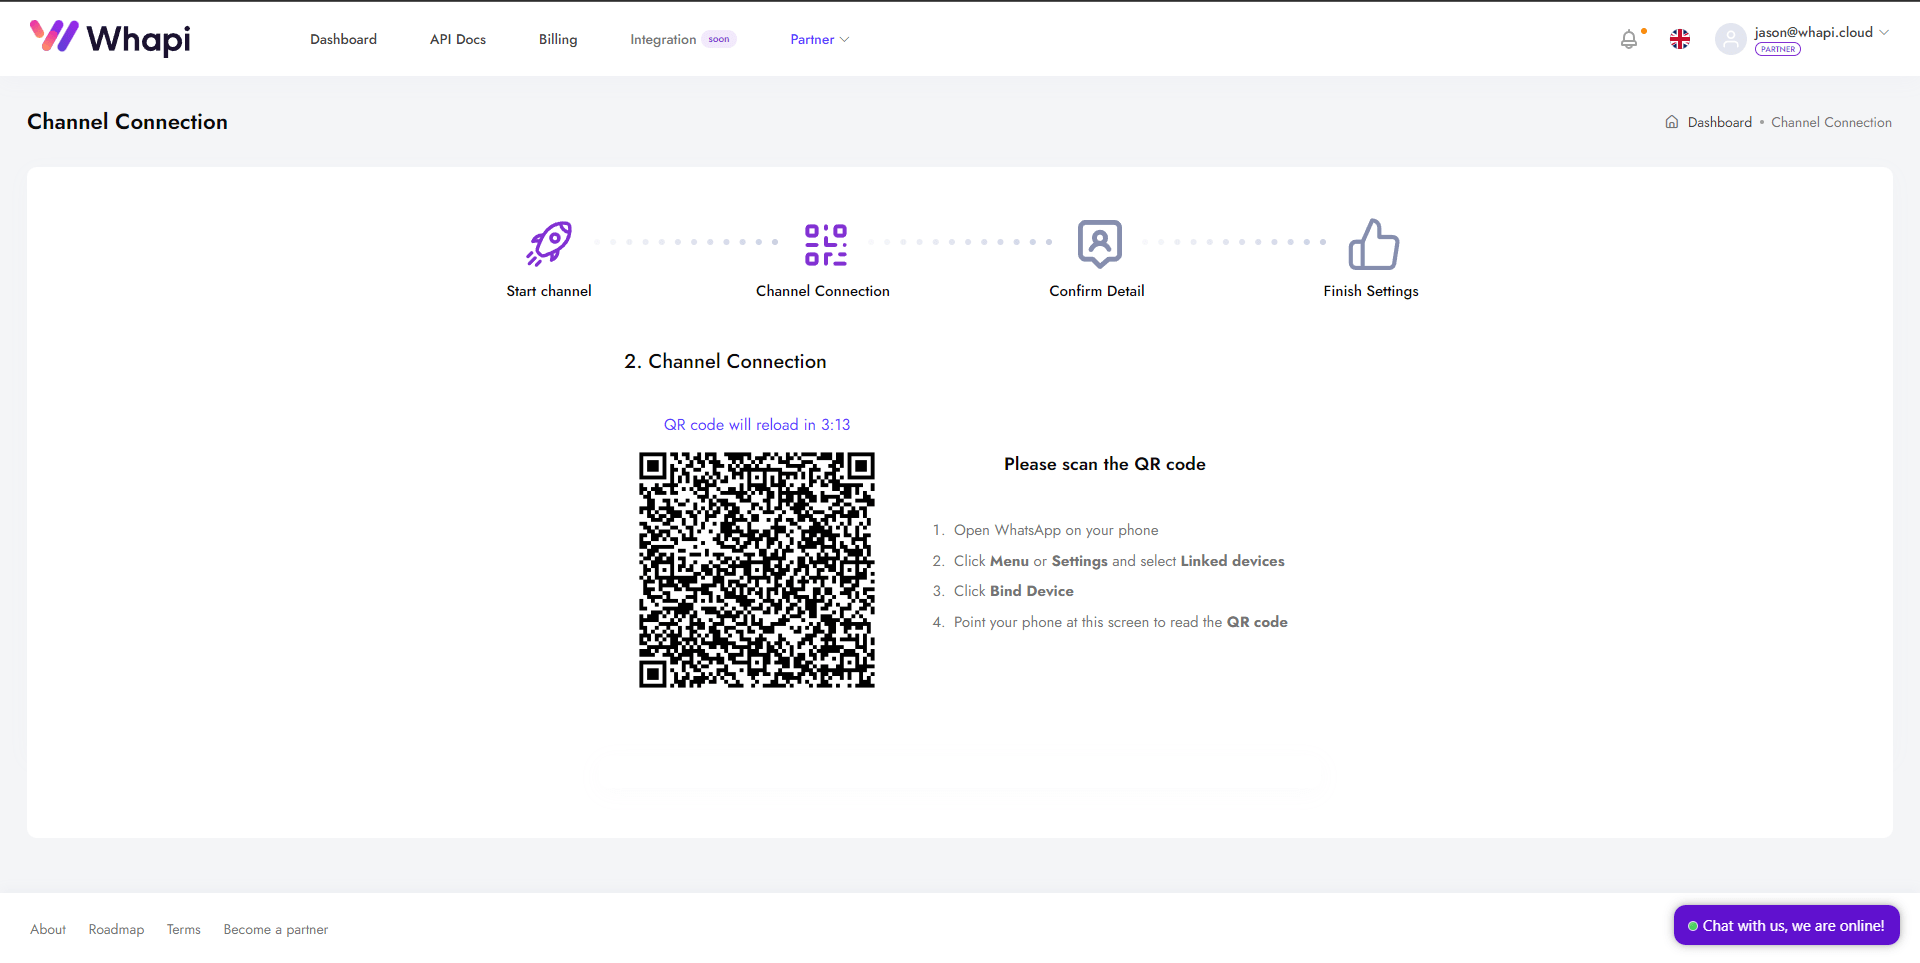
- 1. Go to the dashboard and open the Default Channel page that’s already created for you.
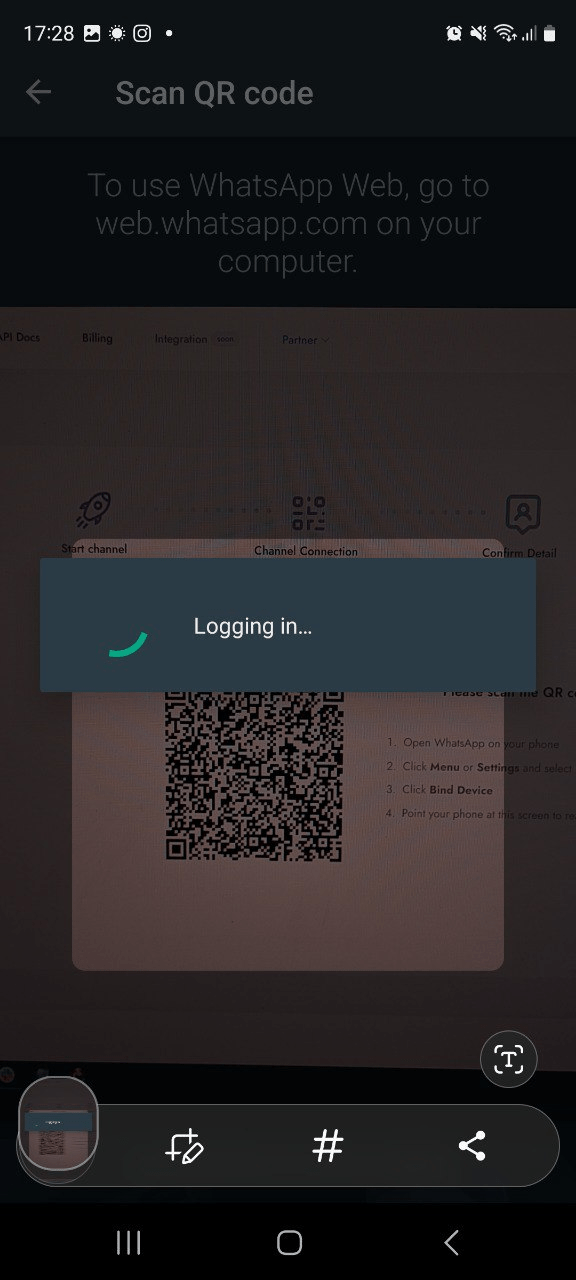
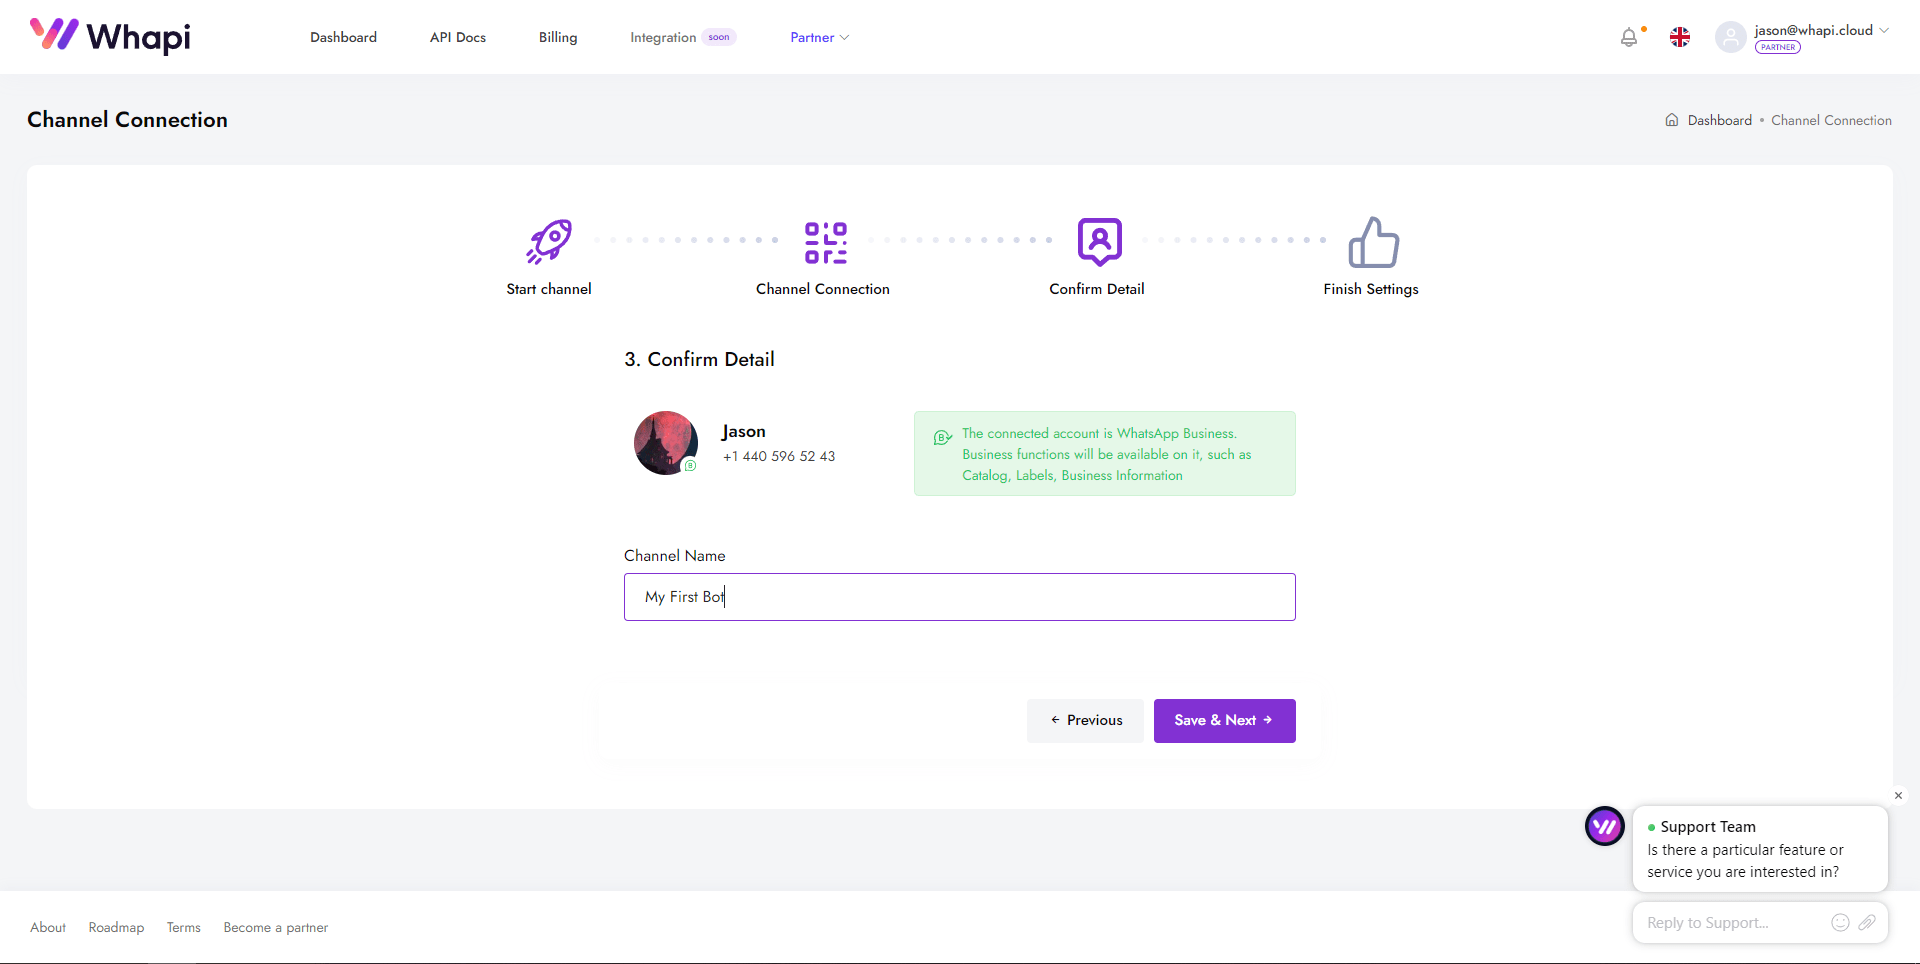
- 2. At the first step, you’ll see a QR code with instructions.
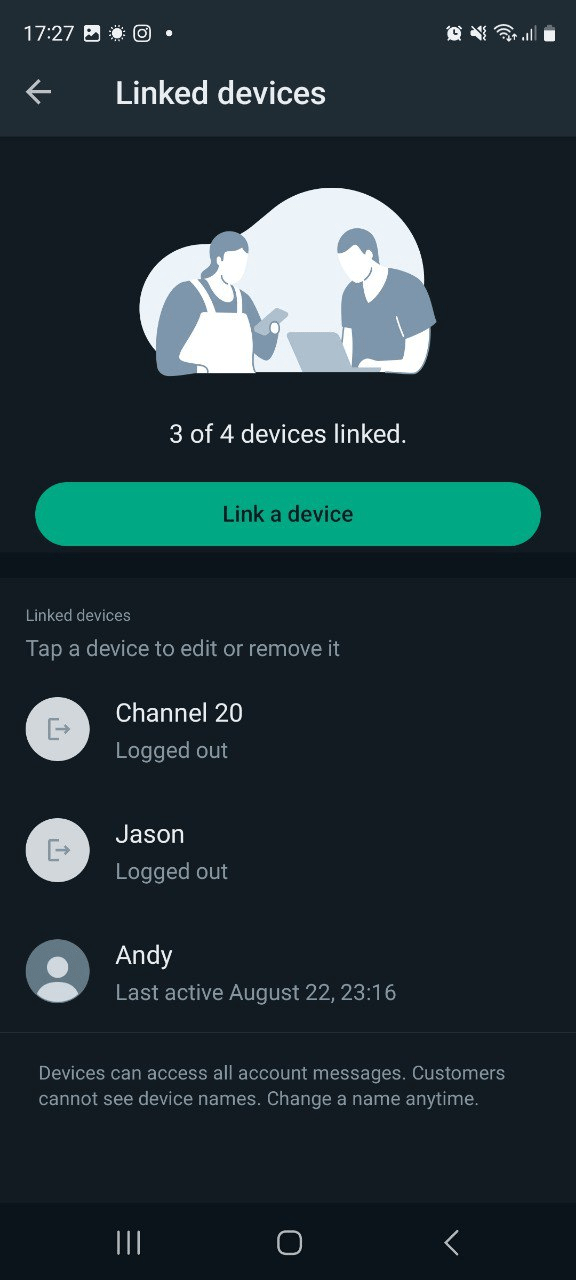
- 3. Open WhatsApp on your device, go to Settings → Linked Devices → Link a Device → Scan QR Code.
- 4. After successful connection, name the channel (e.g., "My Chatbot") for easier management in the future.
Next, you’ll see the settings window, but it’s not required now - you can skip this step, and we’ll return to it later.
Getting an API Token
On the connected channel page, you’ll find your unique API token in the center. This token is critical for authenticating requests. It’s passed in request headers as a Bearer Token or as a parameter, depending on the method.
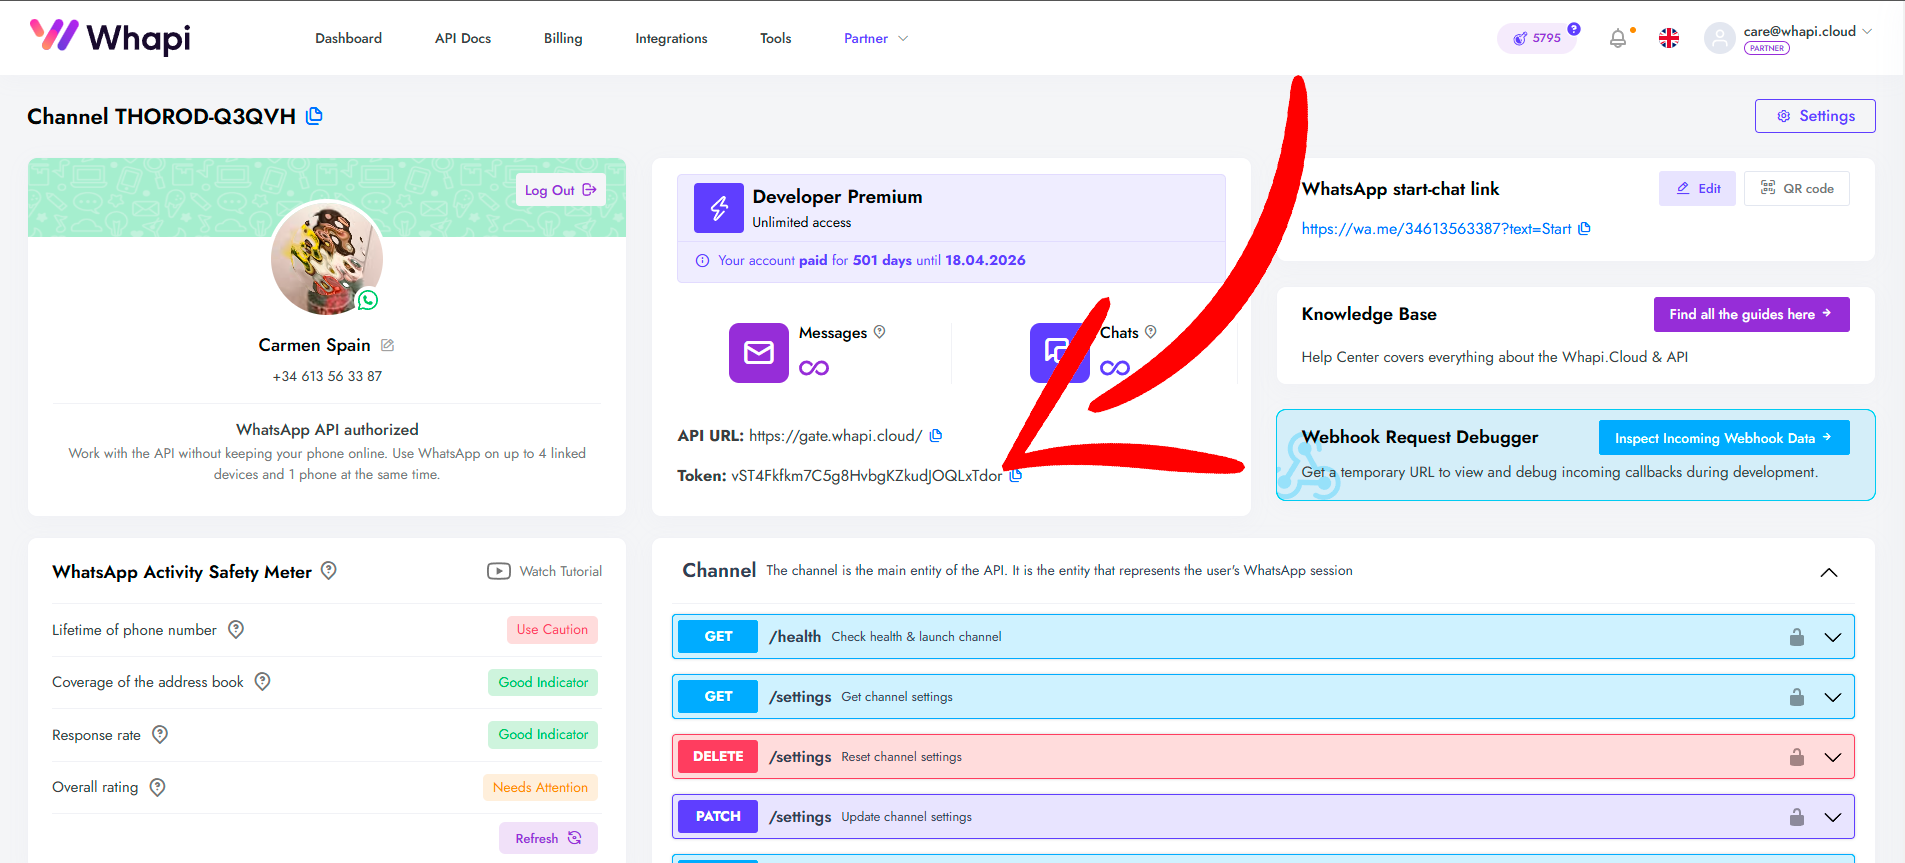 Your API Key
Tools for Working with the API
Whapi.Cloud offers several ways to access API documentation:
- User-Friendly Developer Hub: A specialized platform with documentation and examples provides code snippets for all endpoints in various programming languages.
- Postman Collection: Ready-made requests for testing the API through Postman.
- Swagger File: A detailed description of all API methods, with testing capabilities directly from the channel page.
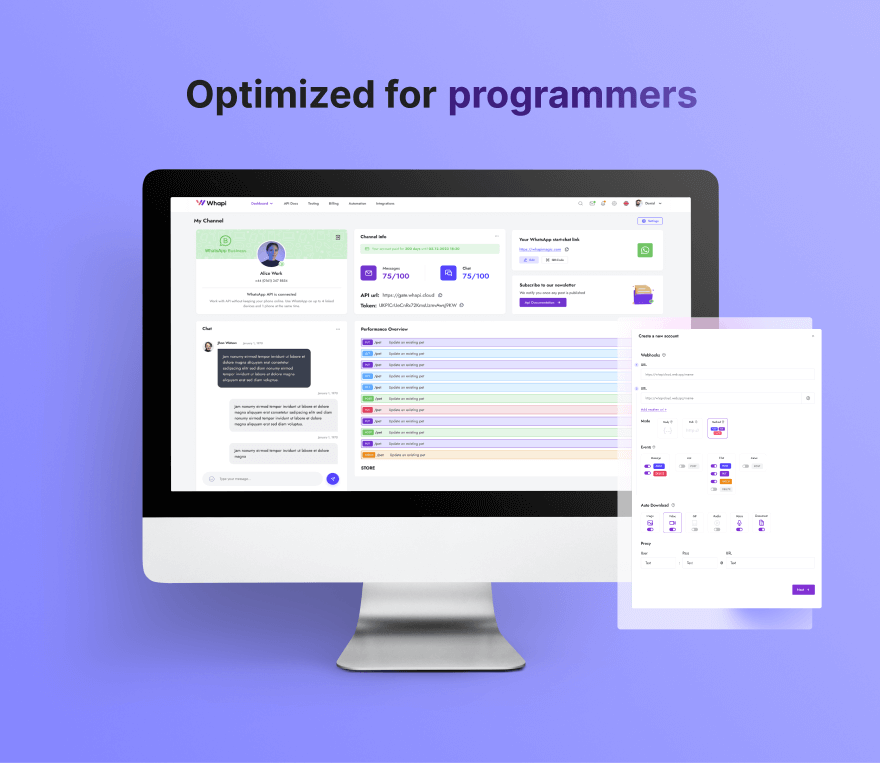
These tools help developers of any level quickly understand the Toolkit features and start integration. One of Whapi.Cloud’s key advantages is the ease of setup: you can start working with the API in just a few minutes.
What is a Webhook and How to Set It Up?
To enable full interaction between your bot and our gateway, you need to set up a webhook. This ensures data exchange between systems: your bot will promptly receive incoming texts, message status updates (e.g., "sent," "delivered," "read"), or notifications about other events.
What is a Webhook?
A webhook is an HTTP callback that sends data from our server to your server when a specific event occurs on WhatsApp. For example, as soon as your client sends a message, your server automatically receives a notification about the incoming message.
The main benefits of webhooks:
- Instant notifications. All events are processed almost in real-time.
- High throughput. Notification speed is only limited by your server's performance.
- Flexibility. You can receive only the events you truly need, such as: Personal and Group messages; Message status changes; Group participant changes; Missed call notifications; Channel statuses, and much more.
Whapi.Cloud provides you with a convenient tool for configuring webhooks, allowing you to flexibly manage notifications in the format you need and tailor them to your tasks.
How and Where to Get a Webhook URL?
To ensure your integration or bot can receive and process information from messenger in real-time, you'll need a server URL where the bot script will be hosted to accept the data. If you're unsure where to get such an address, we’ve prepared a detailed guide: "Where to find the Webhook URL?". The article explains in detail how to set up a local server or choose an external hosting. Below, we’ll cover a simple and quick way to get such a link using Ngrok.
Technically, when a message is received on your WhatsApp, our server will send a POST request with a JSON body to your script’s URL. The JSON body will include all information about the incoming message, such as text, sender number, sending time, etc., allowing you to process this information in real-time.
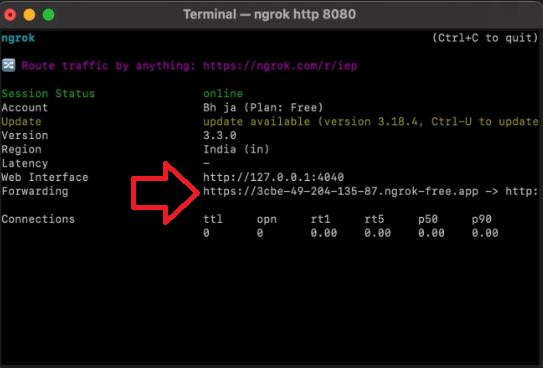
The simplest way to get a URL for local use is to choose a tool like Ngrok, which creates a secure tunnel to your localhost, allowing you to access your local server from the Internet.
- 1) Download Ngrok from the official website and extract it. Open the terminal and navigate to the folder where Ngrok is stored.
- 2) Run ./ngrok http PORT_NUMBER, replacing PORT_NUMBER with the port your Flask server is running on locally (e.g., 80).
- 3) You should now have a public URL that you can use as the webhook URL. Copy it for further use.
Setting Up a Hook on a Channel
Once you have a working webhook URL, follow these steps:
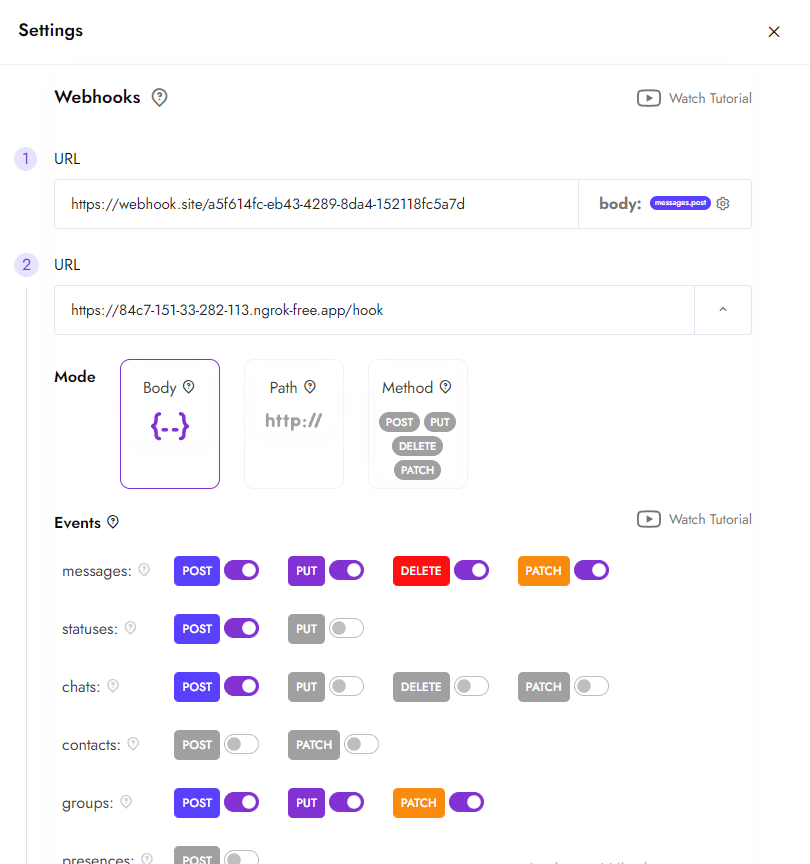
- Go to the channel settings. On the channel page, click the settings button (top right corner).
- Configure the webhook. Enter your URL in the webhook section using preselected settings. You can set up multiple webhooks for different events if necessary. These settings can also be adjusted via the API.
- Save the changes. From now on, all notifications about WhatsApp events will be sent to the server you specified.
For example, if a message arrives at your server, the webhook will send a POST request with the message data. Your task is to process this data and program the bot to respond accordingly. In the next part of the article, we’ll discuss how to do this.
Creating the Basics of a WhatsApp Bot in Python
In this section, we’ll cover how to use the Whapi.Cloud API to send and manage messages on WhatsApp using Python. We assume you already have the environment set up: Python installed, an API token obtained, and a project created with an index.py file.
Installing required libraries.
To interact with the Platform, we’ll need to install several libraries. You can either install them individually or compile a dependency list in a requirements.txt file and install them with a single command.
Flask==3.0.0
requests==2.27.1
requests-toolbelt==0.9.1
python-dotenv==0.20.0
Command for installation:
pip install -r requirements.txtUsing a .env file.
For convenience in working with tokens and other environment variables, create a .env file. This allows you to store sensitive data separately from the code, making it easier to update.
Example of .env file content:
API_TOKEN=8FjpwmyFUulh7emXOprrET3xKrwJ984O # API token from your channel
API_URL=https://gate.whapi.cloud # API endpoint URL
PORT=80 # example, 80 or 443
#URL_LINK= The Webhook link to your server {link to server}/hook.
You can load environment variables into your script using the python-dotenv library:
from dotenv import load_dotenv
import os

load_dotenv()
api_token = os.getenv("API_TOKEN")
Sending a Text Message
Let’s start with a simple example: sending a text message. The token must be passed in the authorization header (Bearer), and the request body should contain the message parameters.
import requests

# URL for sending text messages. Can be pulled from .env
url = "https://gate.whapi.cloud/messages/text"

# Data for sending a message
payload = {
    "to": "919984351847",  # Enter the recipient's number in international format
    "body": "Hello! This is a test message."  # Text of message
}

# Headers, including authorization token
headers = {
    "accept": "application/json",
    "content-type": "application/json",
    "authorization": f"Bearer {api_token}"  # Use the token from the .env file
}

# Sending a POST request
response = requests.post(url, json=payload, headers=headers)

# Output server response
print(response.status_code)
print(response.text)
After successfully sending the message, you can try more complex scenarios, such as delivering images, files, or interacting with groups. Simply follow the examples of requests in our API documentation. We’ll discuss this in the next chapters. For now, ensure your message is sent correctly and the server returns a 200 OK status.
Receiving Messages via Flask Webhook
To process incoming content, you need to configure a Flask route that will serve as the webhook endpoint. This route will receive data from Whapi.Cloud, transmitted as POST requests when events occur (e.g., receiving a message).
After configuration, you need to update the webhook URL in your Whapi.Cloud channel by specifying the URL you created. In this example, we use https://your_domain_or_ip/hook. Remember, this can be an external server or a local one. Ensure this link is functional and accepts requests. You can always check the availability of your webhook link using our endpoint.
A simple variation of processing incoming messages:
from flask import Flask, request, jsonify

app = Flask(__name__)

# Route for processing incoming messages
@app.route('/hook', methods=['POST'])
def webhook():
    # Retrieving data from a request
    data = request.json

    # Logging an incoming message
    print("Received message:", data)

    # Example of incoming message processing
    if "messages" in data:
        for message in data["messages"]:
            sender = message["from"]  # Sender's number
            text = message.get("body", "")  # Text of message

            print(f"Message from {sender}: {text}")

            # Logic for replying to a message
            # Check out our examples on GitHub, where we use more branching on commands for the bot
            if text.lower() == "hello":
                send_response(sender, "Hi there! How can I help you?")
            elif text.lower() == "bye":
                send_response(sender, "Goodbye!")

    return jsonify({"status": "success"}), 200

# Function for sending a reply
def send_response(to, body):
    import requests

    url = "https://gate.whapi.cloud/messages/text"
    payload = {
        "to": to,
        "body": body
    }
    headers = {
        "accept": "application/json",
        "content-type": "application/json",
        "authorization": f"Bearer {api_token}"  # Use the token from the .env file
    }

    response = requests.post(url, json=payload, headers=headers)
    print(f"Response to {to}: {response.status_code}, {response.text}")

if __name__ == '__main__':
    app.run(host='0.0.0.0', port=80)
In this code, we set up a Flask route (make sure the Flask server is running). Ensure your webhook is working correctly and returns a proper 200 response.
Now your bot can automatically respond to incoming notifications and perform actions depending on their content. To simplify the process of writing a bot from scratch, you can use our ready-made Python bot scripts, published on GitHub. These projects include detailed setup and testing instructions, as well as helpful comments in the code. It’s an excellent start for beginner developers.
On GitHub, you will find several repositories with different bots. One of them is considered ideal for beginner programmers as it has very simple but understandable functionality-sending text messages and images in response to commands. Another bot version is suitable for more advanced users, as it includes more features: Sending plain messages, images, files, videos, contacts (vCard), products, creating new WhatsApp groups, sending invitations, and sending messages to groups.
In the next chapter, we’ll look at advanced features, such as sharing multimedia and interacting with groups.
Advanced Features
With Whapi.Cloud, you gain access to an impressive set of tools and features that allow you to create chatbots of any complexity.
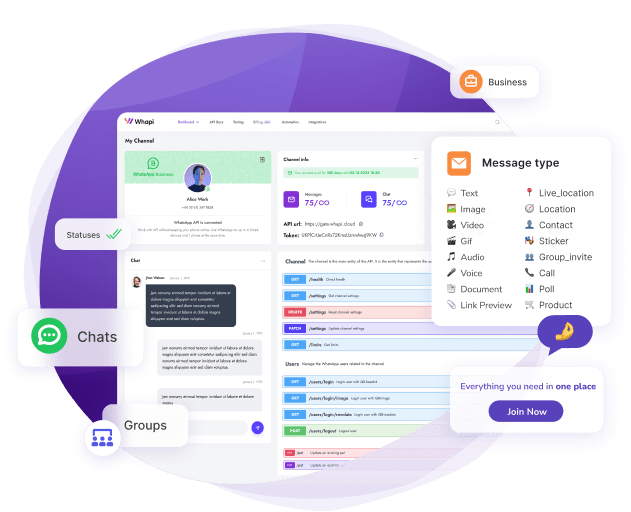
We offer step-by-step instructions and examples of using various Endpoints and SDKs to help automate a wide range of tasks: send text messages, files of any format, geolocation, contacts, stickers, polls, products, and more. React to messages with emojis, quote them, mark them as read, pin conversations, activate the 'typing...' status. Automatically create and delete groups and communities, add and remove group members, set administrators, adjust group parameters and settings, block users, and much more.
Thanks to these features, integrating a bot with your website, application, CRM, ERP, or other systems becomes a straightforward and clear process. Whapi.Cloud provides developers with all the necessary tools for flexible and quick integration.
All methods and their capabilities are described in detail in our documentation. Start automating today to unlock new opportunities for your business!
Sending an Image
Interactivity and visual content can significantly enhance user engagement when communicating with your WhatsApp bot. Sending images via the Integration allows companies to share products, promotions, or important text in a visual format, making interactions richer and more effective. Now, let’s examine how to send an image through the WhatsApp API using Python:
import requests

url = "https://gate.whapi.cloud/messages/image"

payload = {
    "to": "919984351847",
    "media": "https://upload.wikimedia.org/wikipedia/en/a/a9/Example.jpg",
    "caption": "An example image"
}
headers = {
    "accept": "application/json",
    "content-type": "application/json",
    "authorization": "Bearer Your_Token"
}

response = requests.post(url, json=payload, headers=headers)

print(response.text)
Sending a File
Expanding the functionality of your bot to include file sharing makes it an essential tool for exchanging important information. This can be useful for posting invoices, contracts, price lists, and other documents. Let’s explore how to implement file sending via the WhatsApp API using Python:
import requests

url = "https://gate.whapi.cloud/messages/document"

payload = {
    "to": "919984351847",
    "media": "data:application/pdf;base64,JVBERi0xLjQKJdPr6eEKMSAwIG9iago8PC9UaXRsZSAoVGVybXMgb2YgU2VydmljZSBXaGFwaS5DbG91ZCkKL0NyZWF0b3IgKE1vemlsbGEvNS4wIFwoV2luZG93cyBOVCAxMC4wOyBXaW42NDsgeDY0XCkgQXBwbGVXZWJLaXQvNTM3LjM2IFwoS0h............",
    "filename": "Terms of Service Whapi.Cloud.pdf",
    "caption": "Hello, I am attaching an important file to my message"
}
headers = {
    "accept": "application/json",
    "content-type": "application/json",
    "authorization": "Bearer Your_Token"
}

response = requests.post(url, json=payload, headers=headers)

print(response.text)
Creating a WhatsApp Group in Python
With Whapi.Cloud, you can not only create groups but also manage them dynamically. For example, add members, change the group name, assign administrators, and delete groups that are no longer needed. Let’s look at how to create a group via the WhatsApp API using Python:
import requests

url = "https://gate.whapi.cloud/groups"

payload = {
    "participants": ["919984351847", "919984351848", "919984351849"],
    "subject": "Group Subject 3"
}
headers = {
    "accept": "application/json",
    "content-type": "application/json",
    "authorization": "Bearer Your_Token"
}

response = requests.post(url, json=payload, headers=headers)

print(response.text)
Integration with ChatGPT: AI for your WhatsApp bot
One of the most sought-after extensions is connecting your WhatsApp bot to ChatGPT. This allows you to process user messages using artificial intelligence and provide meaningful, dynamic responses.
To demonstrate capabilities and conduct training, we implement a simple bot using the following approach: the user simply writes the command /ai [question], and the bot responds using the ChatGPT model.
Step 1: Add ChatGPT Dependencies
To use ChatGPT via OpenAI's API, you need to install a few Python libraries. The main one is openai, which allows you to interact with the ChatGPT models from your Python code. In your requirements.txt file, add the following lines:
openai>=1.91.0,<2.0.0
httpx>=0.28.1,<1.0.0
httpcore>=1.0.9,<2.0.0
Here’s what each of them does:
- openai - the official SDK to send requests to OpenAI and get ChatGPT responses.
- httpx - a modern, asynchronous HTTP client library that openai depends on internally for making API calls.
- httpcore - a low-level network transport library used by httpx. It needs to be pinned explicitly to avoid version conflicts.
Then install the packages:
pip install -r requirements.txt
These libraries ensure your bot can talk to ChatGPT reliably and securely.
Step 2: Get Your OpenAI API Key
Create an account at platform.openai.com and copy your secret API key from the API Keys section. Add this key to your .env file:
OPENAI_API_KEY=your_api_key_here
Step 3: Add the AI Logic to Your Bot
Now it's time to write a script and create a minimal working version of your WhatsApp bot with ChatGPT support. Let's go through the code step by step. You can copy and paste this code into a file named index.py. So, we will create a simple Flask server that:
- - receives incoming webhook events from Whapi.Cloud,
- - detects whether the message starts with /ai,
- - sends the user's request to ChatGPT via the OpenAI API,
- - returns the AI-generated response to the user in WhatsApp.
# Import necessary libraries for web server, HTTP requests, OpenAI API, environment variables, and .env file loading
from flask import Flask, request, jsonify  # Flask is used to create the web server and handle HTTP requests
import requests  # Used to send HTTP requests to the WhatsApp API
from openai import OpenAI  # OpenAI client for interacting with ChatGPT
import os  # For accessing environment variables
from dotenv import load_dotenv  # For loading variables from a .env file

# Load environment variables from a .env file into the environment
load_dotenv()
# Create a Flask web application instance
app = Flask(__name__)

# Retrieve required configuration values from environment variables
API_TOKEN = os.getenv("API_TOKEN")  # Token for authenticating with WhatsApp API
API_URL = os.getenv("API_URL")      # Base URL for WhatsApp API
OPENAI_API_KEY = os.getenv("OPENAI_API_KEY")  # API key for OpenAI

# Ensure all required environment variables are set, otherwise stop the program with an error
if not API_TOKEN or not API_URL or not OPENAI_API_KEY:
    raise RuntimeError("Missing required environment variables: API_TOKEN, API_URL, or OPENAI_API_KEY")

# Initialize the OpenAI client with the provided API key
openai_client = OpenAI(api_key=OPENAI_API_KEY)

# Function to send a prompt to ChatGPT and get a response
# Takes a string prompt and returns the model's reply as a string
def ask_openai(prompt):
    response = openai_client.chat.completions.create(
        model="gpt-3.5-turbo",  # Specify which OpenAI model to use
        messages=[{"role": "user", "content": prompt}]  # Provide the user's message to the model
    )
    # Extract and return the text of the model's reply
    return response.choices[0].message.content.strip()

# Function to send a text message to a WhatsApp user via the WhatsApp API
# 'to' is the recipient's chat ID, 'body' is the message text
def send_message(to, body):
    headers = {
        "Authorization": f"Bearer {API_TOKEN}",  # Add authentication token to the request
        "Content-Type": "application/json"        # Specify that we're sending JSON data
    }
    payload = {"to": to, "body": body}  # Prepare the message data
    # Send the message to the WhatsApp API endpoint
    response = requests.post(f"{API_URL}/messages/text", json=payload, headers=headers)
    print("Whapi response:", response.status_code, response.text)  # Log the API response for debugging

# Define a webhook endpoint to receive incoming WhatsApp messages
@app.route("/hook/messages", methods=["POST"])
def webhook():
    data = request.json  # Parse the incoming JSON data
    print("Incoming:", data)  # Log the incoming data for debugging

    # Loop through all received messages (could be more than one in a single webhook call)
    for msg in data.get("messages", []):
        if msg.get("from_me"):
            continue  # Skip messages sent by the bot itself

        sender = msg.get("chat_id")  # Get the sender's chat ID
        # Safely extract the message text, handling cases where 'text' might be missing
        text = (msg.get("text") or {}).get("body", "").strip()

        # If the message starts with '/ai ', treat it as a prompt for ChatGPT
        if text.lower().startswith("/ai "):
            prompt = text[4:].strip()  # Extract the user's prompt after '/ai '
            if not prompt:
                send_message(sender, "Please provide a prompt after /ai.")  # Ask user to provide a prompt
            else:
                try:
                    reply = ask_openai(prompt)  # Get response from ChatGPT
                    send_message(sender, reply)  # Send the response back to the user
                except Exception as e:
                    send_message(sender, f"Error: {e}")  # Inform user if something went wrong
        else:
            # If the message doesn't start with '/ai ', send instructions to the user
            send_message(sender, "Hi! To ask me something, type:\n/ai your question")

    # Respond to WhatsApp API to confirm receipt of the webhook
    return jsonify({"status": "received"})

# Optional: health check endpoint to verify the bot is running
@app.route("/", methods=["GET"])
def index():
    return "Bot is running"

# Function to register the webhook URL with the WhatsApp API
def register_webhook():
    if os.getenv("BOT_URL"):
        headers = {"Authorization": f"Bearer {API_TOKEN}"}
        payload = {
            "webhooks": [
                {
                    "url": os.getenv("BOT_URL"),  # The public URL where Whapi should send messages
                    "events": [{"type": "messages", "method": "post"}],  # Listen for message events
                    "mode": "method"
                }
            ]
        }
        # Register the webhook
        response = requests.patch(f"{API_URL}/settings", json=payload, headers=headers)
        print("Webhook setup:", response.status_code, response.text)  # Log the result

# If this script is run directly (not imported), start the bot
if __name__ == "__main__":
    register_webhook()  # Optionally register the webhook on startup
    port = int(os.getenv("PORT", 80))  # Use the PORT environment variable or default to 80
    app.run(host="0.0.0.0", port=port)  # Start the Flask web server, accessible from any network interface
This basic bot processes incoming messages, filters out messages from itself, and searches for messages beginning with /ai. If such a command is found, it extracts the question, sends it to ChatGPT, and responds using the WhatsApp API with an AI response.
This script is ready for testing. And its useful part has already been implemented in our chatbot example on GitHub to make it easier for you to get started!
Of course, you can always make the code more advanced, for example: add support for message history (conversation memory), process images and voice audio files, and much more.
In the following steps, we will show you how to deploy this bot on a cloud platform so that it is always online.
Troubleshooting
Various issues can arise during the testing and operation of the WhatsApp chatbot. Here are a few typical situations and recommendations for their resolution:
The Bot Does Not Respond to Incoming Messages
- Ensure you are sending messages to the number on which the bot is running from a different phone. The bot will not be able to respond to messages sent from the same number.
- If the bot does not respond to messages from other numbers, check the operation of webhooks. Use services to simulate webhooks, for example, Webhook.site, to ensure which path the callback requests are coming through. Afterwards, check if the path matches the one you have configured. Also, ensure your server responds with 200Ok.
If you encounter difficulties, do not hesitate to contact our technical support for help. You can write in the web chat widget on our site or email [email protected]. We will assist you and figure out exactly what's wrong with the webhook.
The Bot Sends Messages Non-Stop
Return to the original version of the code. Our script includes a check to determine whether a message is incoming or outgoing, to prevent getting into an infinite loop of sending messages. Infinite sending may occur if there is no check for outgoing messages in the code, causing the bot to call itself, or if there is a cyclic sending of messages in the code.
The Bot Works in Some Chats, But Not in Others
Check your tariff plan on Whapi.Cloud. If you are using the trial mode or the "Sandbox" tariff, interaction is limited to a certain number of chats per month (currently up to 5 chats). In such a case, the bot will not be able to process messages in the sixth chat and subsequent ones.
It's important to remember that many issues can be prevented by carefully checking your chatbot's configuration and logic before launching. Regularly updating your code and paying attention to the details of settings can help avoid most typical errors. And our support team is always in touch and ready to assist you!
Deployment and Using Servers
To ensure your WhatsApp chatbot is available 24/7, it needs to be hosted on a reliable hosting platform. You can use your server, but in this chapter, we will consider the three most popular platforms - Firebase, AWS, and Heroku - and go through the basic steps of deploying your bot on each of them.
The choice of platform depends on your preferences, budget, and project requirements. Each of the considered platforms offers its unique features and advantages. Firebase and AWS Lambda provide powerful backend functionality without the need to manage a server, while Heroku offers simplicity in deploying applications based on Git.
Firebase
Firebase offers Cloud Functions functionality, allowing you to run your bot without worrying about server infrastructure. In our opinion, this is the most optimal option.
- Create a project in Firebase Console;
- Install Firebase CLI, following the instructions;
- Initialize Firebase in your project directory with the command firebase init;
- Deploy your bot using the command firebase deploy --only functions.
AWS (Amazon Web Services)
AWS Lambda offers the ability to run code in response to triggers from other AWS services, making it a good choice for a bot.
- Register or log in to AWS Management Console;
- Create a new Lambda function through the AWS console, selecting API Gateway as the trigger;
- Upload your bot's code into the Lambda function;
- Configure the API Gateway to interact with your bot and the outside world.
Heroku
Heroku offers an easy-to-use platform for hosting applications, which can automatically deploy code from your Git repository.
- Create an account on Heroku;
- Install Heroku CLI and log in;
- Create a new Heroku app through the console or using the command heroku create;
- Link your Git repository to Heroku and perform deployment with the commands git push heroku master;
- Set the webhook URL provided by Heroku.
Conclusion and Recommendations
Creating a WhatsApp bot using Python and Whapi.Cloud opens the door to extensive automation possibilities. By following this programmer's guide, you have gained not only basic functionality but also an understanding of how to use powerful Service tools effectively.
After successful local setup, it’s essential to consider deploying your bot in a production environment. Flask is excellent for development, but for stable real-time operation, consider using servers like Gunicorn or uWSGI. These provide better performance and reliability.
If you haven’t yet registered for our service, try it for free to test all the features. Follow the instructions in this article to launch your bot or integration as quickly as possible. If you have any questions, our support team is always here to help make the process as simple and effective as possible.
On GitHub, you will find several repositories with different bots. One of them is considered ideal for beginner programmers as it has very simple but understandable functionality-sending text messages and images in response to commands. Another bot version is suitable for more advanced users, as it includes more features: Sending plain messages, images, files, videos, contacts (vCard), products, creating new WhatsApp groups, sending invitations, and sending messages to groups.
Thank you for choosing Whapi.Cloud, and we hope your bot becomes an integral part of your business! We’ll always be here to help you 🚀