Introduction
This article provides a comprehensive how-to guide for managing WhatsApp groups via API. It covers both direct API usage for developers and low-code automation through tools like Make or N8N.
Whether you're building custom integrations, automating group communication, or connecting bots to WhatsApp groups, this guide outlines the key actions you can perform programmatically: sending messages, creating groups, managing participants and admins, and more.
Who is this for:
- Developers integrating WhatsApp features into business systems;
- Low-code users automating workflows via platforms like Make, Zapier, N8N, IFTTT or Pabbly;
Use cases include:
- Auto-creating groups for new customers or events;
- Adding/removing members based on CRM updates;
- Sending announcements or reminders in group chats;
- Connecting AI bots to WhatsApp group conversations;
Prerequisites:
- A phone number registered in regular WhatsApp (not Meta's Business API);
- Basic programming knowledge or access to a low-code platform like Make;
In the next sections, you'll find practical code examples and integration steps for each feature.
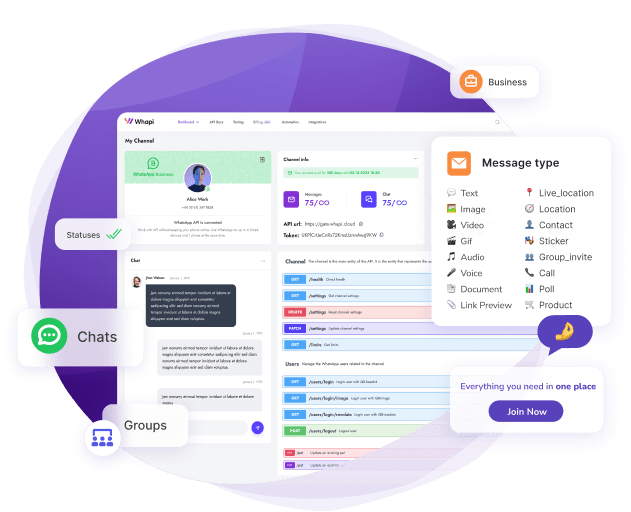
What you can do with WhatsApp Groups via API
Using WhatsApp group management via API, you can automate and control key group functions that normally require manual actions in the app. Here's what's possible:
- Send messages to groups: Broadcast updates, announcements, or reminders directly to any group.
- Create new WhatsApp groups: Automatically generate new groups based on events like new customer onboarding or course enrollment.
- Add members to a group: Programmatically invite contacts to a group without manual approval.
- Promote members to admins: Assign or revoke admin rights for selected participants.
- Fetch group participants: Retrieve a full list of members for analytics or CRM sync.
- Detect group events: Track messages, joins, and leaves using webhook listeners.
- Connect bots to groups: Enable bots to read and respond to group messages using defined logic.
These capabilities are not available in Meta's official WhatsApp Business API. Instead, they are made possible through Whapi.Cloud - a developer-friendly API provider that bridges the gap by allowing server-side control over a regular WhatsApp account. This gives developers and automation platforms full flexibility to build advanced group-based workflows. If you encounter any difficulties or need help implementing a specific use case, our team is here to assist you - just reach out via the chat widget on our website.
In the next sections, we'll go through each feature in detail - with code examples and step-by-step instructions.
How to Link Your WhatsApp and Start Using the API
One of the most common automation tasks is sending messages to a WhatsApp group - whether it's to broadcast updates, deliver reminders, or notify participants of an event. This can be done either via direct API calls or by integrating with a low-code platform.
Before sending messages or building any automation, you'll need an API token from Whapi.Cloud. This token links the API to your WhatsApp account and authorizes all requests.
Instruction: How to get your API token from Whapi.Cloud
Create an account with the provider, it's free and doesn't require a credit card. After registering, you'll receive a free test channel with limited features - enough to start development. Whapi.Cloud is known for its stability, affordable pricing, and rich feature set.
The next step is to connect your WhatsApp number. There's no approval process or number migration required, simply use any number already active in your WhatsApp app. This number will manage your groups and send messages on your behalf.
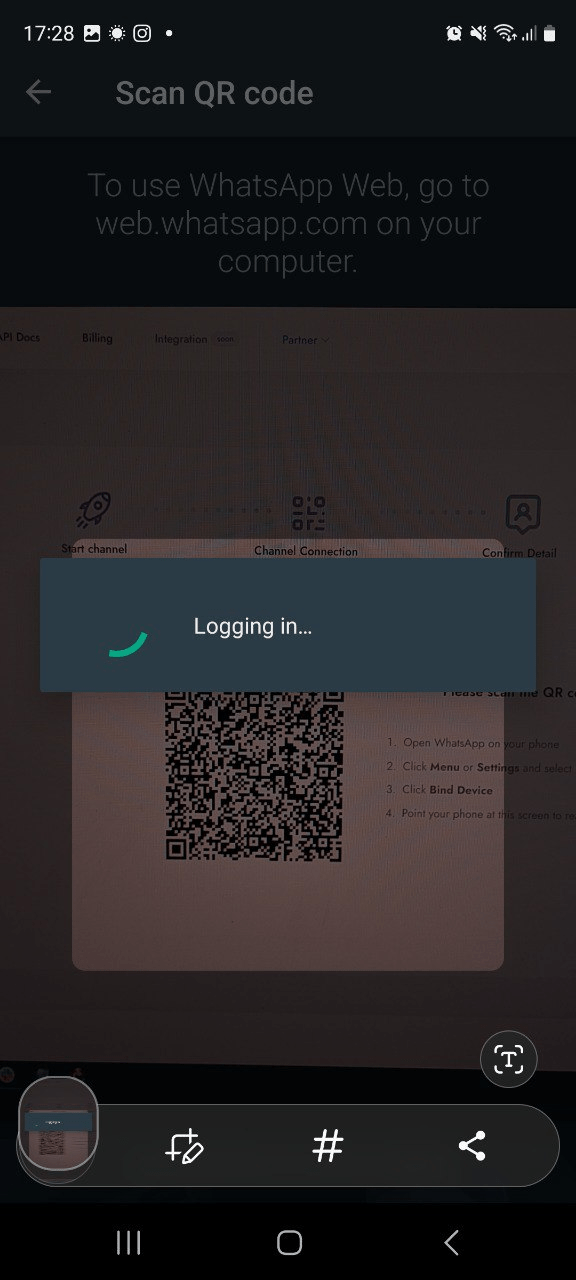
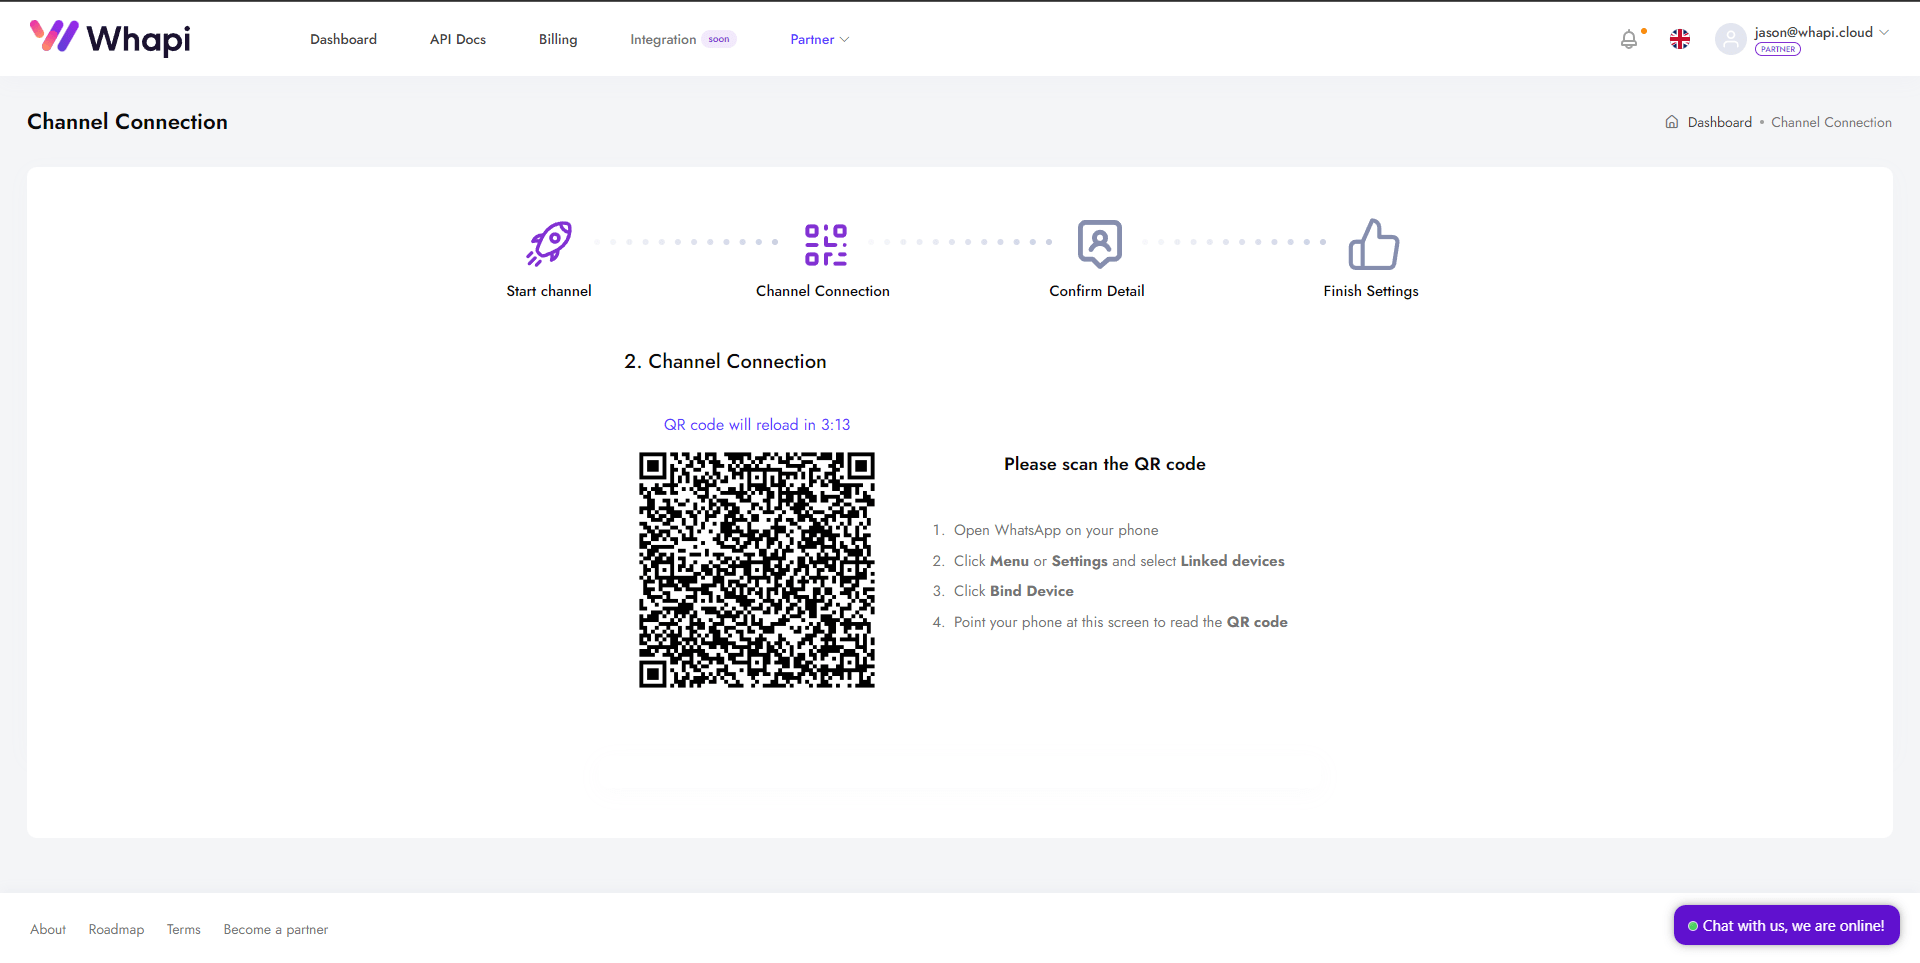
- 1) Go to your dashboard and open the Default Channel - it's already created for you.
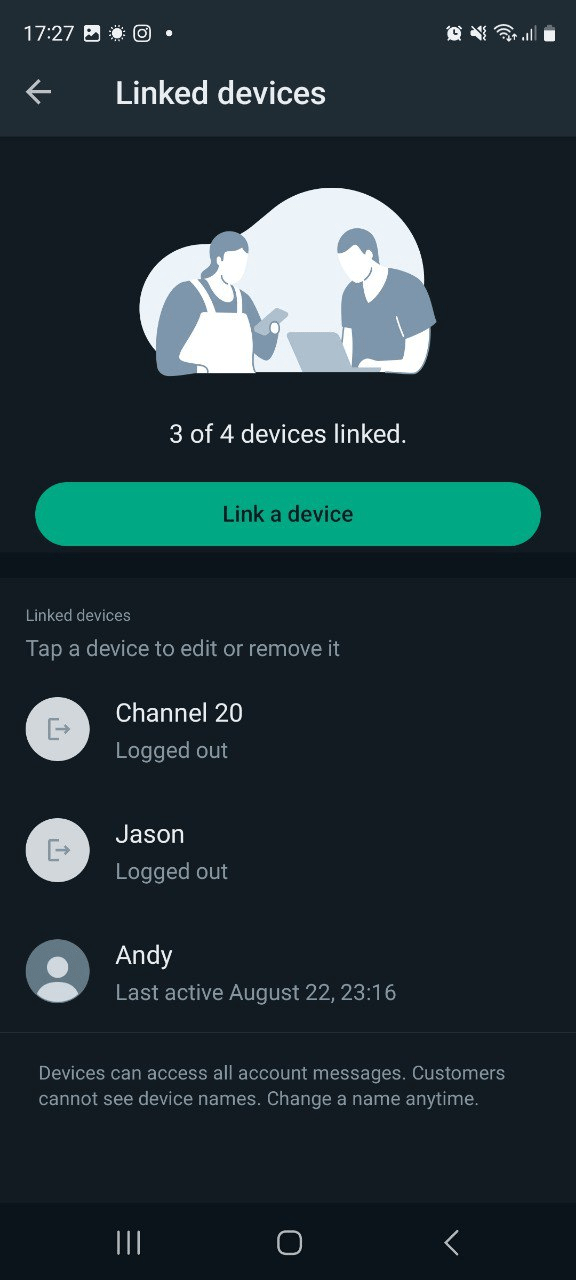
- 2) On Step 1, you'll see a QR code with instructions.
- 3) On your phone, open WhatsApp → Settings → Linked Devices → Link a Device, then scan the QR code.
- 4) Once connected, give your channel a name (e.g., "My Chatbot") for easier identification.
- 5) You'll be redirected to the channel settings screen, you can skip this step for now and return to it later.
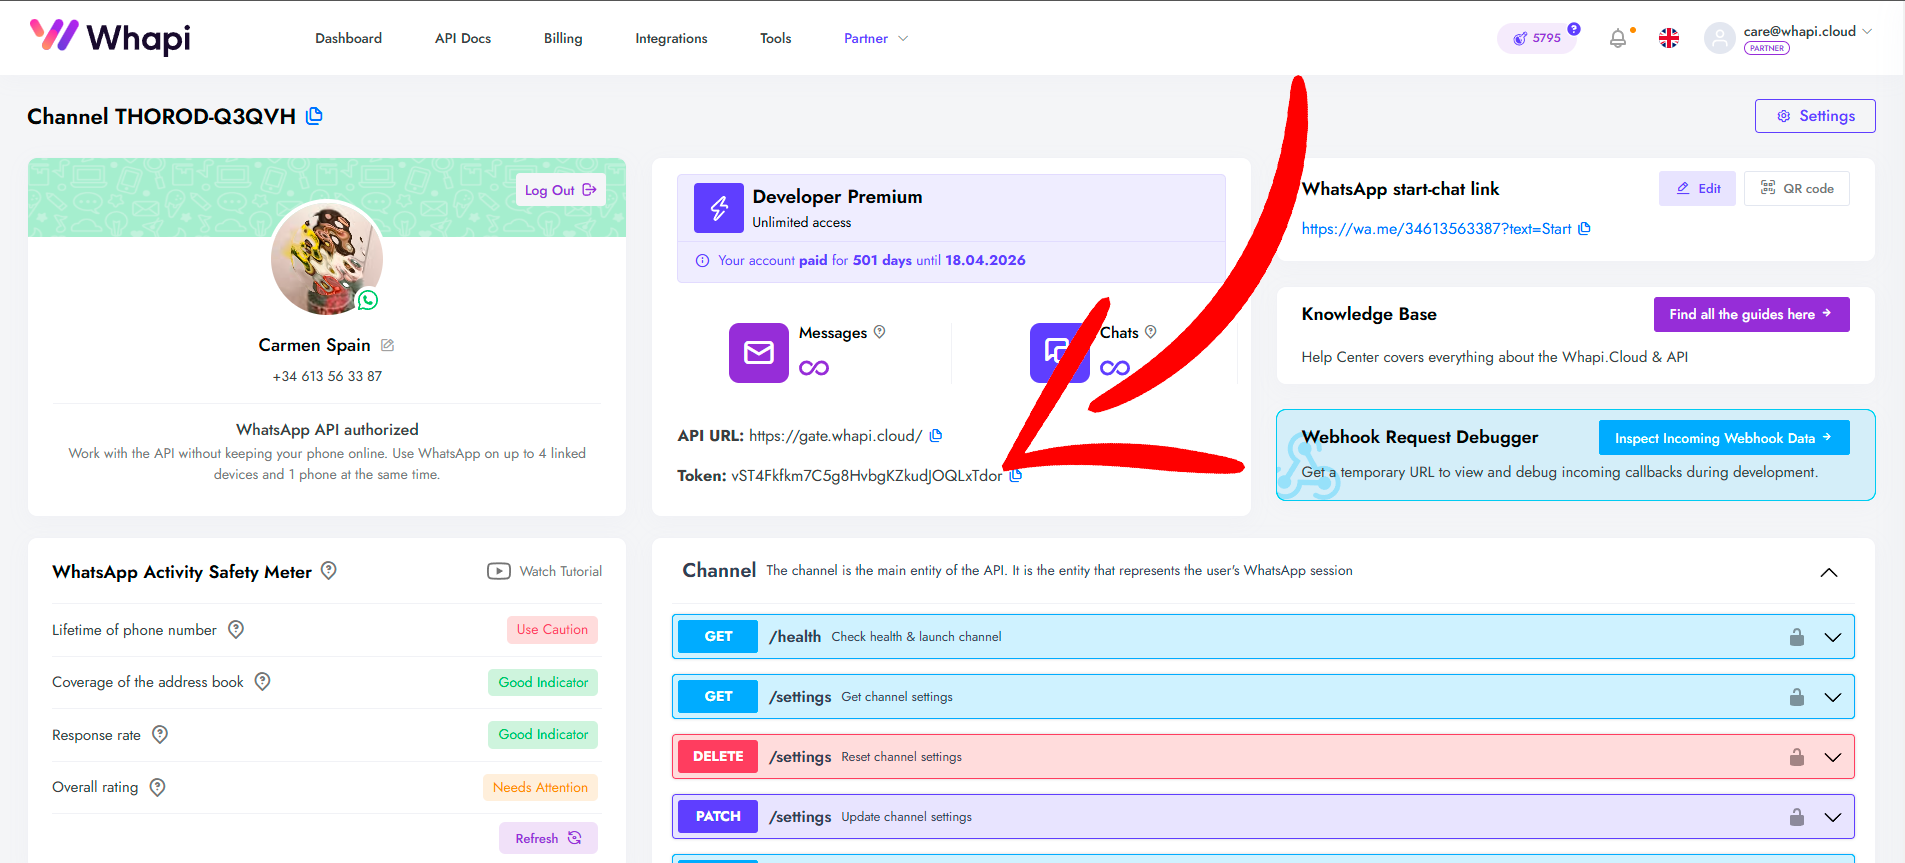
Your unique API token is displayed in the center of the connected channel page. This token is essential for authenticating API requests — it must be included in the request headers as a Bearer token or passed as a parameter, depending on the method.
Let's send our first message to the group!
How to Send WhatsApp Group Messages via API (with Code Examples)
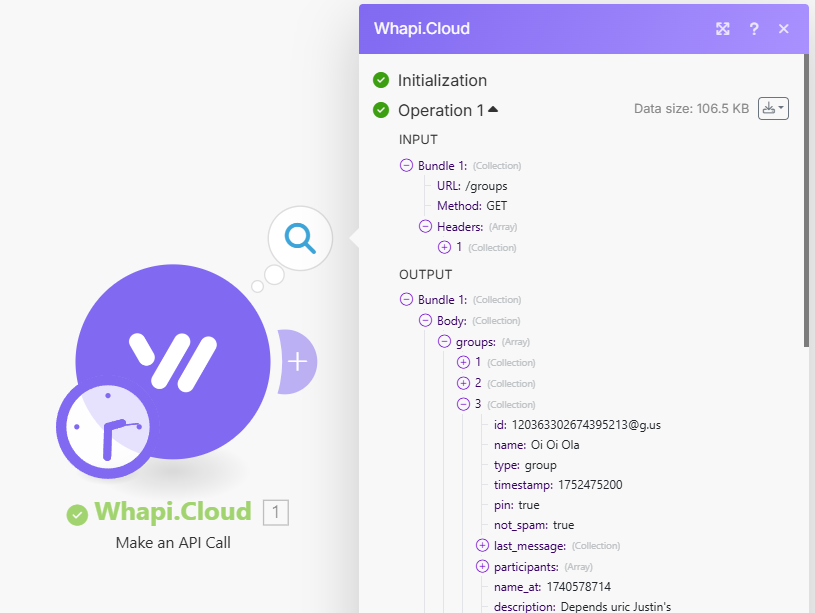
- 1) First, retrieve the group ID. Use the
GET /groupsendpoint to fetch a list of your WhatsApp groups along with their unique identifiers. For full details, see the documentation: Get groups. - 2) Once you have the group ID, you can send a message. Automatically generate new groups based on events like new customer onboarding or course enrollment. Use the
POST /messages/textendpoint, specifying the group ID in thetoparameter and your message content in thebodyparameter. For more details, refer to: Send text message.
To send a message to a WhatsApp group, you'll need its unique group ID. Unfortunately, this information isn't available directly in the WhatsApp app - it can only be accessed via the API.
You can obtain the group ID using the Get groups endpoint or by checking recent conversations through the chats endpoint.
You can obtain the group ID using the Get groups endpoint or by checking recent conversations through the chats endpoint.
You can get the group ID in several ways:
- 1) When you create a group, the group ID will be specified in the response from the API. Below, in a separate chapter, we will show you how to do this;
- 2) Endpoint Get a list of groups;
- 3) Endpoint Get a list of all chats;
The group ID looks like this: [email protected]. This information cannot be seen in the application or Web version!
Once you know the group ID, you can use the method to send any message. Let's take a closer look at how to do this. Below are examples of how to send messages to a WhatsApp group using different technologies.
curl --request POST \
     --url https://gate.whapi.cloud/messages/text \
     --header 'accept: application/json' \
     --header 'authorization: Bearer YOUR_API_TOKEN' \
     --header 'content-type: application/json' \
     --data '
{
  "to": "[email protected]",
  "body": "Hello, this message was sent via API!"
}
'
// composer require guzzlehttp/guzzle

require_once('vendor/autoload.php');

$client = new \GuzzleHttp\Client();

$response = $client->request('POST', 'https://gate.whapi.cloud/messages/text', [
  'body' => '{"to":"[email protected]","body":"Hello, this message was sent via API!"}',
  'headers' => [
    'accept' => 'application/json',
    'authorization' => 'Bearer YOUR_API_TOKEN',
    'content-type' => 'application/json',
  ],
]);

echo $response->getBody();
# python -m pip install requests

import requests

url = "https://gate.whapi.cloud/messages/text"

payload = {
    "to": "[email protected]",
    "body": "Hello, this message was sent via API!"
}
headers = {
    "accept": "application/json",
    "content-type": "application/json",
    "authorization": "Bearer YOUR_API_TOKEN"
}

response = requests.post(url, json=payload, headers=headers)

print(response.text)
// npm install axios --save

import axios from 'axios';

const options = {
  method: 'POST',
  url: 'https://gate.whapi.cloud/messages/text',
  headers: {
    accept: 'application/json',
    'content-type': 'application/json',
    authorization: 'Bearer YOUR_API_TOKEN'
  },
  data: {to: '[email protected]', body: 'Hello, this message was sent via API!'}
};

axios
  .request(options)
  .then(res => console.log(res.data))
  .catch(err => console.error(err));
OkHttpClient client = new OkHttpClient();

MediaType mediaType = MediaType.parse("application/json");
RequestBody body = RequestBody.create(mediaType, "{\"to\":\"[email protected]\",\"body\":\"Hello, this message was sent via API!\"}");
Request request = new Request.Builder()
  .url("https://gate.whapi.cloud/messages/text")
  .post(body)
  .addHeader("accept", "application/json")
  .addHeader("content-type", "application/json")
  .addHeader("authorization", "Bearer YOUR_API_TOKEN")
  .build();

Response response = client.newCall(request).execute();
//dotnet add package RestSharp

using RestSharp;

var options = new RestClientOptions("https://gate.whapi.cloud/messages/text");
var client = new RestClient(options);
var request = new RestRequest("");
request.AddHeader("accept", "application/json");
request.AddHeader("authorization", "Bearer YOUR_API_TOKEN");
request.AddJsonBody("{\"to\":\"[email protected]\",\"body\":\"Hello, this message was sent via API!\"}", false);
var response = await client.PostAsync(request);

Console.WriteLine("{0}", response.Content);
How to Send WhatsApp Group Messages Using No-Code Tools like Make or n8n
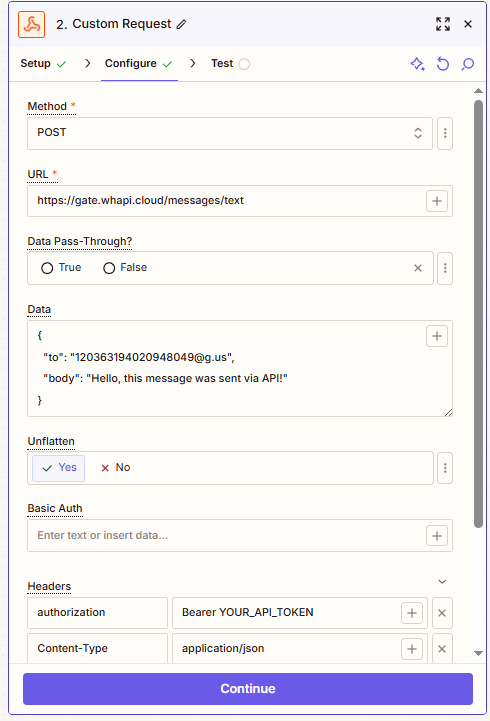
For users without a strong programming background, platforms like Make (Integromat), Zapier, n8n, Pabbly, IFTTT, and others offer a flexible way to automate interactions with our API endpoints. You can trigger WhatsApp group messages based on CRM events, schedules, form submissions, or other workflows. Some of these platforms already have built-in integrations with our service, but even without native support, it's easy to set up a fully functional automation using HTTP modules or custom API calls.
To send a message to a WhatsApp group using a low-code platform like Make, follow these steps:
1. Obtain your API token
Ensure you have an active API token from Whapi.Cloud. If you haven't done this yet, refer to the earlier section of this guide for setup instructions. Once you have the token, configure your HTTP module with the proper Authorization header (Bearer token).
2. Get the Group ID
You'll need the unique identifier of the WhatsApp group you want to message. This ID cannot be retrieved from the WhatsApp app and must be obtained via the API.
If you're working with a fixed group, you can manually retrieve the group ID using the Get groups endpoint or copy it directly from the API response. For automated workflows involving multiple or dynamic groups, use the following GET request:
GET https://gate.whapi.cloud/groups In the JSON response, you'll see an array of group objects. Each object includes an id field with the group's unique identifier.
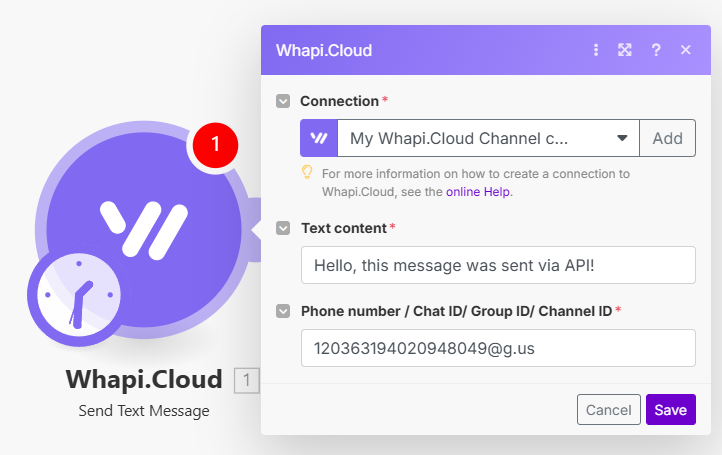
3. Send the Message
Once you have the group ID, use the following POST request to send a message:
POST https://gate.whapi.cloud/messages/text In the request body, provide:
to: the group ID.body: the message content
This setup allows you to automate WhatsApp group messaging through a low-code interface with minimal technical effort.
If you encounter any difficulties or need help implementing a specific use case, our team is here to assist you - just reach out via the chat widget on our website.
How to Create a WhatsApp Group via API
To create a WhatsApp group via API, follow these steps:
- 1) Use the
POSTmethod with thehttps://gate.whapi.cloud/groupsendpoint to create a new group. Provide the group name in the subject parameter and include at least one phone number in the participants parameter - this is required for the group to be successfully created. - 2) Upon successful creation, the API will return a group ID. You'll need this identifier to send messages to the group.
- 3) To send a message to the group, use the standard message-sending method. Specify the group ID in the
toparameter and the message content in thebodyparameter.
Be sure to enter numbers in international format and without the plus sign.
Note that some users may have privacy settings that prevent them from being added to groups. Since at least one participant is required to create a group, a good practice is to include your own number along with another contact in the
participants array to ensure successful group creation.
curl --request POST \
     --url https://gate.whapi.cloud/groups \
     --header 'accept: application/json' \
     --header 'authorization: Bearer Your_Token' \
     --header 'content-type: application/json' \
     --data '
{
  "participants": [
    "498935516106",
    "4915155985667"
  ],
  "subject": "SEO Common GmbH"
}
'
// composer require guzzlehttp/guzzle

require_once('vendor/autoload.php');

$client = new \GuzzleHttp\Client();

$response = $client->request('POST', 'https://gate.whapi.cloud/groups', [
  'body' => '{"participants":["498935516106","4915155985667"],"subject":"SEO Common GmbH"}',
  'headers' => [
    'accept' => 'application/json',
    'authorization' => 'Bearer Your_Token',
    'content-type' => 'application/json',
  ],
]);

echo $response->getBody();
# python -m pip install requests

import requests

url = "https://gate.whapi.cloud/groups"

payload = {
    "participants": ["498935516106", "4915155985667"],
    "subject": "SEO Common GmbH"
}
headers = {
    "accept": "application/json",
    "content-type": "application/json",
    "authorization": "Bearer Your_Token"
}

response = requests.post(url, json=payload, headers=headers)

print(response.text)
// npm install axios --save

import axios from 'axios';

const options = {
  method: 'POST',
  url: 'https://gate.whapi.cloud/groups',
  headers: {
    accept: 'application/json',
    'content-type': 'application/json',
    authorization: 'Bearer Your_Token'
  },
  data: {participants: ['498935516106', '4915155985667'], subject: 'SEO Common GmbH'}
};

axios
  .request(options)
  .then(res => console.log(res.data))
  .catch(err => console.error(err));
OkHttpClient client = new OkHttpClient();

MediaType mediaType = MediaType.parse("application/json");
RequestBody body = RequestBody.create(mediaType, "{\"participants\":[\"498935516106\",\"4915155985667\"],\"subject\":\"SEO Common GmbH\"}");
Request request = new Request.Builder()
  .url("https://gate.whapi.cloud/groups")
  .post(body)
  .addHeader("accept", "application/json")
  .addHeader("content-type", "application/json")
  .addHeader("authorization", "Bearer Your_Token")
  .build();

Response response = client.newCall(request).execute();
//dotnet add package RestSharp

using RestSharp;


var options = new RestClientOptions("https://gate.whapi.cloud/groups");
var client = new RestClient(options);
var request = new RestRequest("");
request.AddHeader("accept", "application/json");
request.AddHeader("authorization", "Bearer Your_Token");
request.AddJsonBody("{\"participants\":[\"498935516106\",\"4915155985667\"],\"subject\":\"SEO Common GmbH\"}", false);
var response = await client.PostAsync(request);

Console.WriteLine("{0}", response.Content);
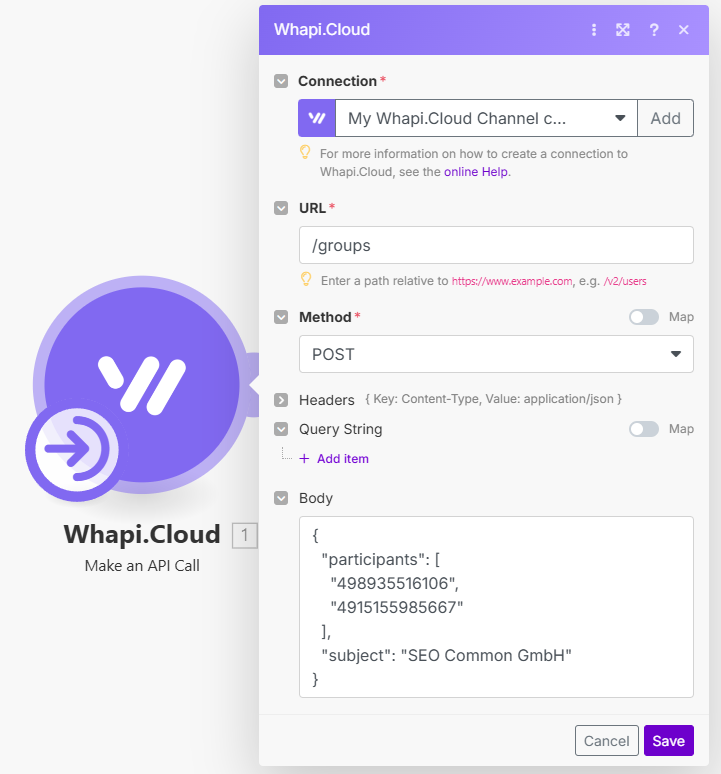
How to Create a WhatsApp Group Using a No-Code Platform
When it comes to creating WhatsApp groups using low-code platforms like Zapier or Make, the process is straightforward. You simply need to replicate the API
POST request to https://gate.whapi.cloud/groups with the correct subject (group name) and participants (array of phone numbers).In Make and n8n, this can be done using a custom module within the existing integration. In platforms like Zapier, IFTTT, or similar tools, you’ll need to use a raw HTTP request module to perform the API call.
{
  "participants": [
    "498935516106",
    "4915155985667"
  ],
  "subject": "SEO Common GmbH"
}
How to Add Participants to a WhatsApp Group
To add participants to an existing WhatsApp group, follow these steps:
- 1) Ensure you have the Group ID of the group you want to update. This is a required parameter for the request. We wrote above how to obtain a group ID.
- 2) Send a
POSTrequest tohttps://gate.whapi.cloud/groups/{GroupID}/participantsto add new members. You'll need to include the Group ID in the URL and provide an array of phone numbers for the participants you wish to add.
Be aware of WhatsApp's anti-spam policies - in some cases, certain contacts may not be added automatically. If this happens, you may need to send a personal message inviting them to join the group. Please read here for more details on why this is happening: Why aren't participants being added to the group?
If you're having trouble adding participants, consider using the Google Contacts integration to sync and manage your contact list. This makes it easier to ensure the numbers are accessible to WhatsApp. You can find a full guide on how to connect and use this integration here.
Be sure to enter numbers in international format and without the plus sign.
curl --request POST \
     --url https://gate.whapi.cloud/groups/120367831625595066%40g.us/participants \
     --header 'accept: application/json' \
     --header 'authorization: Bearer Your_Token' \
     --header 'content-type: application/json' \
     --data '
{
  "participants": [
    "373983445541",
    "373983445542",
    "373983445543"
  ]
}
'
// composer require guzzlehttp/guzzle

require_once('vendor/autoload.php');

$client = new \GuzzleHttp\Client();

$response = $client->request('POST', 'https://gate.whapi.cloud/groups/120367831625595066%40g.us/participants', [
  'body' => '{"participants":["373983445541","373983445542","373983445543"]}',
  'headers' => [
    'accept' => 'application/json',
    'authorization' => 'Bearer Your_Token',
    'content-type' => 'application/json',
  ],
]);

echo $response->getBody();
# python -m pip install requests

import requests

url = "https://gate.whapi.cloud/groups/120367831625595066%40g.us/participants"

payload = { "participants": ["373983445541", "373983445542", "373983445543"] }
headers = {
    "accept": "application/json",
    "content-type": "application/json",
    "authorization": "Bearer Your_Token"
}

response = requests.post(url, json=payload, headers=headers)

print(response.text)
// npm install axios --save

import axios from 'axios';

const options = {
  method: 'POST',
  url: 'https://gate.whapi.cloud/groups/120367831625595066%40g.us/participants',
  headers: {
    accept: 'application/json',
    'content-type': 'application/json',
    authorization: 'Bearer Your_Token'
  },
  data: {participants: ['373983445541', '373983445542', '373983445543']}
};

axios
  .request(options)
  .then(res => console.log(res.data))
  .catch(err => console.error(err));
OkHttpClient client = new OkHttpClient();

MediaType mediaType = MediaType.parse("application/json");
RequestBody body = RequestBody.create(mediaType, "{\"participants\":[\"373983445541\",\"373983445542\",\"373983445543\"]}");
Request request = new Request.Builder()
  .url("https://gate.whapi.cloud/groups/120367831625595066%40g.us/participants")
  .post(body)
  .addHeader("accept", "application/json")
  .addHeader("content-type", "application/json")
  .addHeader("authorization", "Bearer Your_Token")
  .build();

Response response = client.newCall(request).execute();
//dotnet add package RestSharp

using RestSharp;


var options = new RestClientOptions("https://gate.whapi.cloud/groups/120367831625595066%40g.us/participants");
var client = new RestClient(options);
var request = new RestRequest("");
request.AddHeader("accept", "application/json");
request.AddHeader("authorization", "Bearer Your_Token");
request.AddJsonBody("{\"participants\":[\"373983445541\",\"373983445542\",\"373983445543\"]}", false);
var response = await client.PostAsync(request);

Console.WriteLine("{0}", response.Content);
How to Add Participants to a WhatsApp Group Using No-Code Tools
When using no-code platforms to add participants to a WhatsApp group, the only specific detail to note is that the group ID is included directly in the API URL, for example:
https://gate.whapi.cloud/groups/[email protected]/participants.Keep in mind that some platforms may require you to encode special characters — for instance, replacing
@ with %40.Aside from that, the process is identical to group creation: simply pass an array of phone numbers in international format.
{
  "participants": [
    "373983445541",
    "373983445542",
    "373983445543"
  ]
}
How to Fetch WhatsApp Group Participants via API
To retrieve the list of participants in a WhatsApp group, follow these steps:
- 1) Make sure you are a member of the group you want to access. Without being part of the group, you won’t be able to retrieve its participant list.
- 2) Use the API method Get Groups to fetch a list of all groups associated with your WhatsApp account. If you know the ID of the desired group, call it directly using the Get group endpoint.
- 3) The response will include an array of group objects, each containing information such as the group ID, name, and a participants field with a list of members. Example response:
{
  "id": "[email protected]",
  "name": "A group of researchers",
  "participants": [
    { "id": "972558557032", "rank": "member" },
    { "id": "14409416972", "rank": "creator" },
    { "id": "905589461962", "rank": "member" }
  ]
}
To better understand how participant data is collected and why it may not always be immediately available, we recommend reading the article "How Whapi Processes and Updates WhatsApp Group Data".
curl --request GET \
     --url 'https://gate.whapi.cloud/groups?count=100' \
     --header 'accept: application/json' \
     --header 'authorization: Bearer Your_Token'
// composer require guzzlehttp/guzzle

require_once('vendor/autoload.php');

$client = new \GuzzleHttp\Client();

$response = $client->request('GET', 'https://gate.whapi.cloud/groups?count=100', [
  'headers' => [
    'accept' => 'application/json',
    'authorization' => 'Bearer Your_Token',
  ],
]);

echo $response->getBody();
# python -m pip install requests

import requests

url = "https://gate.whapi.cloud/groups?count=100"

headers = {
    "accept": "application/json",
    "authorization": "Bearer Your_Token"
}

response = requests.get(url, headers=headers)

print(response.text)
// npm install axios --save

import axios from 'axios';

const options = {
  method: 'GET',
  url: 'https://gate.whapi.cloud/groups?count=100',
  headers: {accept: 'application/json', authorization: 'Bearer Your_Token'}
};

axios
  .request(options)
  .then(res => console.log(res.data))
  .catch(err => console.error(err));
OkHttpClient client = new OkHttpClient();

Request request = new Request.Builder()
  .url("https://gate.whapi.cloud/groups?count=100")
  .get()
  .addHeader("accept", "application/json")
  .addHeader("authorization", "Bearer Your_Token")
  .build();

Response response = client.newCall(request).execute();
//dotnet add package RestSharp

using RestSharp;

var options = new RestClientOptions("https://gate.whapi.cloud/groups?count=100");
var client = new RestClient(options);
var request = new RestRequest("");
request.AddHeader("accept", "application/json");
request.AddHeader("authorization", "Bearer Your_Token");
var response = await client.GetAsync(request);

Console.WriteLine("{0}", response.Content);
How to Retrieve WhatsApp Group Members via No-Code
Use a
GET request to https://gate.whapi.cloud/groups to retrieve a list of all WhatsApp groups you are a member of, along with details about each group - including participant information.Alternatively, if you already know the group ID, you can use
GET https://gate.whapi.cloud/groups/{GroupID} to fetch data for a specific group.In Make and n8n, this can be done using a custom module within the existing integration. In platforms like Zapier, IFTTT, or similar tools, you’ll need to use a raw HTTP request module to perform the API call.
How to Connect a Bot to a WhatsApp Group
Connecting a bot to a WhatsApp group is technically no different from connecting it to a private chat. The bot is simply a WhatsApp number linked to your API session, capable of receiving and sending messages programmatically. Incoming messages, whether from private chats or group conversations, are delivered to your system via webhook, and you can handle them using your bot logic.
To get started, you can build a bot in your preferred programming language using our API. We provide step-by-step guides for several environments:
- Create a WhatsApp Bot in Node.js;
- Create a WhatsApp Bot in Python;
- Create a WhatsApp Bot in PHP;
- Create a WhatsApp Bot in Java;
In addition, we’ve published several open-source bot templates on GitHub that you can use or extend for your own projects. Some of these bots already support advanced workflows — such as creating a new WhatsApp group with a user from a private chat, automatically adding both the bot and the user to that group, and sending an initial welcome message once the group is created.
These templates are great for onboarding, consultations, team workflows, or organizing users by context.
When your bot is part of a WhatsApp group, it will automatically receive all group messages via webhook. In the callback payload, you can identify group messages by checking the
chat_id, which will follow the format [email protected] (as opposed to a phone number in private chats). The from field will indicate the individual sender's number inside the group.By parsing and responding to these messages, your bot can participate in group conversations - whether to log activity, trigger workflows, or provide automated responses.
Tips, Limitations, and Best Practices
When working with WhatsApp groups via API, it's essential to be aware of key limitations and best practices to ensure stable and compliant automation.
Since the API operates by connecting to a regular WhatsApp account, the following guidelines should be observed:
- Do not add users to groups without their consent. Always respect user privacy and avoid unsolicited invitations;
- Avoid sending spam or unwanted content, as this may result in your account being flagged or permanently banned;
- Even though there are no strict rate limits, we strongly recommend imitating human-like behavior: do not create dozens of groups or send many messages per second. Add deliberate pauses and use reasonable delays between actions when automating group-related tasks;
A critical best practice is to never rely on a single admin account for managing a WhatsApp group via API. If that account is restricted or banned due to misuse or overuse, you may temporarily lose access to the group and its members - even if the number is eventually recovered.
To prevent this, always add a secondary administrator to every group you automate. This ensures you retain access and control in case the primary number is blocked. You can add an additional number to the group and promote it to admin using the
Promote to Group Admin endpoint. For implementation details, see the documentation here.Following these simple precautions can protect your automation flow and help you maintain reliable long-term group operations.
Troubleshooting
Various issues can arise during the testing and operation of the WhatsApp chatbot. Here are a few typical situations and recommendations for their resolution:
The Bot Does Not Respond to Incoming Messages
- Ensure you are sending messages to the number on which the bot is running from a different phone. The bot will not be able to respond to messages sent from the same number.
- If the bot does not respond to messages from other numbers, check the operation of webhooks. Use services to simulate webhooks, for example, Webhook.site, to ensure which path the callback requests are coming through. Afterwards, check if the path matches the one you have configured. Also, ensure your server responds with 200Ok.
If you encounter difficulties, do not hesitate to contact our technical support for help. You can write in the web chat widget on our site or email [email protected]. We will assist you and figure out exactly what's wrong with the webhook.
The Bot Sends Messages Non-Stop
Return to the original version of the code. Our script includes a check to determine whether a message is incoming or outgoing, to prevent getting into an infinite loop of sending messages. Infinite sending may occur if there is no check for outgoing messages in the code, causing the bot to call itself, or if there is a cyclic sending of messages in the code.
Can’t Add a User to the Group?
There are several possible reasons why a participant can’t be added:
- You must be a group admin. Only admins are allowed to add new members.
- The user may have restricted group invitations in their privacy settings. If so, they cannot be added automatically via API.
- The group may have reached the maximum size of 1024 participants. In this case, remove inactive members or consider creating a new group.
- WhatsApp’s anti-spam policies may block certain numbers from being added - especially if the contact isn't saved or hasn’t interacted with you. You can try syncing contacts via our Google Contacts API integration, but even that may not guarantee success due to WhatsApp's internal filters.
For more details, see the article: Why aren't participants being added to the group?
Message Not Delivered?
If your message isn’t being delivered:
- Double-check the group ID - incorrect or expired IDs will result in delivery failure.
- If the message is sent but not visible in the group, review the message format. For example, WhatsApp groups may not display certain content types, such as webp images or interactive buttons.
Permission Denied?
This error typically occurs when:
- Your number is not recognized as a group admin.
- The API may not have correctly synced your admin status or phone number. In such cases, try re-authorizing your API channel to refresh permissions and metadata.
Group Members Not Displayed?
Whapi.Cloud automatically processes and updates group metadata in the background. After connecting your WhatsApp number and making the first
GET /groups or GET /group request, group data is queued for synchronization.Group data is updated every 15 seconds to stay within WhatsApp API limits. If participant phone numbers are not yet visible, it may be due to privacy restrictions or the synchronization still being in progress. In most cases, simply waiting a few moments after setup allows the system to fetch all available group details.
For more information, read: How Whapi Processes and Updates WhatsApp Group Data
What Does @lid Mean in Participant List?
@lid is a new participant identifier format introduced by WhatsApp to enhance privacy and anonymity in groups. Instead of displaying a phone number, members may appear as anonymized IDs like 1524746986546@lid. This typically occurs when number visibility is restricted by group settings or when the group is part of a community with stricter privacy controls.
These changes are part of WhatsApp’s broader privacy strategy. Whapi automatically processes such groups and attempts to resolve @lid values to actual phone numbers over time. However, if your WhatsApp account doesn't have permission to access a participant’s number due to their privacy settings, the number will remain hidden.
For more details, see: What Is lid in WhatsApp Groups?
Deployment and Using Servers
To ensure your WhatsApp chatbot is available 24/7, it needs to be hosted on a reliable hosting platform. You can use your server, but in this chapter, we will consider the three most popular platforms - Firebase, AWS, and Heroku - and go through the basic steps of deploying your bot on each of them.
The choice of platform depends on your preferences, budget, and project requirements. Each of the considered platforms offers its unique features and advantages. Firebase and AWS Lambda provide powerful backend functionality without the need to manage a server, while Heroku offers simplicity in deploying applications based on Git.
Firebase
Firebase offers Cloud Functions functionality, allowing you to run your bot without worrying about server infrastructure. In our opinion, this is the most optimal option.
- Create a project in Firebase Console;
- Install Firebase CLI, following the instructions;
- Initialize Firebase in your project directory with the command firebase init;
- Deploy your bot using the command firebase deploy --only functions.
AWS (Amazon Web Services)
AWS Lambda offers the ability to run code in response to triggers from other AWS services, making it a good choice for a bot.
- Register or log in to AWS Management Console;
- Create a new Lambda function through the AWS console, selecting API Gateway as the trigger;
- Upload your bot's code into the Lambda function;
- Configure the API Gateway to interact with your bot and the outside world.
Heroku
Heroku offers an easy-to-use platform for hosting applications, which can automatically deploy code from your Git repository.
- Create an account on Heroku;
- Install Heroku CLI and log in;
- Create a new Heroku app through the console or using the command heroku create;
- Link your Git repository to Heroku and perform deployment with the commands git push heroku master;
- Set the webhook URL provided by Heroku.
Summary & What’s Next
With the WhatsApp API and no-code tools like Make or n8n, you can fully automate group-related tasks - from sending messages, creating and managing groups, to adding participants and even connecting intelligent bots.
In this guide, you’ve learned how to send WhatsApp group messages using both code and low-code platforms, create and manage groups, promote admins, retrieve participant lists, connect bots, and handle group messages through webhooks - all while following best practices and understanding how to troubleshoot common issues.