Automatización de WhatsApp con Python
WhatsApp hace tiempo dejó de ser solo un mensajero: se ha convertido en una herramienta importante para los negocios. Automatizar la comunicación con los clientes mediante chatbots e integrar WhatsApp en CRM abre nuevas oportunidades para aumentar la eficiencia y mejorar el servicio. Python es una excelente opción para esta tarea gracias a su flexibilidad y accesibilidad, y Whapi.Cloud ofrece acceso conveniente a la API de WhatsApp con un excelente soporte técnico, siempre listo para ayudar.
En esta guía, cubriremos:
- Cómo trabajar con la API de WhatsApp usando Python;
- Integración con Whapi.Cloud para automatizar varias tareas;
- Uso de webhooks para gestionar y responder automáticamente a los mensajes;
- Conectar tu bot de WhatsApp con ChatGPT para conversaciones impulsadas por IA;
El objetivo del artículo es mostrar cómo crear paso a paso un chatbot simple pero útil para WhatsApp en Python. Si tiene preguntas o dificultades, utilice nuestro chat en el sitio web: ¡le ayudaremos rápidamente! Para temas más avanzados, explora recursos adicionales en nuestra “Página sobre cómo crear un bot de WhatsApp”.
Para facilitar el trabajo, puede utilizar nuestros scripts de bots en Python, que hemos publicado en GitHub. Estos proyectos describen en detalle el proceso de configuración y prueba, y dentro del código encontrará comentarios útiles. Es un excelente punto de partida para desarrolladores principiantes.
Para facilitar el trabajo, puede utilizar nuestros scripts de bots en Python, que hemos publicado en GitHub. Estos proyectos describen en detalle el proceso de configuración y prueba, y dentro del código encontrará comentarios útiles. Es un excelente punto de partida para desarrolladores principiantes.
Preparación para desarrollar un bot
Antes de comenzar, asegúrese de tener todo lo necesario:
- Python. Instale Python si aún no lo tiene. Descargue la última versión (se recomienda 3.6 o superior) desde el sitio oficial y siga las instrucciones.
- Flask. Flask es un framework web ligero en Python que usaremos para configurar el servidor y manejar los webhooks. Puede instalar Flask con el siguiente comando: pip install Flask
- Token de API. Regístrese en Whapi.Cloud para obtener un token de API. Este token permitirá que su bot interactúe con WhatsApp a través de la API. Después de registrarse, se le proporcionará un canal gratuito con algunas limitaciones, suficiente para probar su desarrollo. Whapi.Cloud es un proveedor que destaca por su estabilidad, bajo costo y amplia funcionalidad. A continuación, se ofrecen instrucciones para obtener el token.
- Webhook configurado. Para que el bot pueda manejar mensajes entrantes y eventos de WhatsApp, necesitará la URL de su servidor (local o externo) para procesar las notificaciones de WhatsApp. En este artículo explicaremos en detalle cómo hacerlo y dónde obtener dicho enlace.
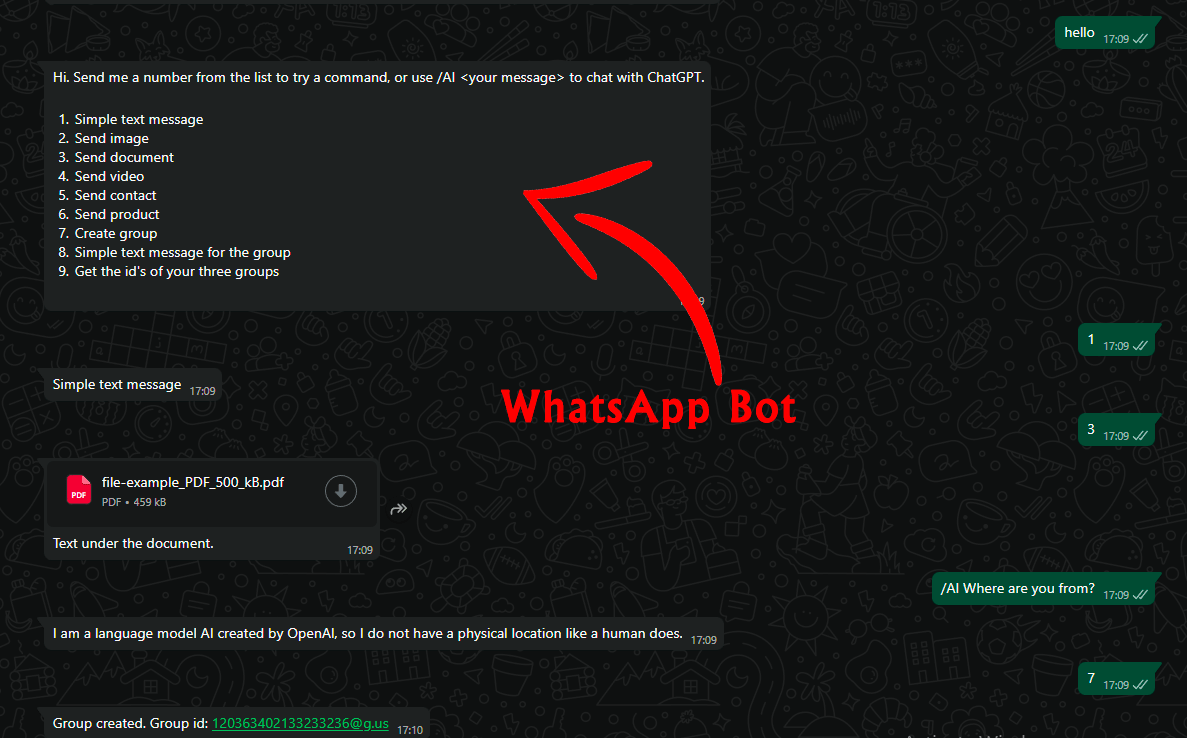
En GitHub encontrará varios repositorios con diferentes bots. Uno de ellos se considera ideal para programadores principiantes, ya que cuenta con una funcionalidad muy simple pero comprensible: envío de mensajes de texto y mensajes con imágenes en respuesta a comandos. Otra variación del bot es más adecuada para usuarios avanzados, ya que este bot incluye más capacidades: envío de mensajes normales, imágenes, archivos, videos, contactos (vCard), productos; creación de un nuevo grupo de WhatsApp, envío de invitaciones y mensajes al grupo.
Si desea saber más sobre las diferencias entre WhatsApp Business API y WhatsApp API o no está seguro de qué proveedor elegir, le recomendamos leer nuestro artículo "Cómo elegir la API de WhatsApp: Comparación de soluciones y proveedores". Esto le ayudará a tomar una decisión informada y evitar futuros problemas y gastos innecesarios.
Obteniendo el token para la API de WhatsApp
Registro y conexión de número
Si aún no se ha registrado en la plataforma Whapi.Cloud, hágalo ahora mismo. El registro es sencillo, no requiere tarjeta de crédito, y obtendrá 5 días de acceso completo a la API con limitaciones menores. Esto será más que suficiente para probar todos los métodos y funciones y configurar su bot o integración.
El siguiente paso es conectar un número de WhatsApp. No necesita pasar por procesos de moderación o migración de números. Conecte cualquier número que ya esté utilizando en su aplicación de WhatsApp. Su chatbot seguirá funcionando incluso si el teléfono está desconectado, por lo que no se preocupe por mantener el dispositivo siempre activo.
Para conectar un número:
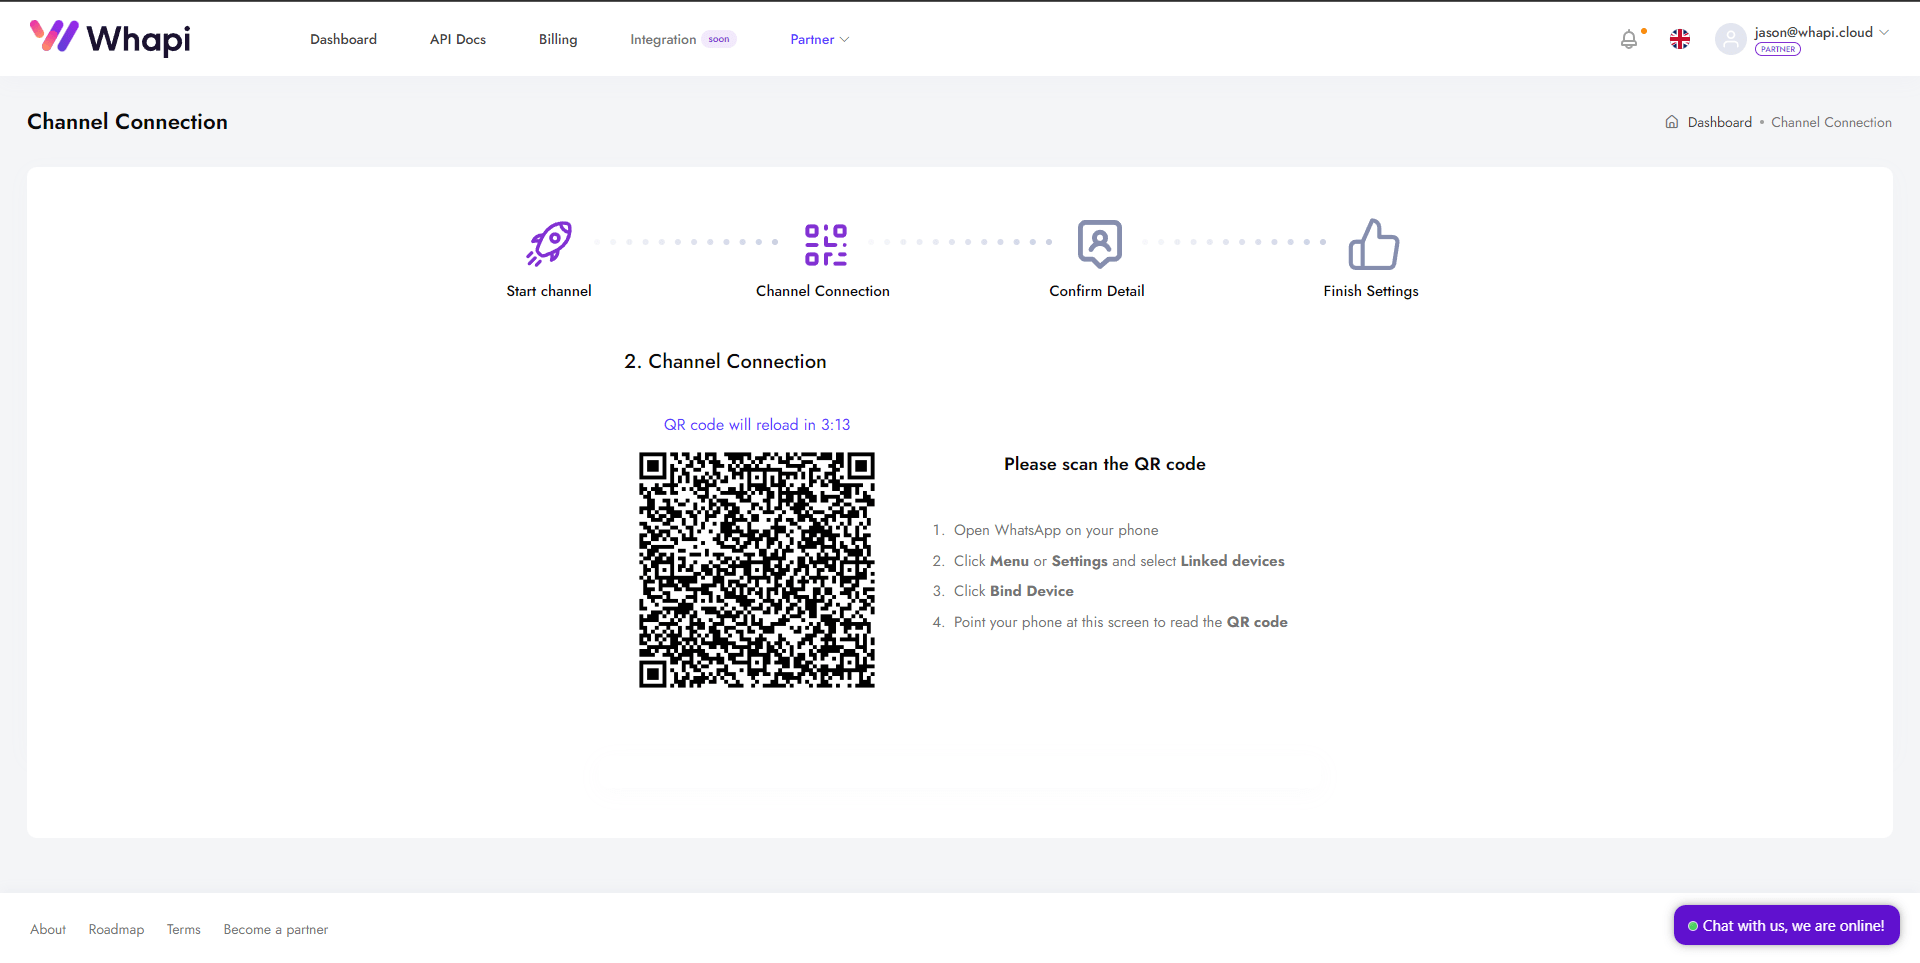
- 1. Vaya al panel y abra la página del canal Default Channel, que ya está creado para usted.
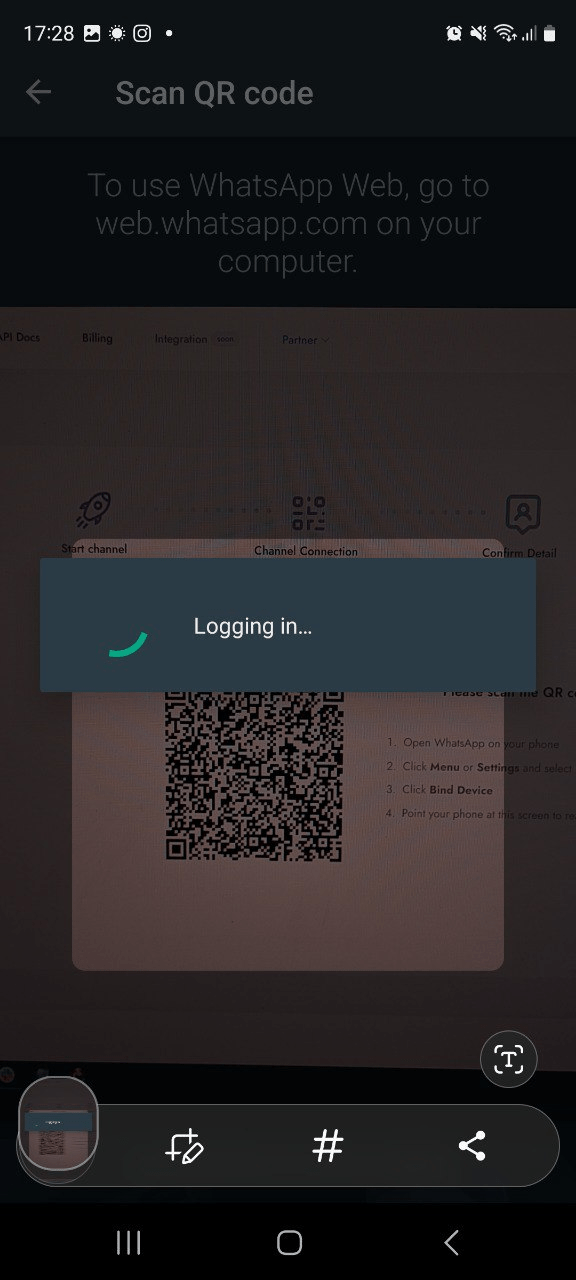
- 2. En el primer paso, verá un código QR con instrucciones.
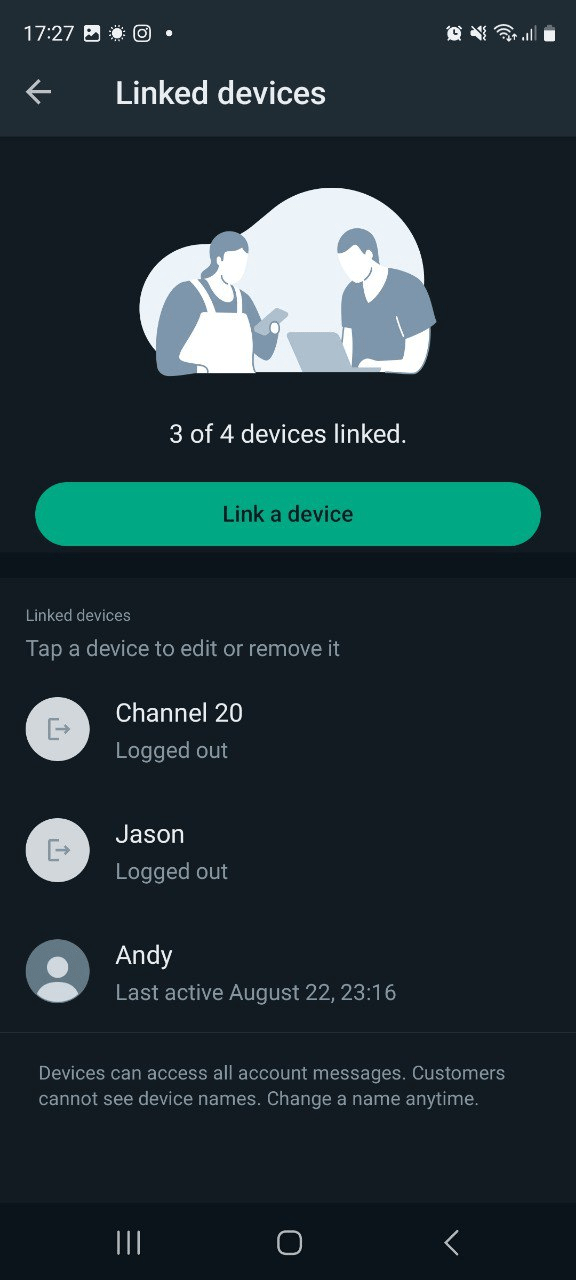
- 3. Abra WhatsApp en su dispositivo, vaya a Configuración → Dispositivos vinculados → Vincular dispositivo → Escanear código QR.
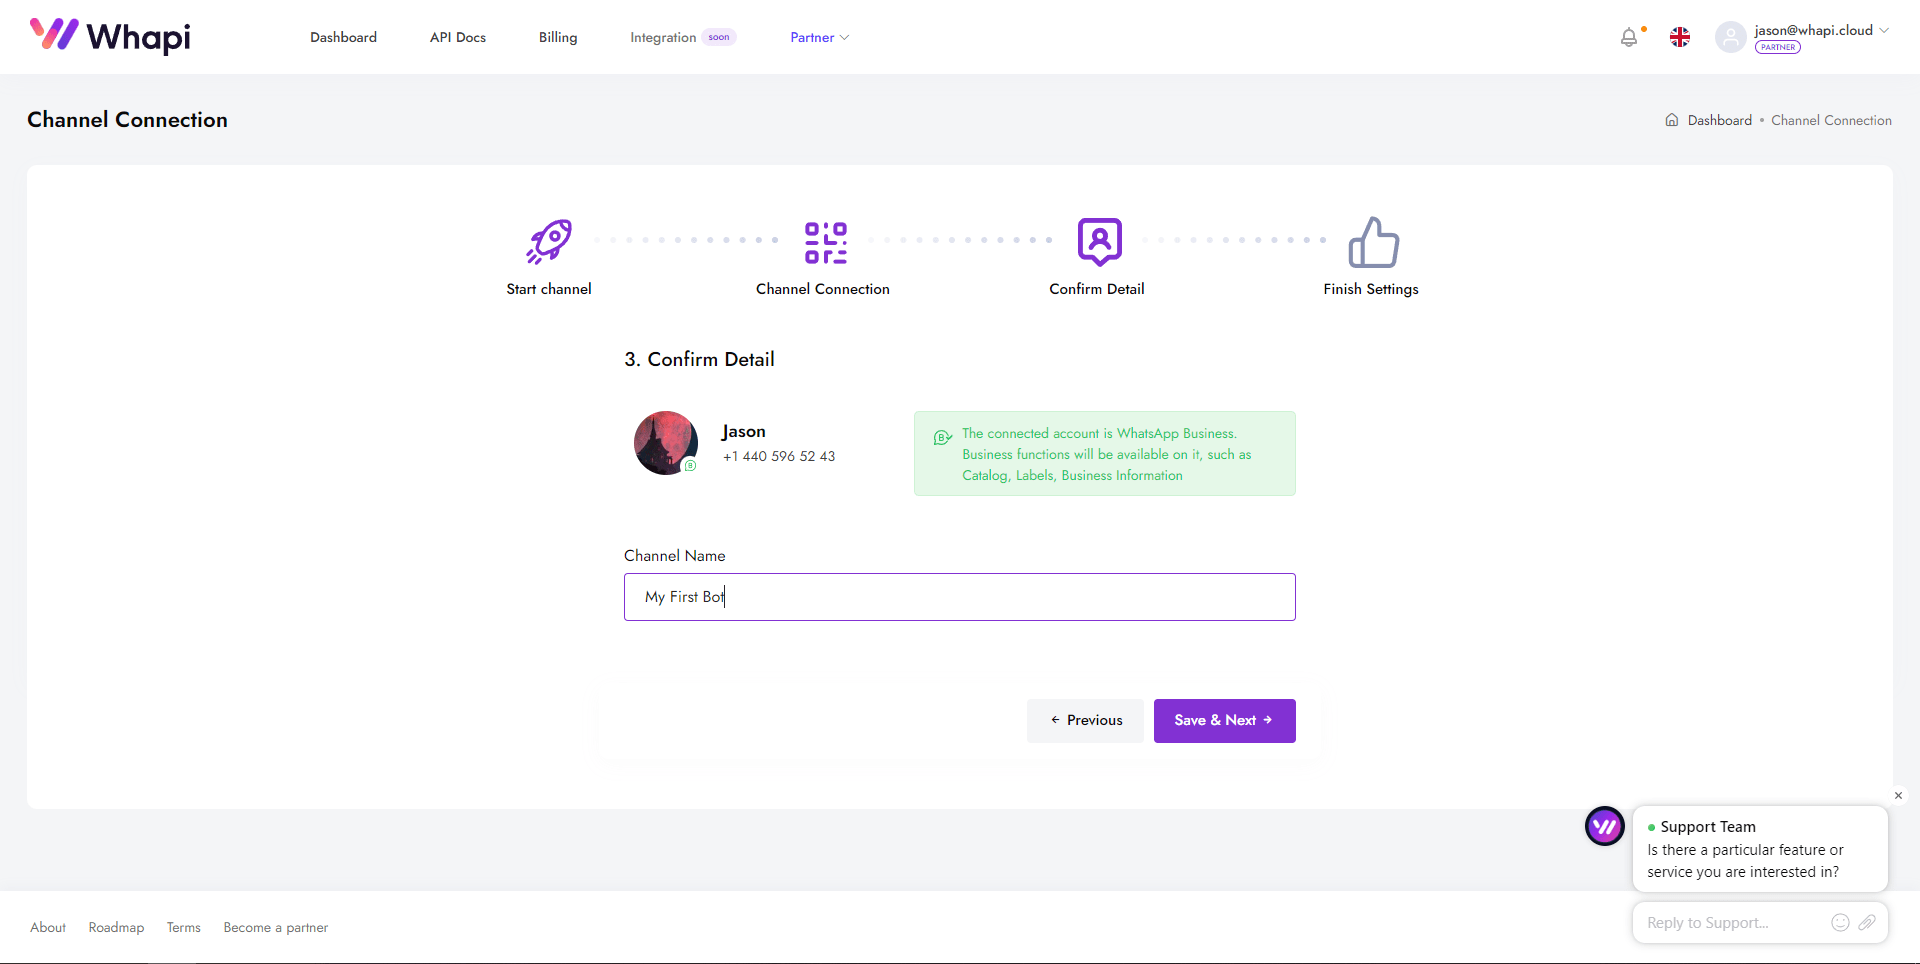
- 4. Después de conectarse exitosamente, asigne un nombre al canal (por ejemplo, "Mi Chatbot") para facilitar su uso en el futuro.
Después verá la ventana de configuración, pero por ahora no es necesario: puede omitir este paso y volveremos a él más tarde.
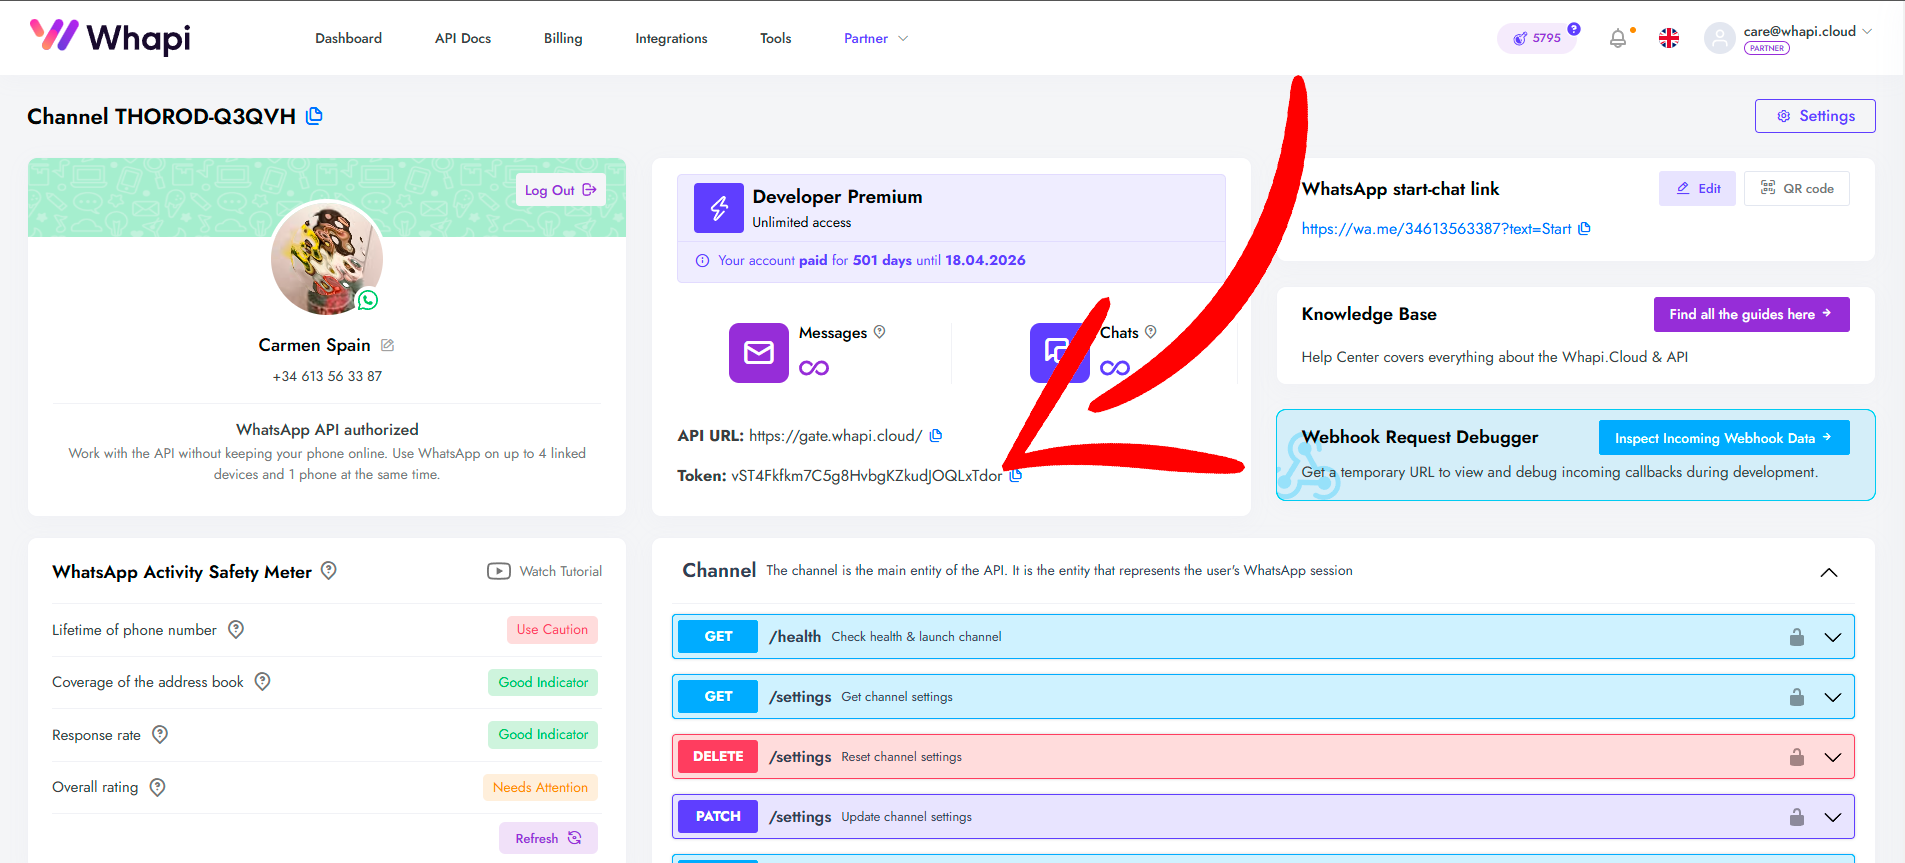
Obtención del token de API
En la página del canal conectado, en el centro se encuentra su token único de API, necesario para la autenticación de solicitudes. Este token es crucial: se envía en los encabezados de las solicitudes como Bearer Token o como parámetro, dependiendo del método de acceso.
 Your API Key
Herramientas para trabajar con la API
Whapi.Cloud ofrece varias formas de familiarizarse con la documentación de la API:
- Hub práctico para desarrolladores: Plataforma especializada con documentación y ejemplos que le permitirá obtener fragmentos de código para todos los endpoints en varios lenguajes de programación.
- Colección de Postman: Solicitudes preparadas para probar la API a través de Postman.
- Archivo Swagger: Descripción detallada de todos los métodos de la API, con la posibilidad de realizar pruebas directamente desde la página del canal.
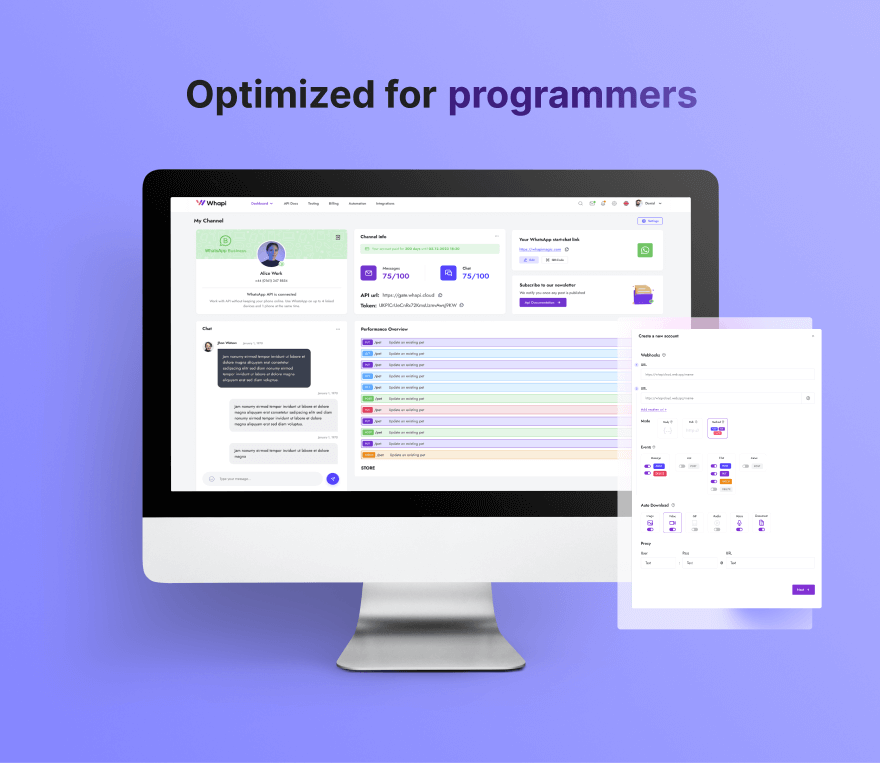
Estas herramientas ayudan a desarrolladores de cualquier nivel a comprender rápidamente las funciones de la API e iniciar la integración. Una de las principales ventajas de Whapi.Cloud es la facilidad de configuración: comenzar a trabajar con la API de WhatsApp puede lograrse en solo unos minutos.
¿Qué es un Webhook y cómo configurarlo?
Para una interacción completa entre su bot de WhatsApp y nuestro gateway API, es necesario configurar un webhook. Esto garantizará el intercambio de datos entre sistemas: su bot podrá recibir mensajes entrantes, actualizaciones sobre el estado de los mensajes (por ejemplo, "enviado", "entregado", "leído") o notificaciones sobre otros eventos de manera eficiente.
¿Qué es un webhook?
Un webhook es una llamada HTTP inversa que envía datos desde nuestro servidor a su servidor cuando ocurre un evento específico en WhatsApp. Por ejemplo, tan pronto como un cliente envía un mensaje, su servidor recibe automáticamente una notificación sobre el mensaje entrante.
Principales ventajas de los webhooks:
- Notificaciones instantáneas. Todos los eventos se procesan casi en tiempo real.
- Alta capacidad. La velocidad de recepción de notificaciones está limitada únicamente por el rendimiento de su servidor.
- Flexibilidad. Puede recibir solo los eventos que realmente necesita, como: Mensajes personales; Mensajes en grupos; Cambios en el estado de los mensajes; Cambios en los participantes de los grupos; Notificaciones de llamadas perdidas; Estados de los canales y mucho más.
Whapi.Cloud le ofrece una herramienta conveniente para configurar webhooks, lo que permite gestionar notificaciones de manera flexible en el formato que necesita y adaptarlas a sus tareas.
¿Cómo y dónde obtener una URL para el webhook?
Para que su integración o bot pueda recibir y procesar datos de WhatsApp en tiempo real, necesitará la URL de un servidor donde se alojará el script del bot que recibirá los datos. Si no está seguro de dónde obtener dicha dirección, hemos preparado una guía detallada: "¿Dónde encontrar la URL del Webhook?". En el artículo se explica cómo configurar un servidor local o qué hosting externo elegir. A continuación, exploraremos una forma sencilla y rápida de obtener dicha URL utilizando Ngrok.
Técnicamente, cuando llega un mensaje a su WhatsApp, nuestro servidor enviará una solicitud POST con un cuerpo JSON a la URL de su script. El cuerpo JSON incluirá toda la información sobre el mensaje recibido, como texto, número del remitente, hora de envío, etc., lo que le permitirá leer esta información en tiempo real.
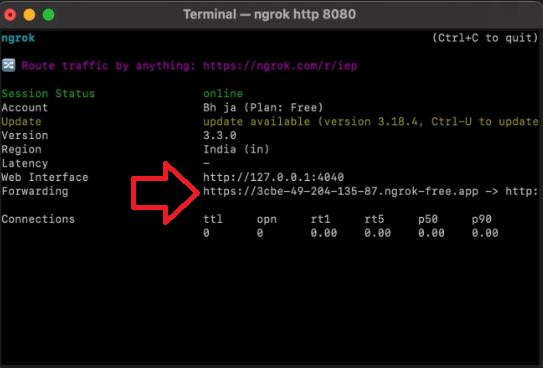
La forma más sencilla de obtener una URL para uso local es utilizar una herramienta como Ngrok, que crea un túnel seguro hacia su localhost, permitiéndole acceder al servidor local desde Internet.
- 1) Descargue Ngrok desde su sitio oficial y descomprímalo. Luego, abra el terminal y navegue a la carpeta donde está almacenado Ngrok.
- 2) Ejecute ./ngrok http PUERTO, reemplazando PUERTO por el puerto en el que su servidor Flask está funcionando localmente (por ejemplo, 80).
- 3) Ahora tendrá una URL pública que puede usar como URL del webhook. Cópiela para su uso posterior.
Configuración del webhook en el canal
Una vez que tenga una URL funcional para el webhook, siga los pasos a continuación:
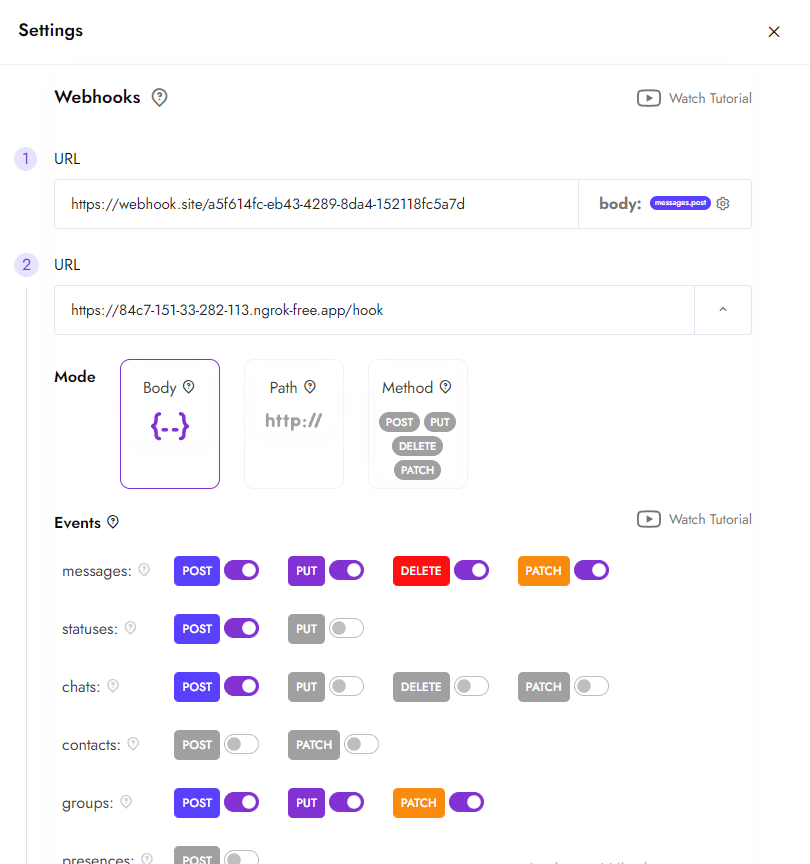
- Vaya a la configuración del canal. En la página del canal, haga clic en el botón de configuración (en la esquina superior derecha).
- Configure el webhook. Especifique su URL en la sección de webhooks utilizando las configuraciones preseleccionadas. Puede configurar múltiples webhooks para diferentes eventos si es necesario. También puede cambiar estas configuraciones mediante la API.
- Guarde los cambios. Después de esto, todas las notificaciones sobre eventos en WhatsApp se enviarán al servidor que especificó.
Por ejemplo, si su servidor recibe un mensaje, el webhook enviará una solicitud POST con los datos del mensaje. Su tarea es procesar estos datos y programar el bot para que responda en consecuencia. En la siguiente parte del artículo, veremos cómo hacerlo.
Creación de la base del bot de WhatsApp en Python
En esta sección, exploraremos cómo usar la API de Whapi.Cloud para enviar y gestionar mensajes en WhatsApp utilizando Python. Suponemos que ya ha configurado el entorno: Python está instalado, el token de API se ha obtenido y ha creado un proyecto con un archivo index.py.
Instalación de bibliotecas necesarias.
Para interactuar con la API, necesitaremos instalar varias bibliotecas. Puede instalarlas individualmente o crear un archivo requirements.txt con la lista de dependencias e instalarlas con un solo comando.
Flask==3.0.0
requests==2.27.1
requests-toolbelt==0.9.1
python-dotenv==0.20.0
Comando para la instalación:
pip install -r requirements.txtUso del archivo .env.
Para facilitar el trabajo con el token y otras variables de entorno, cree un archivo .env. Esto le permitirá almacenar datos sensibles separados del código, simplificando su actualización.
Ejemplo del contenido del archivo .env:
API_TOKEN=8FjpwmyFUulh7emXOprrET3xKrwJ984O # API token from your channel
API_URL=https://gate.whapi.cloud # API endpoint URL
PORT=80 # example, 80 or 443
#URL_LINK= The Webhook link to your server {link to server}/hook.
Puede cargar las variables de entorno en su script utilizando la biblioteca python-dotenv:
from dotenv import load_dotenv
import os

load_dotenv()
api_token = os.getenv("API_TOKEN")
Envío de un mensaje de texto
Comencemos con un ejemplo simple: enviemos un mensaje de texto. El token debe pasarse en el encabezado de autorización (Bearer), y el cuerpo de la solicitud debe contener los parámetros del mensaje.
import requests

# URL for sending text messages. Can be pulled from .env
url = "https://gate.whapi.cloud/messages/text"

# Data for sending a message
payload = {
    "to": "919984351847",  # Enter the recipient's number in international format
    "body": "Hello! This is a test message."  # Text of message
}

# Headers, including authorization token
headers = {
    "accept": "application/json",
    "content-type": "application/json",
    "authorization": f"Bearer {api_token}"  # Use the token from the .env file
}

# Sending a POST request
response = requests.post(url, json=payload, headers=headers)

# Output server response
print(response.status_code)
print(response.text)
Después de enviar exitosamente el mensaje, puede probar escenarios más complejos, como enviar imágenes, archivos o interactuar con grupos. Simplemente use ejemplos de solicitudes similares de nuestra documentación de la API. Hablaremos de esto en los siguientes capítulos. Mientras tanto, asegúrese de que su mensaje se haya enviado correctamente y que el servidor devuelva el estado 200 OK.
Recepción de mensajes a través de Flask Webhook
Para procesar mensajes entrantes, debe configurar una ruta Flask que actuará como el punto final del webhook. Esta ruta recibirá datos de Whapi.Cloud, que se envían como solicitudes POST cuando ocurren eventos (por ejemplo, recepción de un mensaje).
Después de configurarlo, debe actualizar la URL del webhook en su canal en Whapi.Cloud, especificando la URL que creó. En este ejemplo, usamos https://your_domain_or_ip/hook. Recordemos que este puede ser un servidor externo o local. Lo importante es asegurarse de que este enlace sea funcional y acepte solicitudes. Siempre puede verificar la accesibilidad de su enlace de webhook utilizando nuestro endpoint
Una variación simple para procesar mensajes entrantes:
from flask import Flask, request, jsonify

app = Flask(__name__)

# Route for processing incoming messages
@app.route('/hook', methods=['POST'])
def webhook():
    # Retrieving data from a request
    data = request.json

    # Logging an incoming message
    print("Received message:", data)

    # Example of incoming message processing
    if "messages" in data:
        for message in data["messages"]:
            sender = message["from"]  # Sender's number
            text = message.get("body", "")  # Text of message

            print(f"Message from {sender}: {text}")

            # Logic for replying to a message
            # Check out our examples on GitHub, where we use more branching on commands for the bot
            if text.lower() == "hello":
                send_response(sender, "Hi there! How can I help you?")
            elif text.lower() == "bye":
                send_response(sender, "Goodbye!")

    return jsonify({"status": "success"}), 200

# Function for sending a reply
def send_response(to, body):
    import requests

    url = "https://gate.whapi.cloud/messages/text"
    payload = {
        "to": to,
        "body": body
    }
    headers = {
        "accept": "application/json",
        "content-type": "application/json",
        "authorization": f"Bearer {api_token}"  # Use the token from the .env file
    }

    response = requests.post(url, json=payload, headers=headers)
    print(f"Response to {to}: {response.status_code}, {response.text}")

if __name__ == '__main__':
    app.run(host='0.0.0.0', port=80)
En este código, configuramos una ruta Flask (no olvide asegurarse de que el servidor Flask esté en ejecución). Asegúrese de que su webhook funcione correctamente y devuelva una respuesta 200 adecuada.
Ahora su bot puede responder automáticamente a los mensajes entrantes y realizar acciones según su contenido. Recordemos que para simplificar la creación de un bot de WhatsApp desde cero, puede usar nuestros scripts de bots de Python listos para usar que hemos publicado en GitHub. Estos proyectos describen en detalle el proceso de configuración y prueba, y encontrará comentarios útiles dentro del código. Es un excelente punto de partida para desarrolladores principiantes.
En GitHub encontrará varios repositorios con diferentes bots. Uno de ellos se considera ideal para programadores principiantes, ya que cuenta con una funcionalidad muy simple pero comprensible: envío de mensajes de texto y mensajes con imágenes en respuesta a comandos. Otra variación del bot es más adecuada para usuarios avanzados, ya que este bot incluye más capacidades: envío de mensajes normales, imágenes, archivos, videos, contactos (vCard), productos; creación de un nuevo grupo de WhatsApp, envío de invitaciones y mensajes al grupo.
En el próximo capítulo, exploraremos capacidades avanzadas, como el envío de contenido multimedia e interacción con grupos.
Funciones avanzadas
Con Whapi.Cloud, tendrá acceso a un impresionante conjunto de herramientas y funciones que le permitirán crear bots de chat de cualquier nivel de complejidad.
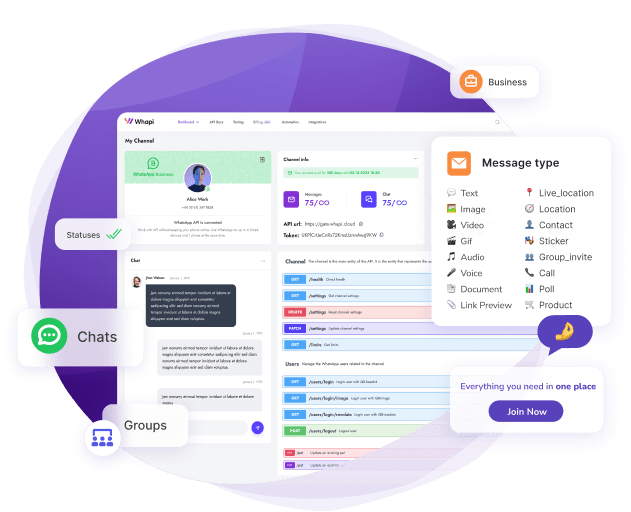
Ofrecemos instrucciones paso a paso y ejemplos de uso de varios endpoints de API y SDK que ayudarán a automatizar muchas tareas: enviar mensajes de texto, archivos de cualquier formato, ubicaciones, contactos, stickers, encuestas, productos y mucho más. Reaccione a mensajes (emojis), cítelos, márquelos como leídos, fije chats, active el estado 'escribiendo...'. Cree y elimine grupos y comunidades automáticamente, agregue y elimine participantes de grupos, configure administradores, cambie parámetros y configuraciones de grupo, bloquee usuarios y más.
Gracias a estas capacidades, integrar un bot de WhatsApp con su sitio web, aplicación, CRM, ERP u otros sistemas se convierte en un proceso simple y comprensible. Whapi.Cloud proporciona a los desarrolladores todas las herramientas necesarias para una integración flexible y rápida.
Todos los métodos y sus capacidades están detallados en nuestra documentación. ¡Comience la automatización hoy mismo para abrir nuevos horizontes para su negocio!
Envío de una imagen
La interactividad y el contenido visual pueden aumentar significativamente el compromiso de los usuarios en la comunicación con su bot de WhatsApp. El envío de imágenes a través de la API brinda a las empresas la oportunidad de compartir productos, promociones o mensajes importantes en forma visual, lo que hace que la interacción sea más rica y efectiva. Ahora expliquemos cómo enviar una imagen a través de la API de WhatsApp usando Python:
import requests

url = "https://gate.whapi.cloud/messages/image"

payload = {
    "to": "919984351847",
    "media": "https://upload.wikimedia.org/wikipedia/en/a/a9/Example.jpg",
    "caption": "An example image"
}
headers = {
    "accept": "application/json",
    "content-type": "application/json",
    "authorization": "Bearer Your_Token"
}

response = requests.post(url, json=payload, headers=headers)

print(response.text)
Envío de un archivo
Extender la funcionalidad de su bot de WhatsApp para incluir el envío de archivos lo convierte en una herramienta indispensable para el intercambio de información importante. Esto puede ser útil para enviar facturas, contratos, listas de precios y otros documentos. Veamos cómo implementar el envío de archivos a través de la API de WhatsApp con Python:
import requests

url = "https://gate.whapi.cloud/messages/document"

payload = {
    "to": "919984351847",
    "media": "data:application/pdf;base64,JVBERi0xLjQKJdPr6eEKMSAwIG9iago8PC9UaXRsZSAoVGVybXMgb2YgU2VydmljZSBXaGFwaS5DbG91ZCkKL0NyZWF0b3IgKE1vemlsbGEvNS4wIFwoV2luZG93cyBOVCAxMC4wOyBXaW42NDsgeDY0XCkgQXBwbGVXZWJLaXQvNTM3LjM2IFwoS0h............",
    "filename": "Terms of Service Whapi.Cloud.pdf",
    "caption": "Hello, I am attaching an important file to my message"
}
headers = {
    "accept": "application/json",
    "content-type": "application/json",
    "authorization": "Bearer Your_Token"
}

response = requests.post(url, json=payload, headers=headers)

print(response.text)
Creación de un grupo de WhatsApp en Python
Con Whapi.Cloud, no solo puede crear grupos, sino también gestionarlos dinámicamente. Por ejemplo, agregar participantes, cambiar el nombre del grupo, asignar administradores y eliminar grupos que ya no sean necesarios. Expliquemos cómo crear un grupo a través de la API de WhatsApp usando Python:
import requests

url = "https://gate.whapi.cloud/groups"

payload = {
    "participants": ["919984351847", "919984351848", "919984351849"],
    "subject": "Group Subject 3"
}
headers = {
    "accept": "application/json",
    "content-type": "application/json",
    "authorization": "Bearer Your_Token"
}

response = requests.post(url, json=payload, headers=headers)

print(response.text)
Integración con ChatGPT: IA para tu bot de WhatsApp
Una de las extensiones más solicitadas es conectar tu bot de WhatsApp con ChatGPT. Esto te permite procesar los mensajes de los usuarios utilizando inteligencia artificial y ofrecer respuestas significativas y dinámicas.
Para demostrar las capacidades y realizar una capacitación, implementamos un bot simple utilizando el siguiente enfoque: el usuario simplemente escribe el comando /ai [pregunta], y el bot responde utilizando el modelo de ChatGPT.
Paso 1: Añadir dependencias de ChatGPT
Para usar ChatGPT a través de la API de OpenAI, necesitas instalar algunas bibliotecas de Python. La principal es openai, que te permite interactuar con los modelos de ChatGPT desde tu código Python. En tu archivo requirements.txt, añade las siguientes líneas:
openai>=1.91.0,<2.0.0
httpx>=0.28.1,<1.0.0
httpcore>=1.0.9,<2.0.0
Esto es lo que hace cada una de ellas:
- openai - el SDK oficial para enviar solicitudes a OpenAI y obtener respuestas de ChatGPT.
- httpx - una biblioteca moderna y asíncrona de cliente HTTP que openai usa internamente para realizar llamadas a la API.
- httpcore - una biblioteca de transporte de red de bajo nivel usada por httpx. Debe fijarse explícitamente para evitar conflictos de versiones.
Luego instala los paquetes:
pip install -r requirements.txt
Estas bibliotecas aseguran que tu bot pueda comunicarse con ChatGPT de forma fiable y segura.
Paso 2: Obtén tu clave API de OpenAI
Crea una cuenta en platform.openai.com y copia tu clave secreta API desde la sección API Keys. Añade esta clave a tu archivo .env:
OPENAI_API_KEY=your_api_key_here
Paso 3: Añadir la lógica de IA a tu bot
Ahora es momento de escribir un script y crear una versión mínima funcional de tu bot de WhatsApp con soporte para ChatGPT. Vamos a repasar el código paso a paso. Puedes copiar y pegar este código en un archivo llamado index.py. Así, crearemos un servidor Flask simple que:
- - recibe eventos webhook entrantes de Whapi.Cloud,
- - detecta si el mensaje comienza con /ai,
- - envía la solicitud del usuario a ChatGPT mediante la API de OpenAI,
- - devuelve la respuesta generada por IA al usuario en WhatsApp.
# Import necessary libraries for web server, HTTP requests, OpenAI API, environment variables, and .env file loading
from flask import Flask, request, jsonify  # Flask is used to create the web server and handle HTTP requests
import requests  # Used to send HTTP requests to the WhatsApp API
from openai import OpenAI  # OpenAI client for interacting with ChatGPT
import os  # For accessing environment variables
from dotenv import load_dotenv  # For loading variables from a .env file

# Load environment variables from a .env file into the environment
load_dotenv()
# Create a Flask web application instance
app = Flask(__name__)

# Retrieve required configuration values from environment variables
API_TOKEN = os.getenv("API_TOKEN")  # Token for authenticating with WhatsApp API
API_URL = os.getenv("API_URL")      # Base URL for WhatsApp API
OPENAI_API_KEY = os.getenv("OPENAI_API_KEY")  # API key for OpenAI

# Ensure all required environment variables are set, otherwise stop the program with an error
if not API_TOKEN or not API_URL or not OPENAI_API_KEY:
    raise RuntimeError("Missing required environment variables: API_TOKEN, API_URL, or OPENAI_API_KEY")

# Initialize the OpenAI client with the provided API key
openai_client = OpenAI(api_key=OPENAI_API_KEY)

# Function to send a prompt to ChatGPT and get a response
# Takes a string prompt and returns the model's reply as a string
def ask_openai(prompt):
    response = openai_client.chat.completions.create(
        model="gpt-3.5-turbo",  # Specify which OpenAI model to use
        messages=[{"role": "user", "content": prompt}]  # Provide the user's message to the model
    )
    # Extract and return the text of the model's reply
    return response.choices[0].message.content.strip()

# Function to send a text message to a WhatsApp user via the WhatsApp API
# 'to' is the recipient's chat ID, 'body' is the message text
def send_message(to, body):
    headers = {
        "Authorization": f"Bearer {API_TOKEN}",  # Add authentication token to the request
        "Content-Type": "application/json"        # Specify that we're sending JSON data
    }
    payload = {"to": to, "body": body}  # Prepare the message data
    # Send the message to the WhatsApp API endpoint
    response = requests.post(f"{API_URL}/messages/text", json=payload, headers=headers)
    print("Whapi response:", response.status_code, response.text)  # Log the API response for debugging

# Define a webhook endpoint to receive incoming WhatsApp messages
@app.route("/hook/messages", methods=["POST"])
def webhook():
    data = request.json  # Parse the incoming JSON data
    print("Incoming:", data)  # Log the incoming data for debugging

    # Loop through all received messages (could be more than one in a single webhook call)
    for msg in data.get("messages", []):
        if msg.get("from_me"):
            continue  # Skip messages sent by the bot itself

        sender = msg.get("chat_id")  # Get the sender's chat ID
        # Safely extract the message text, handling cases where 'text' might be missing
        text = (msg.get("text") or {}).get("body", "").strip()

        # If the message starts with '/ai ', treat it as a prompt for ChatGPT
        if text.lower().startswith("/ai "):
            prompt = text[4:].strip()  # Extract the user's prompt after '/ai '
            if not prompt:
                send_message(sender, "Please provide a prompt after /ai.")  # Ask user to provide a prompt
            else:
                try:
                    reply = ask_openai(prompt)  # Get response from ChatGPT
                    send_message(sender, reply)  # Send the response back to the user
                except Exception as e:
                    send_message(sender, f"Error: {e}")  # Inform user if something went wrong
        else:
            # If the message doesn't start with '/ai ', send instructions to the user
            send_message(sender, "Hi! To ask me something, type:\n/ai your question")

    # Respond to WhatsApp API to confirm receipt of the webhook
    return jsonify({"status": "received"})

# Optional: health check endpoint to verify the bot is running
@app.route("/", methods=["GET"])
def index():
    return "Bot is running"

# Function to register the webhook URL with the WhatsApp API
def register_webhook():
    if os.getenv("BOT_URL"):
        headers = {"Authorization": f"Bearer {API_TOKEN}"}
        payload = {
            "webhooks": [
                {
                    "url": os.getenv("BOT_URL"),  # The public URL where Whapi should send messages
                    "events": [{"type": "messages", "method": "post"}],  # Listen for message events
                    "mode": "method"
                }
            ]
        }
        # Register the webhook
        response = requests.patch(f"{API_URL}/settings", json=payload, headers=headers)
        print("Webhook setup:", response.status_code, response.text)  # Log the result

# If this script is run directly (not imported), start the bot
if __name__ == "__main__":
    register_webhook()  # Optionally register the webhook on startup
    port = int(os.getenv("PORT", 80))  # Use the PORT environment variable or default to 80
    app.run(host="0.0.0.0", port=port)  # Start the Flask web server, accessible from any network interface
Este bot básico procesa los mensajes entrantes, filtra los mensajes provenientes de sí mismo y busca aquellos que comienzan con /ai. Si se encuentra dicho comando, extrae la pregunta, la envía a ChatGPT y responde mediante la API de WhatsApp con una respuesta generada por la IA.
Este script está listo para pruebas. Y su parte útil ya ha sido implementada en nuestro ejemplo de chatbot en GitHub para facilitarte el inicio.
Por supuesto, siempre puedes hacer el código más avanzado, por ejemplo: agregar soporte para historial de mensajes (memoria de conversación), procesar imágenes y archivos de audio, y mucho más.
En los siguientes pasos, te mostraremos cómo desplegar este bot en una plataforma en la nube para que esté siempre en línea.
Solución de problemas
Durante la prueba y operación del chatbot para WhatsApp, pueden surgir varios problemas. Aquí hay algunas situaciones típicas y recomendaciones para resolverlas:
El bot no responde a mensajes entrantes
- Asegúrate de que estás enviando mensajes al número en el que se ejecuta el bot desde otro teléfono. El bot no podrá reaccionar a los mensajes enviados desde el mismo número.
- Si el bot no reacciona a los mensajes de otros números, verifica el funcionamiento de los webhooks. Utiliza servicios para simular webhooks, por ejemplo, Webhook.site, para asegurarte de por dónde llegan las solicitudes de callback. Luego, verifica que el camino coincide con lo que configuraste. Además, asegúrate de que tu servidor responde con 200Ok.
Si encuentras dificultades, no dudes en contactar a nuestro soporte técnico para obtener ayuda. Puedes escribirnos a través del widget de chat en nuestro sitio web o por correo a [email protected]. Te ayudaremos y averiguaremos exactamente qué está mal con el webhook.
El bot envía mensajes sin parar
Regresa a la versión original del código. Nuestro script implementa una verificación para determinar si un mensaje es entrante o saliente, para evitar caer en un bucle infinito de envío de mensajes.
El envío infinito puede ocurrir si falta la verificación de mensajes salientes en el código, lo que hace que el bot se llame a sí mismo, o si hay un envío cíclico de mensajes en el código.
El bot funciona en algunos chats, pero en otros no
Revisa tu plan tarifario en Whapi.Cloud. Si estás usando el modo de prueba o el plan "Sandbox", la interacción está limitada a una cierta cantidad de chats por mes (actualmente hasta 5 chats). En tal caso, el bot no podrá procesar mensajes en el sexto chat y siguientes.
Es importante recordar que muchos problemas pueden prevenirse revisando cuidadosamente la configuración y la lógica de tu chatbot antes del lanzamiento. Mantener tu código actualizado y prestar atención a los detalles de las configuraciones ayudará a evitar la mayoría de los errores comunes. ¡Y nuestro equipo de soporte siempre está disponible y listo para ayudarte!
Despliegue y uso de servidores
Para que tu chatbot de WhatsApp esté disponible 24/7, necesita estar alojado en una plataforma de hosting confiable. Puedes usar tu propio servidor, pero en este capítulo examinaremos las tres plataformas más populares —Firebase, AWS y Heroku— y repasaremos los pasos básicos para desplegar tu bot en cada una de ellas.
La elección de la plataforma depende de tus preferencias, presupuesto y requisitos del proyecto. Cada una de las plataformas examinadas ofrece sus propias capacidades únicas y ventajas. Firebase y AWS Lambda proporcionan un potente backend sin la necesidad de gestionar un servidor, mientras que Heroku ofrece simplicidad en el despliegue de aplicaciones basadas en Git.
Firebase
Firebase ofrece la funcionalidad de Cloud Functions, que te permite ejecutar tu bot sin tener que preocuparte por la infraestructura del servidor. En nuestra opinión, esta es la opción más óptima.
- Crea un proyecto en Firebase Console;
- Instala Firebase CLI, siguiendo las instrucciones;
- Inicializa Firebase en el directorio de tu proyecto con el comando firebase init;
- Despliega tu bot usando el comando firebase deploy --only functions.
AWS (Amazon Web Services)
AWS Lambda permite ejecutar código en respuesta a desencadenantes de otros servicios de AWS, lo que lo convierte en una buena elección para un bot.
- Regístrate o inicia sesión en AWS Management Console;
- Crea una nueva función Lambda a través de la consola de AWS, eligiendo API Gateway como desencadenante;
- Sube el código de tu bot a la función Lambda;
- Configura API Gateway para que tu bot interactúe con el mundo exterior.
Heroku
Heroku ofrece una plataforma de alojamiento de aplicaciones fácil de usar que puede desplegar automáticamente el código desde tu repositorio Git.
- Crea una cuenta en Heroku;
- Instala Heroku CLI e inicia sesión;
- Crea una nueva aplicación en Heroku a través de la consola o usando el comando heroku create;
- Conecta tu repositorio Git con Heroku y realiza el despliegue con los comandos git push heroku master;
- Configura la URL del webhook proporcionada por Heroku.
Conclusiones y recomendaciones
Crear un bot para WhatsApp usando Python y Whapi.Cloud abre la puerta a amplias oportunidades de automatización. Siguiendo esta guía para desarrolladores, no solo ha obtenido funcionalidad básica, sino también una comprensión de cómo utilizar potentes herramientas de API para un trabajo eficiente.
Después de una configuración local exitosa, es importante considerar implementar el bot en un entorno de producción. Flask es excelente para el desarrollo, pero para un rendimiento estable en tiempo real, considere usar servidores como Gunicorn o uWSGI. Esto garantizará un mejor rendimiento y fiabilidad.
Si aún no se ha registrado en nuestro servicio, pruebe todas las funciones de forma gratuita. Siga las instrucciones de este artículo para lanzar su bot o integración en el menor tiempo posible. Y si tiene preguntas, nuestro equipo de soporte siempre está disponible para ayudarlo a hacer el proceso lo más simple y eficiente posible.
En GitHub encontrará varios repositorios con diferentes bots. Uno de ellos se considera ideal para programadores principiantes, ya que cuenta con una funcionalidad muy simple pero comprensible: envío de mensajes de texto y mensajes con imágenes en respuesta a comandos. Otra variación del bot es más adecuada para usuarios avanzados, ya que este bot incluye más capacidades: envío de mensajes normales, imágenes, archivos, videos, contactos (vCard), productos; creación de un nuevo grupo de WhatsApp, envío de invitaciones y mensajes al grupo.
¡Gracias por elegir Whapi.Cloud! Esperamos que su bot de WhatsApp se convierta en una parte importante de su negocio. Y estaremos siempre disponibles para ayudarle. 🚀