Python ile WhatsApp Otomasyonu
WhatsApp artık sadece bir mesajlaşma uygulaması değil, iş dünyası için önemli bir araç haline geldi. Chatbotlar aracılığıyla müşteri iletişiminin otomasyonu ve WhatsApp'ın CRM'e entegrasyonu, hizmeti iyileştirmek ve verimliliği artırmak için yeni fırsatlar sunar. Python, esnekliği ve kullanılabilirliği sayesinde bu tür bir görev için mükemmel bir seçimdir. Whapi.Cloud ise mükemmel destek hizmetiyle WhatsApp API'ye kolay erişim sağlar ve her zaman yardıma hazırdır.
Bu kılavuzda aşağıdaki konuları ele alacağız:
- Python kullanarak WhatsApp API ile nasıl çalışılır;
- Farklı görevleri otomatikleştirmek için Whapi.Cloud entegrasyonu;
- Mesajları işlemek ve otomatik yanıtlamak için webhook'ların kullanımı;
- WhatsApp botunuzu ChatGPT ile bağlayarak yapay zekâ destekli sohbetler gerçekleştirme;
Bu makalenin amacı, adım adım basit ama faydalı bir WhatsApp chatbotu oluşturmayı göstermektir. Sorularınız veya zorluklarınız varsa, web sitemizdeki sohbet widget'ımızdan bizimle iletişime geçin — size hızlı bir şekilde yardımcı oluruz! Daha gelişmiş konular için “WhatsApp Botu Nasıl Oluşturulur” sayfamızdaki ek kaynakları inceleyin.
Ayrıca, işinizi kolaylaştırmak için GitHub'da yayınladığımız hazır Python bot scriptlerimizi kullanabilirsiniz. GitHub projelerimizde kurulum ve test süreçleri detaylıca açıklanmıştır ve kod içinde yararlı açıklamalar bulunmaktadır. Bu, yeni başlayan geliştiriciler için harika bir başlangıçtır.
Ayrıca, işinizi kolaylaştırmak için GitHub'da yayınladığımız hazır Python bot scriptlerimizi kullanabilirsiniz. GitHub projelerimizde kurulum ve test süreçleri detaylıca açıklanmıştır ve kod içinde yararlı açıklamalar bulunmaktadır. Bu, yeni başlayan geliştiriciler için harika bir başlangıçtır.
Bot Geliştirme için Hazırlık
Çalışmaya başlamadan önce ihtiyacınız olan her şeyin mevcut olduğundan emin olun:
- Python. Python yüklü değilse kurun. En son sürümü (tercihen 3.6 veya üzeri) resmi web sitesinden indirin ve yönergeleri izleyin.
- Flask. Flask, hafif bir Python web framework'üdür ve sunucuyu kurmak ve webhook'ları işlemek için kullanılacaktır. Flask'ı şu komutla kurabilirsiniz: pip install Flask
- API Token. API token almak için Whapi.Cloud'a kaydolun. Bu token, botunuzun WhatsApp ile API üzerinden etkileşim kurmasına olanak tanır. Kayıttan sonra, bazı sınırlamalarla birlikte ücretsiz bir kanal sağlanacaktır. Bu, geliştirmenizi test etmek için yeterlidir. Whapi.Cloud, istikrarı, düşük maliyeti ve geniş özellikleri ile öne çıkan bir sağlayıcıdır. Token alımı ile ilgili talimatları aşağıda vereceğiz.
- Webhook Ayarı. Botun gelen mesajları ve WhatsApp'taki olayları işleyebilmesi için WhatsApp bildirimlerini işlemek üzere bir sunucu URL'sine (yerel veya harici) ihtiyacınız olacak. Bu bağlantının nasıl ve nereden alınacağı hakkında detayları makalemizde inceleyeceğiz.
GitHub'da çeşitli botların yer aldığı birkaç depo bulabilirsiniz. Bunlardan biri, komutlara yanıt olarak metin mesajları ve resim mesajları gönderen çok basit ama anlaşılır bir işlevselliğe sahip olduğu için yeni başlayan programcılar için ideal olarak kabul edilir. Bir diğer bot varyasyonu ise daha ileri düzey kullanıcılar için uygundur çünkü bu botta daha fazla özellik bulunur: Standart mesaj, görüntü, dosya, video, kişi (vCard), ürün gönderimi, yeni bir WhatsApp grubu oluşturma, davet gönderme ve gruba mesaj gönderme.
WhatsApp Business API ve WhatsApp API arasındaki farkları öğrenmek veya hangi sağlayıcıyı seçeceğinizden emin değilseniz, "WhatsApp API'si Nasıl Seçilir: Çözümler ve Sağlayıcıların Karşılaştırması" başlıklı makalemizi incelemenizi öneririz. Bu, bilinçli bir seçim yapmanıza yardımcı olur ve gelecekteki sorunlar ile gereksiz maliyetlerden kaçınmanızı sağlar.
WhatsApp API'si için Token Alma
Kayıt ve Numara Bağlama
Henüz Whapi.Cloud platformuna kaydolmadıysanız, şimdi kaydolun. Kayıt basit, kredi kartı bilgisi gerektirmez ve API'yi tüm özellikleriyle test etmek için küçük sınırlamalarla 5 günlük tam erişim elde edersiniz. Bu, tüm yöntemleri ve işlevleri test etmek ve botunuzu veya entegrasyonunuzu kurmak için fazlasıyla yeterlidir.
Bir sonraki adım, WhatsApp numarasını bağlamaktır. Hiçbir moderasyon veya numara taşıma adımı gerekmez. WhatsApp uygulamanızda zaten kullandığınız herhangi bir numarayı bağlayın. Telefonunuz kapalı olsa bile chatbot çalışmaya devam eder, bu yüzden cihazı sürekli açık tutma gerekliliği hakkında endişelenmeyin.
Numarayı bağlamak için:
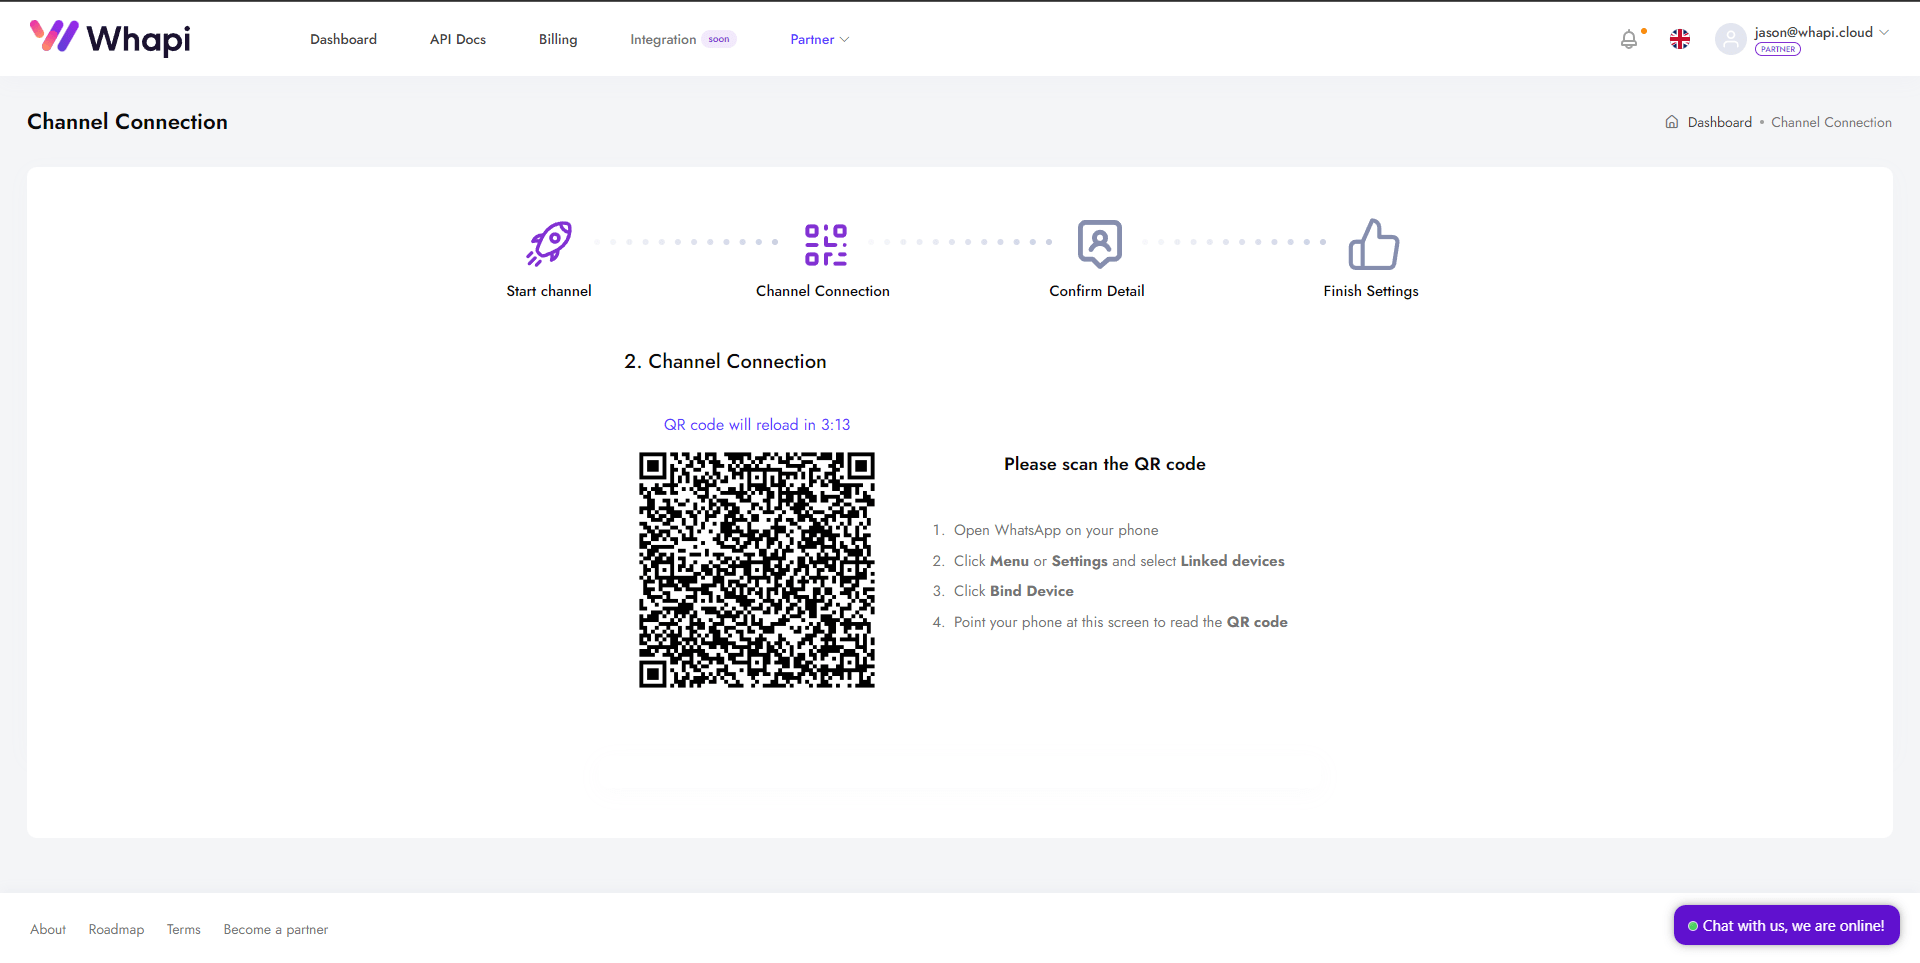
- 1. Kontrol paneline gidin ve sizin için önceden oluşturulmuş olan Default Channel sayfasını açın.
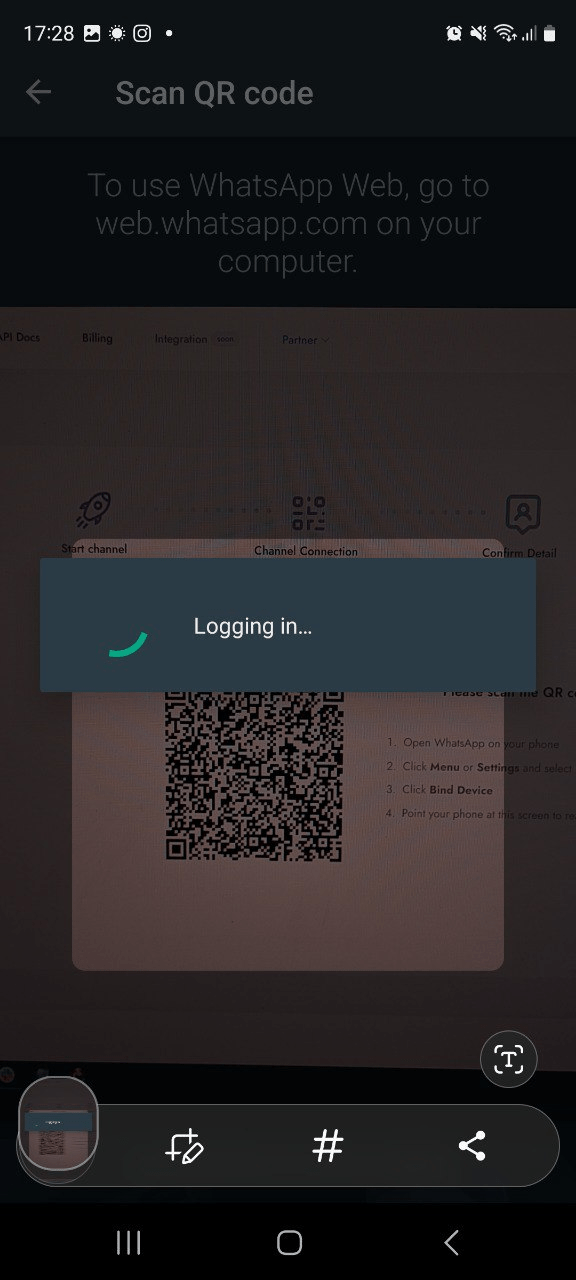
- 2. İlk adımda bir QR kodu ve talimatlar göreceksiniz.
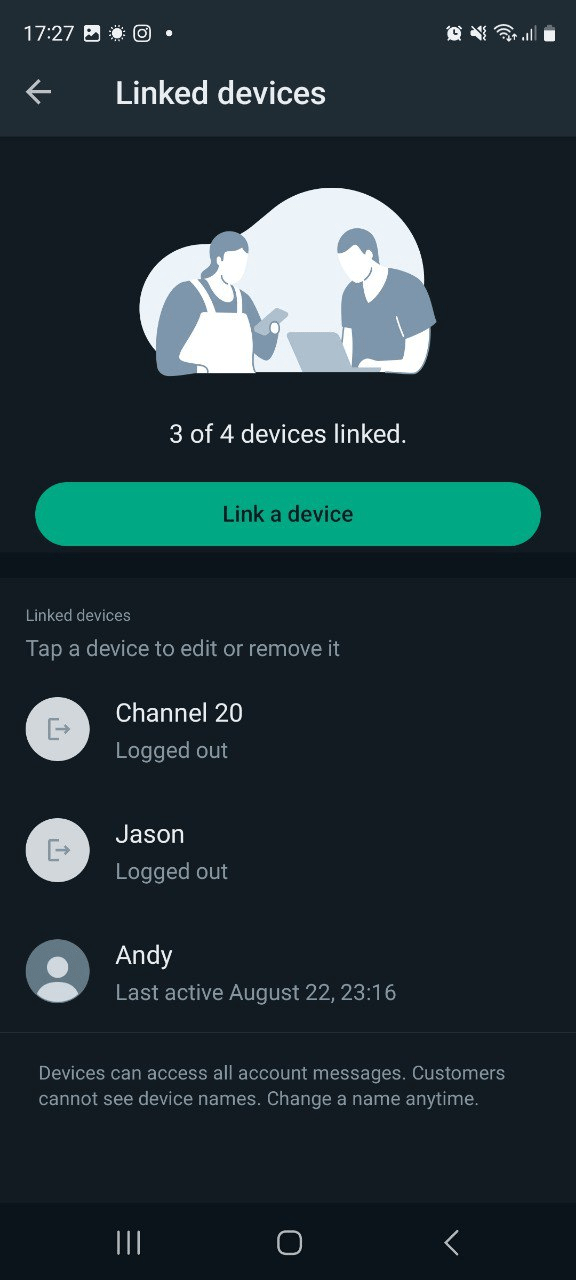
- 3. Cihazınızda WhatsApp'ı açın, Ayarlar → Bağlı cihazlar → Cihaz bağla → QR kodunu tara seçeneklerine gidin.
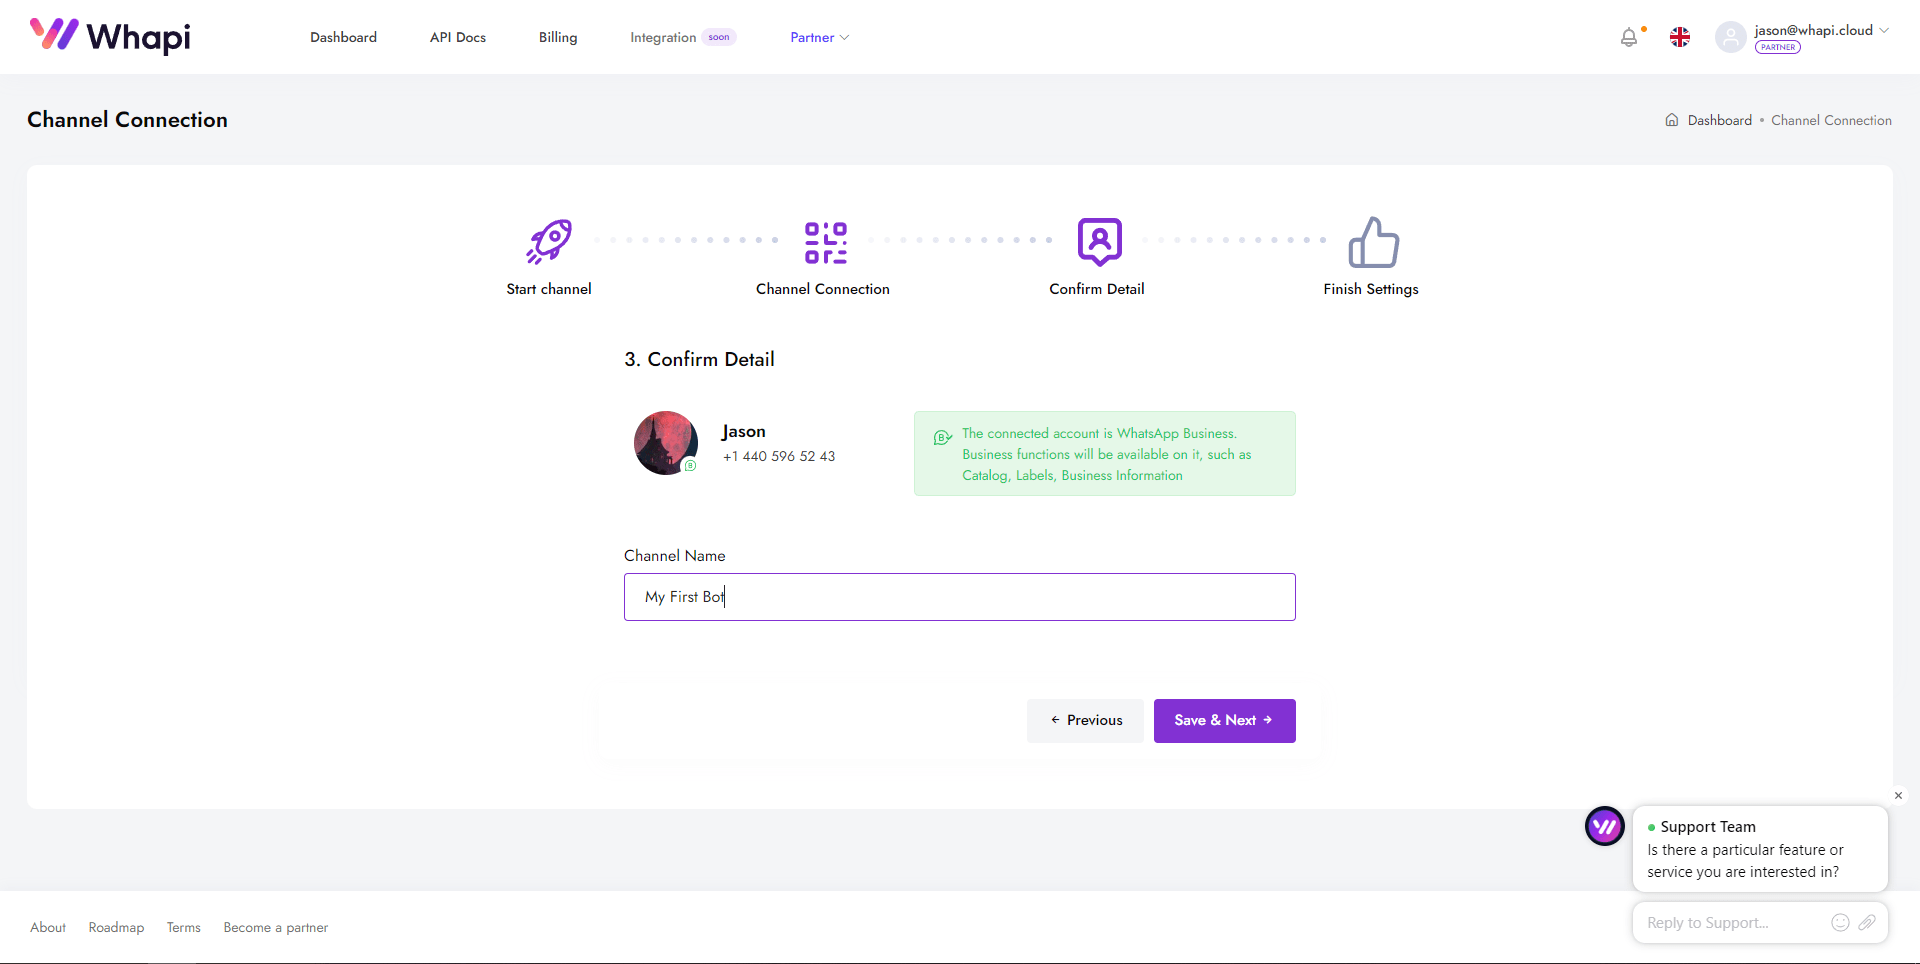
- 4. Başarılı bir bağlantıdan sonra, daha kolay çalışabilmek için kanala bir isim verin (örneğin, "Chatbotum").
Sonraki adımda bir ayarlar ekranı göreceksiniz, ancak şu anda bu gerekli değil — bu adımı atlayabilirsiniz, daha sonra geri döneceğiz.
API Token Alma
Bağlı kanalın sayfasının ortasında, isteklerin kimliğini doğrulamak için gereken benzersiz bir API token bulunur. Bu token kritik öneme sahiptir: İstek başlıklarında Bearer Token olarak veya yöntemine bağlı olarak bir parametre olarak iletilir.
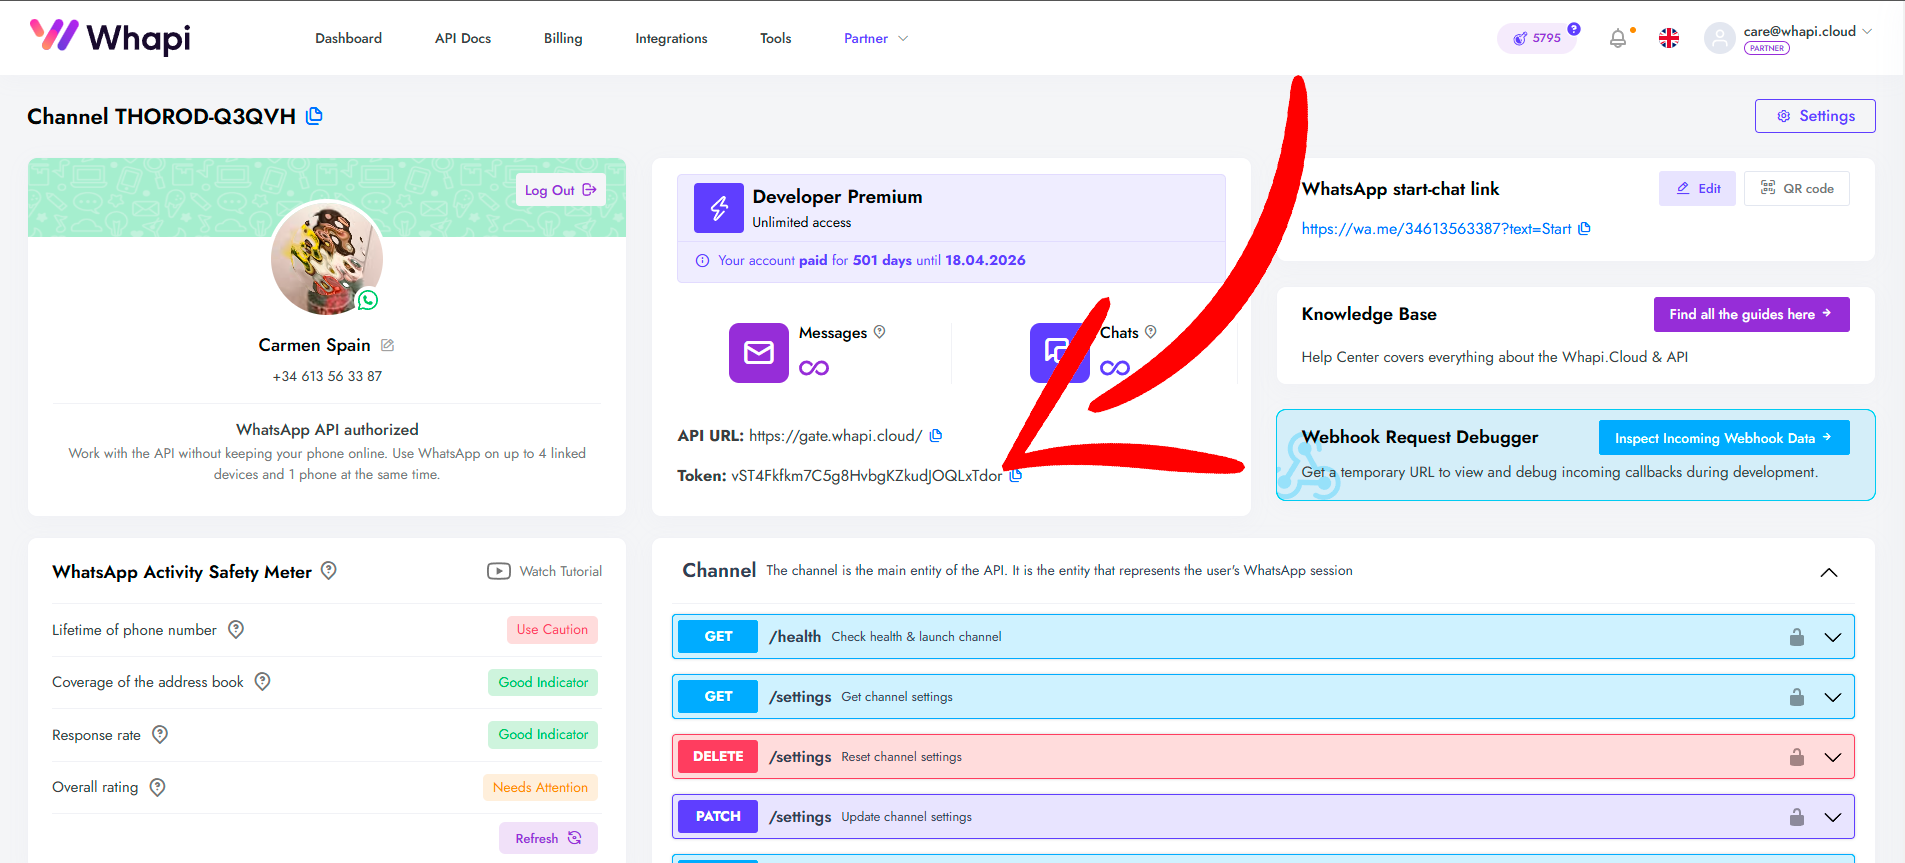 Your API Key
API ile Çalışma Araçları
Whapi.Cloud, API belgeleriyle tanışmak için birkaç seçenek sunar:
- Geliştirici Merkezi: API uç noktalarına yönelik örnek kod parçaları almanıza olanak tanıyan belgeler ve örneklerle dolu özelleştirilmiş bir platform.
- Postman Koleksiyonu: API'yi Postman aracılığıyla test etmek için hazır istekler.
- Swagger Dosyası: Tüm API yöntemlerinin ayrıntılı bir açıklaması ve kanal sayfasında doğrudan test etme imkanı.
Bu araçlar, her seviyeden geliştiricinin API işlevlerini hızla anlamasına ve entegrasyona başlamasına yardımcı olur. Whapi.Cloud'un temel avantajlarından biri, kurulumu kolaylaştırmasıdır: WhatsApp API ile çalışmaya başlamak sadece birkaç dakikanızı alır.
Webhook Nedir ve Nasıl Kurulur?
WhatsApp botunuz ile API geçidimiz arasında tam etkileşim sağlamak için bir webhook kurmanız gerekir. Bu, sistemler arasında veri alışverişini sağlar: botunuz gelen mesajları, mesaj durum güncellemelerini (örneğin, "gönderildi", "teslim edildi", "okundu") veya diğer olaylarla ilgili bildirimleri hızlı bir şekilde alabilir.
Webhook Nedir?
Webhook, belirli bir olay meydana geldiğinde sunucumuzdan sizin sunucunuza veri gönderen bir HTTP geri çağrıdır. Örneğin, müşteriniz bir mesaj gönderdiğinde, gelen bir mesajla ilgili bir bildirim sunucunuza otomatik olarak ulaşır.
Webhook'ların temel avantajları:
- Anlık bildirimler. Tüm olaylar neredeyse gerçek zamanlı olarak işlenir.
- Yüksek bant genişliği. Bildirim alma hızı yalnızca sunucunuzun performansı ile sınırlıdır.
- Esneklik. Sadece ihtiyacınız olan olayları alabilirsiniz, örneğin: Özel mesajlar; Grup mesajları; Mesaj durum değişiklikleri; Grup üyeleri değişiklikleri; Cevapsız çağrı bildirimleri; Kanal durumları ve daha fazlası.
Whapi.Cloud, bildirimleri ihtiyacınıza göre esnek bir şekilde yönetmenizi sağlayan, webhook ayarları için kullanışlı bir araç sunar.
Webhook URL'si Nasıl ve Nereden Alınır?
Entegrasyonunuzun veya botunuzun WhatsApp'tan gelen bilgileri alabilmesi ve anında işleyebilmesi için bir sunucu URL'sine ihtiyacınız olacak. Bu URL, botun betiğinin verileri alacağı yer olacak. Eğer böyle bir adresi nereden alacağınızı bilmiyorsanız, detaylı bir rehber hazırladık: "Webhook URL'si nereden alınır?". Bu makalede, yerel bir sunucunun nasıl ayarlanacağı veya hangi dış hostingin seçileceği detaylı olarak açıklanmıştır. Aşağıda, Ngrok kullanarak bu tür bir bağlantının basit ve hızlı bir şekilde nasıl elde edileceğini ele alacağız.
Teknik olarak, WhatsApp'ınıza bir mesaj geldiğinde, sunucumuz betiğinizin URL'sine JSON içeriği ile bir POST isteği yapar. JSON içeriği, gelen mesaj hakkındaki tüm bilgileri içerir, örneğin metin, gönderenin numarası, gönderim zamanı vb. Bu, bilgileri anında okumanıza olanak tanır.
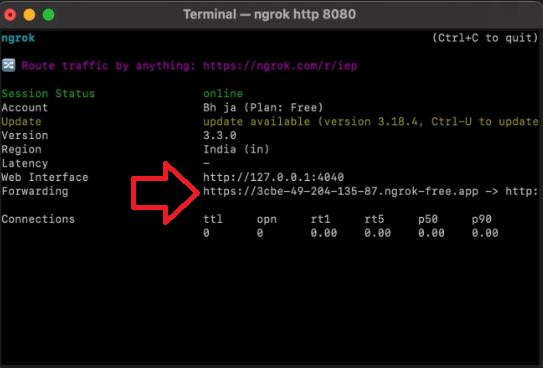
Yerel kullanım için bir bağlantı almak için en basit yöntem, Ngrok gibi bir aracı seçmektir. Bu araç, yerel sunucunuza internet üzerinden erişim sağlayan güvenli bir tünel oluşturur.
- 1) Ngrok'u resmi web sitesinden indirin ve çıkarın. Şimdi terminali açın ve Ngrok'un bulunduğu klasöre gidin.
- 2) ./ngrok http PORT_NUMARASI komutunu çalıştırın ve PORT_NUMARASI yerine Flask sunucunuzun yerel olarak çalıştığı portu (örneğin 80) yazın.
- 3) Artık webhook URL'si olarak kullanabileceğiniz bir genel URL'ye sahipsiniz. İleride kullanım için bu URL'yi kopyalayın.
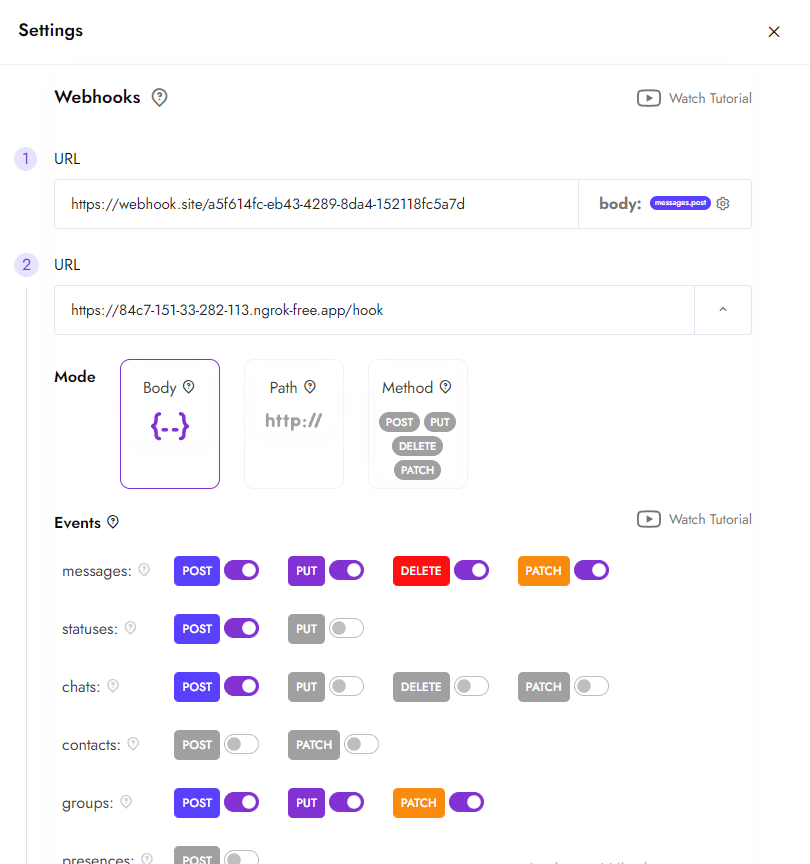
Kanalda Webhook Kurulumu
Webhook için çalışan bir URL'niz olduğunda şu adımları izleyin:
- Kanal ayarlarına gidin. Kanal sayfasında sağ üst köşedeki ayarlar düğmesine tıklayın.
- Webhook'u yapılandırın. Webhook bölümünde URL'nizi önceden seçilmiş ayarlarla girin. Gerekirse, farklı olaylar için birden fazla webhook ayarlayabilirsiniz. Ayrıca bu ayarları API aracılığıyla değiştirebilirsiniz.
- Değişiklikleri kaydedin. Bundan sonra WhatsApp'taki tüm olaylarla ilgili bildirimler, belirttiğiniz sunucuya gönderilecektir.
Örneğin, sunucunuza bir mesaj geldiğinde, webhook mesaj verileri ile bir POST isteği gönderir. Göreviniz, bu verileri işlemek ve botu buna uygun bir yanıt verecek şekilde programlamaktır. Makalenin bir sonraki bölümünde bunun nasıl yapılacağını ele alacağız.
Python ile WhatsApp Botunun Temellerini Oluşturma
Bu bölümde, Whapi.Cloud API'sini kullanarak Python ile WhatsApp mesajlarını nasıl göndereceğinizi ve yöneteceğinizi inceleyeceğiz. Çevrenizin zaten ayarlanmış olduğunu varsayıyoruz: Python kurulmuş, API token alınmış ve index.py dosyasıyla bir proje oluşturulmuş.
Gerekli kütüphanelerin yüklenmesi.
API ile etkileşim kurmak için birkaç kütüphane yüklememiz gerekecek. Bunları ayrı ayrı yükleyebilir veya bağımlılıkların bir listesini requirements.txt dosyasına ekleyip tek bir komutla yükleyebilirsiniz.
Flask==3.0.0
requests==2.27.1
requests-toolbelt==0.9.1
python-dotenv==0.20.0
Yükleme komutu:
pip install -r requirements.txt.env dosyasının kullanımı.
Token ve diğer ortam değişkenleriyle çalışmayı kolaylaştırmak için bir .env dosyası oluşturun. Bu, hassas verilerin koddan ayrı olarak saklanmasını sağlayarak güncellemeyi kolaylaştırır.
.env dosyası içeriği örneği:
API_TOKEN=8FjpwmyFUulh7emXOprrET3xKrwJ984O # API token from your channel
API_URL=https://gate.whapi.cloud # API endpoint URL
PORT=80 # example, 80 or 443
#URL_LINK= The Webhook link to your server {link to server}/hook.
Ortam değişkenlerini betiğinize python-dotenv kütüphanesiyle yükleyebilirsiniz:
from dotenv import load_dotenv
import os

load_dotenv()
api_token = os.getenv("API_TOKEN")
Metin Mesajı Gönderme
Basit bir örnekle başlayalım: bir metin mesajı gönderelim. Token, yetkilendirme başlığında (Bearer) iletilmeli ve istek gövdesi mesaj parametrelerini içermelidir.
import requests

# URL for sending text messages. Can be pulled from .env
url = "https://gate.whapi.cloud/messages/text"

# Data for sending a message
payload = {
    "to": "919984351847",  # Enter the recipient's number in international format
    "body": "Hello! This is a test message."  # Text of message
}

# Headers, including authorization token
headers = {
    "accept": "application/json",
    "content-type": "application/json",
    "authorization": f"Bearer {api_token}"  # Use the token from the .env file
}

# Sending a POST request
response = requests.post(url, json=payload, headers=headers)

# Output server response
print(response.status_code)
print(response.text)
Mesaj gönderimi başarılı olduktan sonra, resim, dosya gönderimi veya gruplarla etkileşim gibi daha karmaşık senaryoları deneyebilirsiniz. Bunun için API belgelerimizdeki örnek istekleri benzer şekilde kullanabilirsiniz. Bunları sonraki bölümlerde ele alacağız. Şimdilik, mesajınızın doğru şekilde gönderildiğinden ve sunucunun 200 OK durumunu döndürdüğünden emin olun.
Flask Webhook ile Mesaj Alma
Gelen mesajları işlemek için bir Flask rotası ayarlamanız gerekir. Bu rota, Whapi.Cloud'dan gelen ve olaylar gerçekleştiğinde (örneğin, bir mesaj alındığında) POST istekleri şeklinde iletilen verileri alacak bir webhook son noktası olarak hizmet edecektir.
Ayarlar yapıldıktan sonra, Whapi.Cloud kanalınızdaki webhook URL'sini, oluşturduğunuz URL'yi belirterek güncellemeniz gerekir. Bu örnekte https://your_domain_or_ip/hook kullanıyoruz. Bunun bir harici sunucu ya da yerel bir sunucu olabileceğini unutmayın. Önemli olan, bu bağlantının çalışır durumda olması ve istekleri kabul etmesidir. Webhook bağlantınızın erişilebilirliğini her zaman endpointimiz ile kontrol edebilirsiniz.
Gelen mesajları işlemek için basit bir varyasyon:
from flask import Flask, request, jsonify

app = Flask(__name__)

# Route for processing incoming messages
@app.route('/hook', methods=['POST'])
def webhook():
    # Retrieving data from a request
    data = request.json

    # Logging an incoming message
    print("Received message:", data)

    # Example of incoming message processing
    if "messages" in data:
        for message in data["messages"]:
            sender = message["from"]  # Sender's number
            text = message.get("body", "")  # Text of message

            print(f"Message from {sender}: {text}")

            # Logic for replying to a message
            # Check out our examples on GitHub, where we use more branching on commands for the bot
            if text.lower() == "hello":
                send_response(sender, "Hi there! How can I help you?")
            elif text.lower() == "bye":
                send_response(sender, "Goodbye!")

    return jsonify({"status": "success"}), 200

# Function for sending a reply
def send_response(to, body):
    import requests

    url = "https://gate.whapi.cloud/messages/text"
    payload = {
        "to": to,
        "body": body
    }
    headers = {
        "accept": "application/json",
        "content-type": "application/json",
        "authorization": f"Bearer {api_token}"  # Use the token from the .env file
    }

    response = requests.post(url, json=payload, headers=headers)
    print(f"Response to {to}: {response.status_code}, {response.text}")

if __name__ == '__main__':
    app.run(host='0.0.0.0', port=80)
Bu kodda Flask rotasını ayarladık (Flask sunucusunun çalıştığından emin olun). Webhook'unuzun genel olarak çalıştığını ve doğru bir şekilde 200 yanıtı verdiğini mutlaka kontrol edin.
Artık botunuz gelen mesajlara otomatik olarak yanıt verebilir ve içeriklerine göre eylemler gerçekleştirebilir. Unutmayın, sıfırdan bir WhatsApp botu yazmayı kolaylaştırmak için GitHub'da yayımladığımız hazır Python bot betiklerimizi kullanabilirsiniz. Bu projelerde, ayarlama ve test süreci ayrıntılı bir şekilde açıklanmış ve kodda faydalı yorumlar eklenmiştir. Bu, yeni başlayan geliştiriciler için harika bir başlangıçtır.
GitHub'da çeşitli botların yer aldığı birkaç depo bulabilirsiniz. Bunlardan biri, komutlara yanıt olarak metin mesajları ve resim mesajları gönderen çok basit ama anlaşılır bir işlevselliğe sahip olduğu için yeni başlayan programcılar için ideal olarak kabul edilir. Bir diğer bot varyasyonu ise daha ileri düzey kullanıcılar için uygundur çünkü bu botta daha fazla özellik bulunur: Standart mesaj, görüntü, dosya, video, kişi (vCard), ürün gönderimi, yeni bir WhatsApp grubu oluşturma, davet gönderme ve gruba mesaj gönderme.
Sonraki bölümde, multimedya gönderimi ve gruplarla etkileşim gibi gelişmiş özellikleri ele alacağız.
Gelişmiş Özellikler
Whapi.Cloud ile her türlü karmaşıklıkta sohbet botları oluşturmanıza olanak tanıyan etkileyici bir araç ve özellik setine erişim sağlayabilirsiniz.
Mesaj gönderme, her türlü dosya, konum, kişiler, çıkartmalar, anketler, ürünler ve çok daha fazlasını otomatikleştirmek için çeşitli API uç noktalarını ve SDK'ları kullanma konusunda adım adım talimatlar ve örnekler sunuyoruz. Mesajlara emoji tepkileri ekleyin, mesajları alıntılayın, okundu olarak işaretleyin, sohbetleri sabitleyin, "yazıyor..." durumunu etkinleştirin. Otomatik olarak gruplar ve topluluklar oluşturun ve silin, grup üyeleri ekleyin veya çıkarın, yöneticiler atayın, grup ayarlarını değiştirin ve kullanıcıları engelleyin.
Bu özellikler sayesinde, WhatsApp botunuzu web siteniz, uygulamanız, CRM, ERP veya diğer sistemlerle entegre etmek basit ve anlaşılır bir süreç haline gelir. Whapi.Cloud, geliştiricilere esnek ve hızlı entegrasyon için gereken tüm araçları sunar.
Tüm yöntemler ve özellikleri belgelerimizde ayrıntılı olarak açıklanmıştır. İşletmeniz için yeni ufuklar açmak adına otomasyona bugün başlayın!
Resim Gönderme
Etkileşimli ve görsel içerik, kullanıcıların WhatsApp botunuzla olan iletişimlerini önemli ölçüde artırabilir. API üzerinden görüntü gönderimi, şirketlerin ürünlerini, kampanyalarını veya önemli mesajlarını görsel bir formatta paylaşmalarına olanak tanır ve bu da etkileşimi daha zengin ve etkili hale getirir. Şimdi, Python kullanarak WhatsApp API üzerinden nasıl görüntü gönderileceğini inceleyelim:
import requests

url = "https://gate.whapi.cloud/messages/image"

payload = {
    "to": "919984351847",
    "media": "https://upload.wikimedia.org/wikipedia/en/a/a9/Example.jpg",
    "caption": "An example image"
}
headers = {
    "accept": "application/json",
    "content-type": "application/json",
    "authorization": "Bearer Your_Token"
}

response = requests.post(url, json=payload, headers=headers)

print(response.text)
Dosya Gönderme
WhatsApp botunuzun dosya gönderme özelliğini genişletmek, onu önemli bilgiler için vazgeçilmez bir araç haline getirir. Bu, faturalar, sözleşmeler, fiyat listeleri ve diğer belgeleri göndermek için faydalı olabilir. Python ile WhatsApp API üzerinden dosya gönderimini nasıl gerçekleştireceğinizi inceleyelim:
import requests

url = "https://gate.whapi.cloud/messages/document"

payload = {
    "to": "919984351847",
    "media": "data:application/pdf;base64,JVBERi0xLjQKJdPr6eEKMSAwIG9iago8PC9UaXRsZSAoVGVybXMgb2YgU2VydmljZSBXaGFwaS5DbG91ZCkKL0NyZWF0b3IgKE1vemlsbGEvNS4wIFwoV2luZG93cyBOVCAxMC4wOyBXaW42NDsgeDY0XCkgQXBwbGVXZWJLaXQvNTM3LjM2IFwoS0h............",
    "filename": "Terms of Service Whapi.Cloud.pdf",
    "caption": "Hello, I am attaching an important file to my message"
}
headers = {
    "accept": "application/json",
    "content-type": "application/json",
    "authorization": "Bearer Your_Token"
}

response = requests.post(url, json=payload, headers=headers)

print(response.text)
Python ile WhatsApp Grubu Oluşturma
Whapi.Cloud ile yalnızca gruplar oluşturmakla kalmaz, aynı zamanda onları dinamik olarak yönetebilirsiniz. Örneğin, üyeler ekleyebilir, grubun adını değiştirebilir, yöneticiler atayabilir ve artık gerekli olmayan grupları silebilirsiniz. Python kullanarak WhatsApp API ile bir grup oluşturmayı inceleyelim:
import requests

url = "https://gate.whapi.cloud/groups"

payload = {
    "participants": ["919984351847", "919984351848", "919984351849"],
    "subject": "Group Subject 3"
}
headers = {
    "accept": "application/json",
    "content-type": "application/json",
    "authorization": "Bearer Your_Token"
}

response = requests.post(url, json=payload, headers=headers)

print(response.text)
ChatGPT ile entegrasyon: WhatsApp botunuz için yapay zeka
En çok talep edilen uzantılardan biri, WhatsApp botunuzu ChatGPT’ye bağlamaktır. Bu, kullanıcı mesajlarını yapay zeka ile işleyip anlamlı ve dinamik yanıtlar vermenizi sağlar.
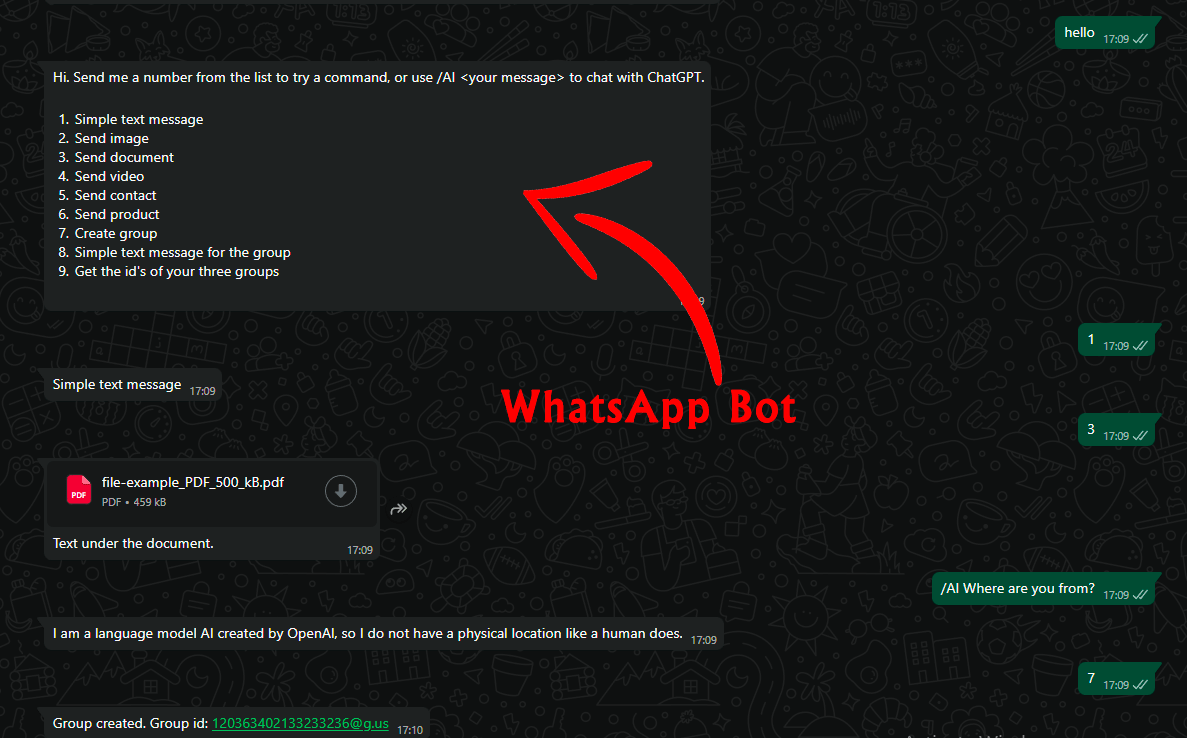
Yetenekleri göstermek ve eğitim sağlamak için, aşağıdaki yaklaşımla basit bir bot uyguluyoruz: kullanıcı sadece /ai [soru] komutunu yazar ve bot ChatGPT modeliyle yanıt verir.
Adım 1: ChatGPT Bağımlılıklarını Ekleyin
OpenAI API üzerinden ChatGPT’yi kullanmak için birkaç Python kütüphanesi yüklemeniz gerekir. Ana kütüphane, Python kodunuzdan ChatGPT modelleriyle etkileşim kurmanıza olanak tanıyan openai'dir. requirements.txt dosyanıza aşağıdaki satırları ekleyin:
openai>=1.91.0,<2.0.0
httpx>=0.28.1,<1.0.0
httpcore>=1.0.9,<2.0.0
Her birinin işlevi şudur:
- openai - OpenAI’ye istek göndermek ve ChatGPT yanıtları almak için resmi SDK.
- httpx - OpenAI'nin dahili olarak API çağrıları için kullandığı modern, asenkron bir HTTP istemci kütüphanesi.
- httpcore - httpx tarafından kullanılan düşük seviyeli bir ağ taşıma kütüphanesi. Sürüm çakışmalarını önlemek için açıkça sabitlenmelidir.
Daha sonra bu paketleri yükleyin:
pip install -r requirements.txt
Bu kütüphaneler, botunuzun ChatGPT ile güvenli ve kararlı şekilde iletişim kurmasını sağlar.
Adım 2: OpenAI API Anahtarınızı Alın
platform.openai.com sitesinde bir hesap oluşturun ve API Keys bölümünden gizli API anahtarınızı kopyalayın. Bu anahtarı .env dosyanıza ekleyin:
OPENAI_API_KEY=your_api_key_here
Adım 3: Botunuza Yapay Zeka Mantığını Ekleyin
Artık bir betik yazma ve ChatGPT desteği ile çalışan basit bir WhatsApp botunun işleyen sürümünü oluşturma zamanı. Kod adımlarını birlikte inceleyelim. Bu kodu index.py adlı bir dosyaya kopyalayabilirsiniz. Böylece, aşağıdaki işlemleri yapan basit bir Flask sunucusu oluşturacağız:
- - Whapi.Cloud’dan gelen webhook olaylarını alır,
- - mesajın /ai ile başlayıp başlamadığını algılar,
- - kullanıcının isteğini OpenAI API aracılığıyla ChatGPT’ye gönderir,
- - AI tarafından oluşturulan yanıtı WhatsApp üzerinden kullanıcıya iletir.
# Import necessary libraries for web server, HTTP requests, OpenAI API, environment variables, and .env file loading
from flask import Flask, request, jsonify  # Flask is used to create the web server and handle HTTP requests
import requests  # Used to send HTTP requests to the WhatsApp API
from openai import OpenAI  # OpenAI client for interacting with ChatGPT
import os  # For accessing environment variables
from dotenv import load_dotenv  # For loading variables from a .env file

# Load environment variables from a .env file into the environment
load_dotenv()
# Create a Flask web application instance
app = Flask(__name__)

# Retrieve required configuration values from environment variables
API_TOKEN = os.getenv("API_TOKEN")  # Token for authenticating with WhatsApp API
API_URL = os.getenv("API_URL")      # Base URL for WhatsApp API
OPENAI_API_KEY = os.getenv("OPENAI_API_KEY")  # API key for OpenAI

# Ensure all required environment variables are set, otherwise stop the program with an error
if not API_TOKEN or not API_URL or not OPENAI_API_KEY:
    raise RuntimeError("Missing required environment variables: API_TOKEN, API_URL, or OPENAI_API_KEY")

# Initialize the OpenAI client with the provided API key
openai_client = OpenAI(api_key=OPENAI_API_KEY)

# Function to send a prompt to ChatGPT and get a response
# Takes a string prompt and returns the model's reply as a string
def ask_openai(prompt):
    response = openai_client.chat.completions.create(
        model="gpt-3.5-turbo",  # Specify which OpenAI model to use
        messages=[{"role": "user", "content": prompt}]  # Provide the user's message to the model
    )
    # Extract and return the text of the model's reply
    return response.choices[0].message.content.strip()

# Function to send a text message to a WhatsApp user via the WhatsApp API
# 'to' is the recipient's chat ID, 'body' is the message text
def send_message(to, body):
    headers = {
        "Authorization": f"Bearer {API_TOKEN}",  # Add authentication token to the request
        "Content-Type": "application/json"        # Specify that we're sending JSON data
    }
    payload = {"to": to, "body": body}  # Prepare the message data
    # Send the message to the WhatsApp API endpoint
    response = requests.post(f"{API_URL}/messages/text", json=payload, headers=headers)
    print("Whapi response:", response.status_code, response.text)  # Log the API response for debugging

# Define a webhook endpoint to receive incoming WhatsApp messages
@app.route("/hook/messages", methods=["POST"])
def webhook():
    data = request.json  # Parse the incoming JSON data
    print("Incoming:", data)  # Log the incoming data for debugging

    # Loop through all received messages (could be more than one in a single webhook call)
    for msg in data.get("messages", []):
        if msg.get("from_me"):
            continue  # Skip messages sent by the bot itself

        sender = msg.get("chat_id")  # Get the sender's chat ID
        # Safely extract the message text, handling cases where 'text' might be missing
        text = (msg.get("text") or {}).get("body", "").strip()

        # If the message starts with '/ai ', treat it as a prompt for ChatGPT
        if text.lower().startswith("/ai "):
            prompt = text[4:].strip()  # Extract the user's prompt after '/ai '
            if not prompt:
                send_message(sender, "Please provide a prompt after /ai.")  # Ask user to provide a prompt
            else:
                try:
                    reply = ask_openai(prompt)  # Get response from ChatGPT
                    send_message(sender, reply)  # Send the response back to the user
                except Exception as e:
                    send_message(sender, f"Error: {e}")  # Inform user if something went wrong
        else:
            # If the message doesn't start with '/ai ', send instructions to the user
            send_message(sender, "Hi! To ask me something, type:\n/ai your question")

    # Respond to WhatsApp API to confirm receipt of the webhook
    return jsonify({"status": "received"})

# Optional: health check endpoint to verify the bot is running
@app.route("/", methods=["GET"])
def index():
    return "Bot is running"

# Function to register the webhook URL with the WhatsApp API
def register_webhook():
    if os.getenv("BOT_URL"):
        headers = {"Authorization": f"Bearer {API_TOKEN}"}
        payload = {
            "webhooks": [
                {
                    "url": os.getenv("BOT_URL"),  # The public URL where Whapi should send messages
                    "events": [{"type": "messages", "method": "post"}],  # Listen for message events
                    "mode": "method"
                }
            ]
        }
        # Register the webhook
        response = requests.patch(f"{API_URL}/settings", json=payload, headers=headers)
        print("Webhook setup:", response.status_code, response.text)  # Log the result

# If this script is run directly (not imported), start the bot
if __name__ == "__main__":
    register_webhook()  # Optionally register the webhook on startup
    port = int(os.getenv("PORT", 80))  # Use the PORT environment variable or default to 80
    app.run(host="0.0.0.0", port=port)  # Start the Flask web server, accessible from any network interface
Bu temel bot, gelen mesajları işler, kendi mesajlarını filtreler ve /ai ile başlayanları arar. Böyle bir komut bulunduğunda, soruyu ayıklar, ChatGPT’ye gönderir ve WhatsApp API üzerinden AI yanıtını kullanıcıya gönderir.
Bu betik test için hazırdır. Ayrıca kullanışlı kısmı, GitHub'daki örnek chatbotumuzda zaten uygulanmıştır — başlamanızı kolaylaştırmak için!
Elbette, kodu daha da gelişmiş hale getirebilirsiniz: örneğin konuşma geçmişi (sohbet hafızası) desteği eklemek, görselleri ve sesli mesaj dosyalarını işlemek gibi. Takip eden adımlarda, bu botu her zaman çevrimiçi çalışacak şekilde bir bulut platformuna nasıl dağıtacağınızı göstereceğiz.
Sorun Giderme
WhatsApp chat-bot'unun test edilmesi ve kullanımı sırasında çeşitli sorunlar ortaya çıkabilir. İşte bazı tipik durumlar ve çözüm önerileri:
Bot Gelen Mesajlara Yanıt Vermiyor
- Botun çalıştırıldığı numaraya, başka bir telefondan mesaj gönderdiğinizden emin olun. Bot, aynı numaradan gönderilen mesajlara yanıt veremez.
- Eğer bot diğer numaralardan gelen mesajlara yanıt vermiyorsa, web kancalarının çalışıp çalışmadığını kontrol edin. Örneğin, Webhook.site gibi web kancası simülasyon servislerini kullanarak, geri çağırma isteklerinin hangi yoldan geldiğini doğrulayın. Daha sonra, yolun yapılandırmanızda belirttiğiniz yola uyup uymadığını kontrol edin. Ayrıca, sunucunuzun 200Ok yanıtı verdiğinden de emin olun.
Sorunlarla karşılaştığınızda teknik destek ekibimizden yardım istemekten çekinmeyin. Web sitemizdeki sohbet widget'ı üzerinden veya [email protected] adresine e-posta göndererek bize ulaşabilirsiniz. Webhook'la ilgili neyin yanlış gittiğini çözmenize yardımcı olacağız.
Bot Durmaksızın Mesaj Gönderiyor
Kodunuzun orijinal versiyonuna dönün. Scriptimiz, mesajın gelen veya giden olup olmadığını belirleyen bir kontrol içerir, böylece mesajların sonsuz bir döngüye girmesini önler.
Sonsuz mesaj gönderimi, kodunuzda giden bir mesaj kontrolünün eksik olması nedeniyle botun kendini tetiklemesi veya kodda döngüsel mesaj gönderimi olması durumunda meydana gelebilir.
Bot Bazı Sohbetlerde Çalışıyor, Diğerlerinde Çalışmıyor
Whapi.Cloud'daki tarifenizi kontrol edin. Eğer deneme sürümünü veya "Kum Havuzu" tarifesini kullanıyorsanız, etkileşim ayda belirli bir sayıda sohbetle sınırlıdır (şu an için 5 sohbet). Bu durumda, altıncı sohbetten sonraki mesajları işleyemeyebilir.
Unutmayın, çoğu sorun, chat-bot'unuzun yapılandırmasını ve mantığını başlatmadan önce dikkatlice kontrol ederek önlenebilir. Kodunuzu düzenli olarak güncel tutmak ve ayarların detaylarına dikkat etmek, tipik hataların çoğundan kaçınmanıza yardımcı olacaktır. Ve her zaman yanınızda olduğumuzu unutmayın, destek ekibimiz size yardımcı olmaya hazır!
Dağıtım ve Sunucuları Kullanma
WhatsApp chat-bot'unuzun 24/7 kullanılabilir olması için güvenilir bir hosting platformunda barındırılması gerekir. Kendi sunucunuzu kullanabilirsiniz, ancak bu bölümde, botunuzu her birinde nasıl dağıtacağınıza dair temel adımlarla birlikte en popüler üç platform olan Firebase, AWS ve Heroku'yu ele alacağız.
Platform seçimi, tercihlerinize, bütçenize ve projenizin gereksinimlerine bağlıdır. İncelenen her platform, Firebase ve AWS Lambda'nın sunucu yönetimi gerektirmeyen güçlü bir backend sağlaması, Heroku'nun ise Git tabanlı uygulama dağıtımlarının kolaylığını sunması gibi kendi benzersiz olanaklarını ve avantajlarını sunar.
Firebase
Firebase, sunucu altyapısıyla ilgilenmenize gerek kalmadan botunuzu çalıştırmanıza olanak tanıyan Cloud Functions özelliğini sunar. Bize göre, bu en iyi seçenektir.
- Firebase Console'da bir proje oluşturun;
- talimatları takip ederek Firebase CLI yükleyin;
- Proje dizininizde firebase init komutu ile Firebase'i başlatın;
- Botunuzu firebase deploy --only functions komutu kullanarak dağıtın.
AWS (Amazon Web Services)
AWS Lambda, AWS'nin diğer hizmetlerinden tetiklemelerle kod çalıştırma olanağı sağladığı için botlar için iyi bir seçenektir.
- AWS Yönetim Konsolu'na kaydolun veya giriş yapın;
- AWS konsolu üzerinden API Gateway tetikleyici olarak seçilerek yeni bir Lambda fonksiyonu oluşturun;
- Botunuzun kodunu Lambda fonksiyonuna yükleyin;
- Botunuzun dış dünya ile etkileşimde bulunması için API Gateway'i yapılandırın.
Heroku
Heroku, uygulamalarınızı barındırmak için kullanıcı dostu bir platform sunar ve Git reposundan kodunuzu otomatik olarak dağıtabilir.
- Heroku'da bir hesap oluşturun;
- Heroku CLI yükleyin ve sisteme giriş yapın;
- Konsol üzerinden veya heroku create komutunu kullanarak Heroku'da yeni bir uygulama oluşturun;
- Git reposunu Heroku ile ilişkilendirin ve git push heroku master komutları ile dağıtım yapın;
- Heroku tarafından sağlanan web kancası URL'sini ayarlayın.
Sonuç ve Öneriler
Python ve Whapi.Cloud kullanarak WhatsApp botu oluşturmak, geniş otomasyon olanaklarının kapılarını açar. Bu geliştirici rehberini takip ederek yalnızca temel işlevselliği değil, aynı zamanda güçlü API araçlarını etkili bir şekilde kullanmayı da öğrendiniz.
Yerel ayarlar başarılı olduktan sonra, botunuzu üretim ortamına dağıtmayı düşünmek önemlidir. Flask geliştirme için harikadır, ancak gerçek zamanlı kararlı çalışma için Gunicorn veya uWSGI gibi sunucuları kullanmayı düşünün. Bu, daha iyi performans ve güvenilirlik sağlar.
Hizmetimize henüz kaydolmadıysanız, tüm işlevleri ücretsiz olarak denemeyi deneyin. Botu veya entegrasyonunuzu en kısa sürede başlatmak için bu makaledeki talimatları izleyin. Sorularınız varsa, destek ekibimiz süreci olabildiğince basit ve etkili hale getirmenize yardımcı olmak için her zaman yanınızdadır.
GitHub'da çeşitli botların yer aldığı birkaç depo bulabilirsiniz. Bunlardan biri, komutlara yanıt olarak metin mesajları ve resim mesajları gönderen çok basit ama anlaşılır bir işlevselliğe sahip olduğu için yeni başlayan programcılar için ideal olarak kabul edilir. Bir diğer bot varyasyonu ise daha ileri düzey kullanıcılar için uygundur çünkü bu botta daha fazla özellik bulunur: Standart mesaj, görüntü, dosya, video, kişi (vCard), ürün gönderimi, yeni bir WhatsApp grubu oluşturma, davet gönderme ve gruba mesaj gönderme.
Whapi.Cloud'u seçtiğiniz için teşekkür ederiz ve WhatsApp botunuzun işinizin önemli bir parçası olacağını umuyoruz! Biz her zaman yanınızdayız 🚀